There is no shortage of screen/webcam recording tools. It occurred to someone at Dropbox that if so many people are uploading their recordings to Dropbox and sharing links to those recordings, wouldn’t it be easier if recordings were automatically saved to Dropbox? Enter the newest recording tool: Dropbox Capture.
Those of us on Dropbox Basic, Plus, and Family plans get 120 minutes of total recording time. Once you record something using Dropbox Capture, a folder called “Capture” will be added to your Dropbox folder. Once I’ve recorded 120 minutes, I’ll need to delete or move recordings to be able to record more. It’s better thought of as stored recording time, not actual recording time. When I near my limit, I can navigate to my Dropbox folder, click on the Capture folder, then click and drag my recordings (mp4 files) into a different folder. Easy peasy.
Do you remember when Dropbox first launched? We had a small amount of storage space, but if people joined using a link we gave them, Dropbox would add space to our account (see this 2011 blog post, for example). They are taking the same approach with Dropbox Capture. If you use this link to download Dropbox Capture, Dropbox will give both of us an additional 20 minutes of recording time.
Installing Dropbox Capture
Visit this Dropbox Capture page, and click the “Accept Invite” button. Sign in to your Dropbox account. If you don’t have an account, click the “Create an account” link. After logging in, you’ll be asked to allow Dropbox Capture to connect to your Dropbox account. Next, click the big blue Download for Windows (or Download for Mac, I’m guessing it says) button. Lastly, run the installer from wherever it downloaded to—probably your Download folder.
How Dropbox Capture works
Launch Dropbox Capture. (Tangent: we used to run programs. Now we launch apps. It’s the same thing. We’ve just become more dramatic.)
Dropbox Capture is pretty intuitive to use. In the Capture window (screenshot below), I can see how many recording minutes I have (120) and how many I’ve used so far (1). I’ve recorded more minutes than that, but I’ve deleted the recordings I don’t need. Clicking on the folder icon will open my Dropbox Capture folder. Clicking on the globe icon takes me to capture.dropbox.com where I can see all of my recordings.
That recording I just did? You can watch it here. Note that in the top right corner of that video page, there is a transcript button. Dropbox Capture created that transcript all on its own. It did a pretty good job, but it’s not perfect. I wish it were, because as of this writing, there does not appear to be a way to edit the transcript.
With Dropbox Capture we can do a screen recording with our camera showing us in a corner of the screen. If you don’t like the placement of the webcam video, just click and drag it somewhere else on the screen. If you don’t want the webcam at all, choose “screen recording.” Your microphone will be on by default, but you can mute it by clicking the mic icon.
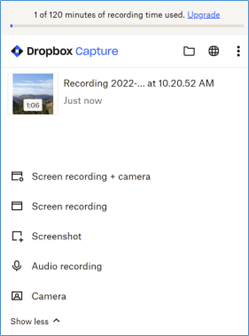
Or maybe you just want a static screenshot? Select “Screenshot” and draw a box around what you want. In the bottom right corner of your screen, you’ll see the screenshot. Click the pencil icon to edit your screenshot. The tool bar includes the ability add text, free draw, add a line/arrow/circle/square, blur a part of the image, crop the image, change the color and the weight of the text/line/etc.
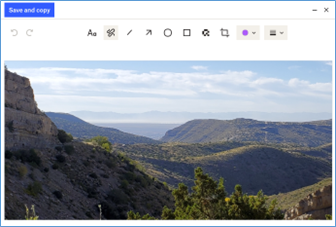
When your image looks as you’d like, click the “Save and copy” button. The image will automatically be saved to your Dropbox Capture folder. Take a look at my edited image.
And, of course, you can also just do an audio recording or just a webcam (plus audio) recording (again, click the mic icon to mute if you just want the video with no audio).
capture.dropbox.com
Visit the https://capture.dropbox.com/ webpage to see everything you’ve created with Capture.
Click “Create collection” to create, well, collections. You can create multiple collections, and you can add the same recording to multiple collections. If you’re familiar with the concept of tagging content, this is really what this is. Click on a collection (here I have a collection called New Mexico Recordings) to get a link to the collection.
Under each item, there is a plus sign icon. Click on it to add it to a collection. Click the link icon to get a link to the video. The default security setting is “Anyone with a link” can access it. Click the trash can icon to delete.

By clicking on my recording (but not the screen capture), I have a rudimentary editing tool. I can click and drag from the left or right to delete content at the beginning or end of the recording. How do we remove something from the middle of the recording? I have no idea. It’s possible to click in the middle. It adds a blue line, but I can’t actually select anything. Click and drag? Doesn’t work. Click, press shift or ctrl, click something else? No luck. It doesn’t look like Dropbox Capture’s technical writers know how to do it either. They write on the “how to edit videos” page, “Use the controls at the bottom of the window to select a portion of your video.” I’m going to guess that this feature was not ready for primetime, but Dropbox didn’t want to delay the release of Dropbox Capture. A
Conclusion
Dropbox Capture makes solid use of the Dropbox ecosystem. This is a good tool for quick one-off recordings. If you need more robust video editing tools (something more than deleting the start and end of the recording, ability to edit the transcript), Dropbox Capture is not the tool for you (yet?).
