I want to pronounce the names of others how they want them pronounced, and I assume that others feel the same way about my name—that they want to pronounce it as I pronounce it. Let’s make it easy for everyone and put a “hear my name” badge in our email signatures, in our learning management systems, and on our dot cards. The free service called NameCoach makes this easy.
This is what my NameCoach icon looks like in my email signature.
I’ve embedded the clickable button in this blog post. Click on it.

My NameCoach webpage will open. Click the speaker icon next to my name to hear a recording of me speaking my name. That’s it. Slick, eh?
If you don’t want to use the button, you don’t have to. The button is just an image that you link to your own NameCoach webpage. Here’s a direct link to my NameCoach web address: https://www.name-coach.com/sue-frantz.
Creating your own NameCoach profile
To get started, go to the NameCoach login page. In the top right corner, click the sign up button. Signing up as an individual is fine.
Fill out the form, which includes creating an audio recording of your name. There are three options for doing an audio recording. 1.) Phone: enter your phone number and their automated system will call you. 2.) Web recorder: press the record button. And for the DIYers, 3.) Uploader: upload your own recording.
Everything you enter on this form can be edited later, including your recording.
Using NameCoach
After you’ve created your profile, go to your “My NameBadge” page.

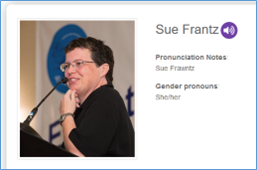
At the top of this page, you’ll see largely what others will see: your name, the speaker icon to listen to your name, pronunciation notes if you included them, and gender pronouns if you included them.
Below this section, you can share additional information about where your name came from (mine: Germany, probably Rhineland), what your name means (mine: free/Frenchman, if the internet is to be trusted), or a funny or interesting story about your name (mine: I’ve got nothing).
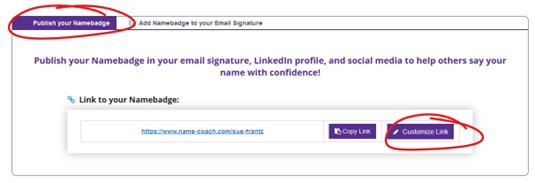
In the next section, from the “Publish your Namebadge” tab, click “Customize Link.” Change the end of your profile url into something that’s more you. If wonder-woman is available, claim it.
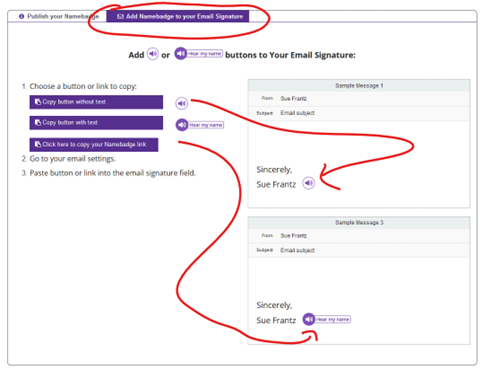
Next, click on the “Add Namebadge to your Email Signature” tab. This tab is really just about copying the button—with or without—text. After copying your preferred button, you can paste it anywhere, not just in your email signature. This is how I copied the button that pasted at the top of this post.
That’s it. You are now good to go.
Any time you want to make changes to your NameCoach page, just follow the link in your signature to get to your public profile page, click the login button, and log in.
