Office Tab: Added Functionality for Word, Excel, PowerPoint
I ran into a colleague today who posed an interesting question. (Shout out to Tina O. and Eric B.!)
Paraphrasing, “I’m replying to an email message in Outlook, and I open a file in Word, and edit that file. Now I want to attach that file to my Outlook email message. Is there a way to do it?”
There’s the save-and-send option in Word, but that will attach the file to a new email message, not attach it to a reply, so that’s not going to work here.
Option 1 (least desirable). In the Outlook message, click the Insert tab, then click “Attach File,” and navigate to the file.
Option 2 (less desirable). Open the Documents folder, navigate to the file, drag and drop the file onto the message to attach it.
Both options 1 and 2 require you to remember where you saved the file. My colleague explicitly said that she doesn’t want to have to remember where the file has been saved and then have to navigate the folder system to find it. Fair enough. I don’t want to do that either.
Option 3 (not that great unless you’re a programmer). You can write a little code that will allow you to open the containing folder of any Office file. See this blog for instructions. Fortunately for my colleague she is a programmer. I suspect she’s going to take this route. I’m normally the adventurous sort, and I briefly dabbled down this path.
And then I remembered something.
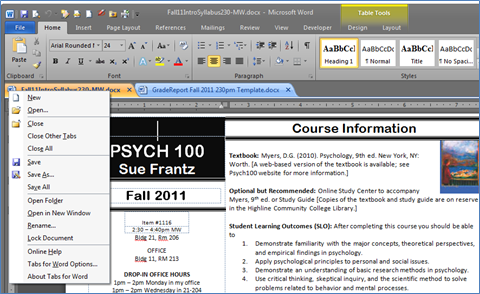
Option 4 (for those who have $25; try it with limited functionality for free). A couple months ago I read about an Office add-in that opens files as tabs, and I’ve been trying it out. Appropriately, it’s called Office Tab (works with Office 2003, 2007, and 2010). In the screenshot below you can see I have two files open in Word 2010. Just like most web browsers, I click on the tab to switch documents. But here’s the cool part. Right clicking on a tab generates a menu.
From here I can create a new document, open an existing document, close this file, close all of the other files open in this program, save this file, save it as a new file, or save all of the tabs I have open.
Now I get to the answer to my colleague’s question. I can “open folder”. Yes, this opens the folder where this particular document is saved. Now just select the file and drag it onto the email message to send it as an attachment.
To finish out the nifty stuff in this menu, I can also choose to open the file in a new window, rename the file, or lock the file.
Office Tab works with Word, Excel, and PowerPoint. If you go with Office Tab Enterprise, it will work with those programs plus Publisher, Visio, Access, and Project.


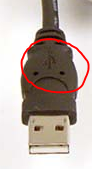 Quick Tech Tip. Tired of guessing which way your USB cable needs to be inserted? Look for the logo. That way is up.

 I’ve left Firefox. It was using up a massive amount of RAM (Firefox 6) and had slowed to a crawl. I started looking at my add-ons to see what might be slowing it down as I did with previous iterations of Firefox. And then I stopped. I thought, “Using a web browser shouldn’t be this hard.” I had tried Chrome before, but I had Firefox set up exactly as I wanted with the add-ons that I wanted. Then the scales tipped. I didn’t have many add-ons left that worked, and Chrome had many more add-ons available. I’ve been happily, and speedily, cruising the web with Chrome. Now, in all fairness, Firefox 7 is supposed to be faster than 6, so I just did the download, and its speed certainly appears to be on par with Chrome’s. But I’m a little gun-shy. Chrome, for now, is my primary browser.
 Feeling harried? The

 ree webinar series to learn how to eliminate Death by PowerPoint and make your presentations come to life. Listen to guest experts share their best techniques and answer your questions!”