I tried out a new assignment in my Psych 100 course this quarter. After students have done the assigned reading, but before we cover it in class, students are asked to reflect on what they found particularly interesting in the reading and why the average person on the street should know that information. They’ve been emailing me their responses, which has greatly increased the volume of email in my mailbox. I thought there must be a better way.
And then I remembered that you can create forms in Google Docs.
I’m not a heavy user of Google Docs, I prefer Dropbox as my cloud storage solution, but for gathering this kind of data, Google Docs is the way to go. I create a form and link to it from my website or LMS (e.g., Angel), students fill out the form, and the data is recorded in a Google spreadsheet. When I’m ready to grade, I just open the spreadsheet, and record the scores in a new column. To get the score to the students, I have several options. I can record the score in my LMS. I can open my email and email students one by one. Or I can download the spreadsheet to Excel, create a form letter in Word, and use mail merge to email my students. (See this blog post for instructions on how to use mail merge.)
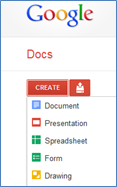
Creating form.
In Google Docs, click “CREATE” and select “Form” from the dropdown menu.
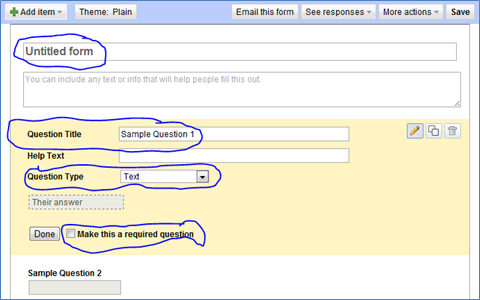
That will call up this screen. Click on “Untitled form” to add a title. Google gives you two sample questions to start with. For question 1, I’ll change the question title and the question type, and then I’ll check the box to make it a required question.
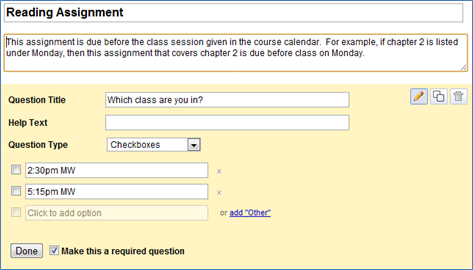
Here I’ve named the form “Reading Assignment” and added some text that explains when the assignment is due. I want the first question to be about which class section the student is in. When Google Docs produces the spreadsheet, the first column will contain a timestamp. I want the second column (first question in the form), to be the class section so I can sort on class section, then time. That way I’ll be able to grade each class as a group, and I’ll be able to see which students at the bottom of the group turned their assignments in late just by looking at the column to the immediate left.
For the question title, I opted for “Which class are you in?” Next, under “Question Type” I clicked the down arrow to change the question type to checkboxes. I created a checkbox for each of the classes I’ll have next quarter. Then I checked the box to make it a required question.
Click the “Done” button to exit editing question one.
I’m now ready to move onto question two. On the far right side of each question are three icons. Click the pencil to edit the question. Click the squares icon to duplicate the question. Click the trashcan to delete the question.

I’ll click the pencil to edit it.
With the first column being the timestamp and the second column the class time, I’d like the third column to be last name and the fourth first name.
I’ll change the question title to “Your last name” and check the box that makes it a required question. Clicking “done” gives me this. But I obviously want more questions than this. In the top left corner, click “Add item”.
That gives me this drop down menu. I want this question to be the first name, so a text question is fine.
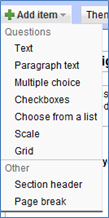
The “who are you” questions are done. Since this is a repeating assignment, I’m going to use the “Choose from a list” question type to enter all of the chapters covered in my course. Students can just click the dropdown menu and select the chapter they’re addressing in their assignment.
Now I’m ready for the assignment questions. For these I’m going to choose “Paragraph text” for the question type because I want to give students more space in which to write. The more space that’s available, the more people tend to write. In the “Help text” section of each of these questions, I’ve added “Click and hold on the bottom right corner of the box to expand it.”
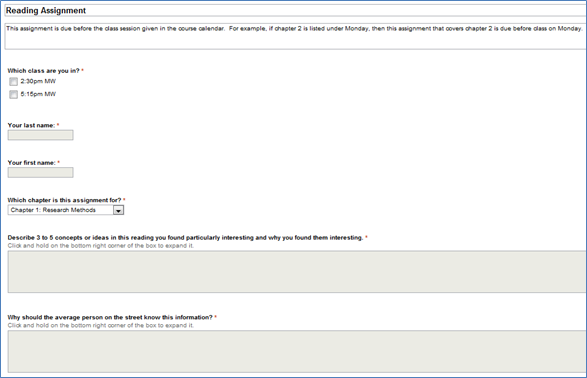
This is what my final form looks like.
If you would like to reorder your questions, just click and hold on a question, and move it wherever you’d like.
Get the link.
At the very bottom of the screen, I see this.

Click the link to go to the form page. I’ll copy the URL and paste it on my course webpage.
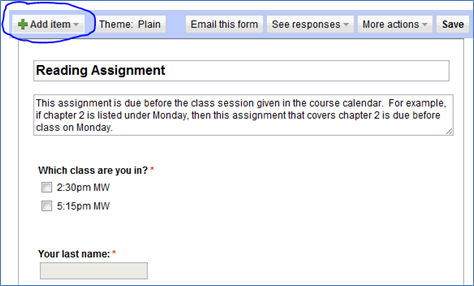
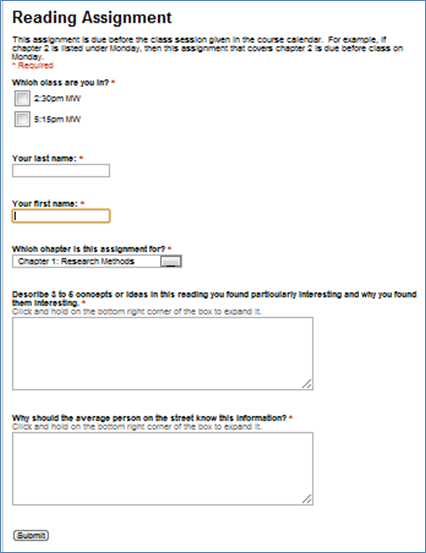
When my students follow the URL, this will be what they see.
Alternatively, embed the form on a webpage. To get the code, click on “More actions” and select “Embed”.

Copy the html code and paste it wherever you’d like the form to appear. Within your LMS or webpage editor, you’ll need to switch to “html view” to do that.
The data.
However I get the form to my students, they’ll fill it out, and I’ll need to see what they entered.
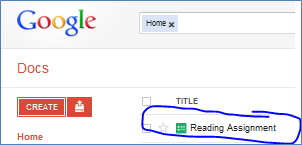
When I go into Google Docs, my new form appears at the top of my list of documents.
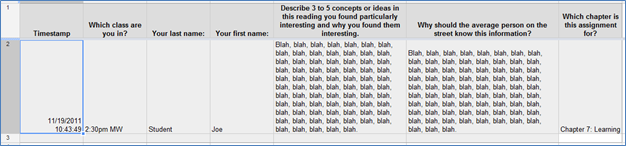
When I click on it, it takes me to the spreadsheet. If I would like to edit the form page, I can just click “Form” at the top of the page. Notice that the chapter column is in the last column rather than right after the first name column as it appears on my form. That’s because I added the chapter question after someone (me) entered data on the form. If I had moved the question before data had been entered on the form, the column would have appeared in the correct place.
I clicked on the column and dragged it to the right location. I got a warning that the form may not work correctly if I do that, but for me the form continued to work just fine.
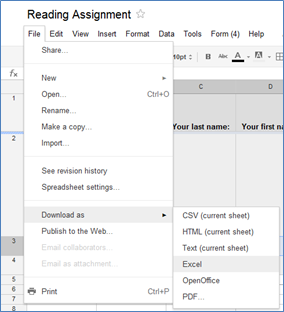
Rather than leave this data in Google Docs, I’ll download it to my computer as an Excel file. Once downloaded, I’ll delete the data from the Google spreadsheet. That will keep the data in that file manageable. With 80 students submitting something for each chapter, if I left all the data in the Google spreadsheet, I would have over 800 lines in the file by the end of the term.
To download, go to file, “Download as”, then “Excel”.
Notification.
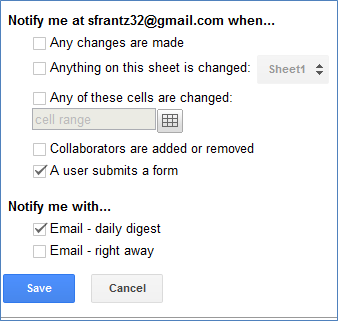
I’m going to ask Google to email me once a day with a summary if anyone fills out the form. Go to “Tools” then “Notification rules” to get this window. When someone fills out the form, I want Google to email me. But only once a day. I just want a reminder that there are assignments ready to be graded.
That’s it! It takes a little time to set up the form, but once it’s set up, you can use it term after term. If you have several sections you want to use this with, consider creating a separate form for each class. Or a separate form for each assignment. If you try it out, please let me know how it worked for you.