In spring of 2022, I wrote about some of the very cool features in MS PowerToys for Windows 10 and 11, such as highlighting the mouse pointer (very handy with three screens) and creating fixed zones on the desktop to drop windows into (also very handy with three screens). The good folks at Microsoft have just released a PowerToys update with three new features: text extractor, quick accent, and screen ruler. I’m particularly excited about the first two.
Get PowerToys here. It’s free. No ads. No annual fees. It really is free.
If you already have PowerToys, to get the update, launch PowerToys from your Windows start menu, and on the PowerToys general tab click the “Check for updates” button.
Text extractor
This tool allows you to grab the text from anywhere on your screen. Yes, that also includes images. Use the keyboard shortcut to run the text extractor: Windows key + Shift + t (for text). Your screen will go gray. Click and drag your mouse to draw a rectangle around the text you want to capture. Unclick your mouse. Windows has captured the text from the image, and that text is now on clipboard ready for pasting.
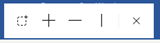
For an example, let’s take this CDC infographic.
I’m going to run the text extractor on the infographic title and subtitle. I press windows key + shift + t. My screen turns gray, and I click and drag from the top left corner of the title to the bottom right corner of the subtitle. The content is quietly sent to my clipboard. When I paste it, I get this text:
ADDRESS IT TODAY. PREVENT IT TOMORROW.
We can reduce the generational impact of adverse childhood experiences (ACEs), overdose, and suicide.
Pretty slick, eh?
Quick accent
I have a need to type accented letters often enough that I need a quick way to do it, but not often enough that I can remember how to do it. I confident this is going to solve it for me, because there is only keyboard combination I need to remember.
Quick accent is disabled by default. To enable it, launch PowerToys from your Windows start menu. Select “Quick Accent.” Next to “Enable Quick Accent,” flip the switch to the on position.
On your keyboard, press and hold the letter you want accented, then press and release the spacebar or left or right arrow keys. This will give you a toolbar of accents to choose from. Here, I pressed and held a, and then pressed and released the spacebar. I can then use my keyboard arrow keys to select the accent I want.

When you’ve selected the accent you want, release the letter key.
á
That’s worth going through one more time.
- Press and hold letter key
- Press and release spacebar, left arrow key, or right arrow key
- Use arrow keys to select the accent
- Release letter key
If you’re like me, you will discover that it’s not unusual to press a letter key at the end of a word while simultaneously pressing the spacebar to move onto the next word. For example, when typing “the,” if I press the e and press the spacebar at the same time, and then I release the e as I prepare to move on to the next word, I end up selecting the very first option in the toolbar, so what I actually type is “thé.” That’s great if I’m writing about French tea; it’s less great if I just want the mundane article “the.” Soon after I had quick accents up and running, I found myself making this error quite a bit. Hours later, the feedback has helped my brain adjust my typing to be more precise. I still make the error, but they are getting less frequent.
By default, the accent options toolbar appears in the top center of the screen. For some reason, I have a hard time finding it up there. In the quick accent section of PowerToys, I changed the location of the toolbar to bottom center. This seems to be a better spot for me. You do you.
Screen ruler
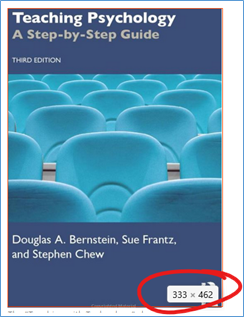
The last PowerToys tool in this update measures the number of pixels for objects on your screen. Windows key + Shift + M (for measuring) will cause the pixel measuring toolbar to appear in the top center of your screen.
Click the first icon—dashed square. Click and drag around an area you want to measure. Here you can see the red line that marks the area I’ve measured. The measurement of 333 pixels by 462 pixels appears in the bottom right corner. When you are done measuring, click the dashed square icon again.
For my purposes, that’s the only icon in the toolbar that I’m interested in. Try out the plus, the horizontal, and the vertical icons. Choose one, move your cursor around whatever is on your screen that you’d like to measure. The screen ruler will try its best to guess what you want measured.
When you’re done with the screen ruler, click the x at the end of the toolbar to close it.
Conclusion
That’s it for this round of PowerToys updates. Enjoy!
