YouCanBook.Me: Updated
Of all the tech tools I’ve written about, there’s one that garners the most praise from my readers: YouCanBook.Me. There are three faculty members on my campus that, whenever I see them, mention how much they love it. Last month I was at the American Psychological Association Convention, and one of the attendees was a reader of this blog. She told me how great she though this tool was, and that several faculty on her campus concurred. What makes it so great? It automates a task that otherwise requires several emails and a lot of time.
Without YouCanBook.Me:
Student: I’d like to make an appointment with you. When are you free?
Instructor: <looks at calendar> I’m free at these times. What time would you like?
Student: <looks at calendar> I’m not available at any of those times. How about one of these times?
Instructor: <looks at calendar> I can do X time. See you then.
Student: Great!
X time arrives, student doesn’t show.
With YouCanBook.Me
Instructor posts URL for making appointments. Student visits URL and selects a time. Appointment is added to instructor’s calendar. Student gets a reminder email a few hours before the appointment. Student gets a cancellation link to use in case of the need to cancel.
It was almost a year ago that I first wrote about the free service YouCanBook.Me, and I did a quick follow-up a month later. Since then YouCanBook.Me has been redesigned with a lot of new features. It’s time for an update.
Recap: YouCanBook.Me allows others to schedule an appointment in my calendar. It accesses my Google Calendar, and then shows my free times to those who need to make an appointment. The visitor clicks on a time, fills out the form, and that appointment is automatically added to my Google Calendar. I get an email letting me know of the appointment and the appointment-maker gets an email. The appointment-maker also gets a reminder email a few hours before the appointment. Both of those emails contain a cancellation link. To cancel, the appointment-maker clicks the URL to go to a website where they then just click the cancel button. When canceled, the appointment is automatically removed from my Google Calendar.
To see what it’s like, you’re welcome to schedule an appointment with me using my fall quarter calendar. When you get the confirmation email, follow the cancellation link to cancel it.
YouCanBook.Me is fully customizable with an easy-to-use user interface. As you read through this post, it may feel like a lot to do. It really isn’t. YouCanBook.Me uses a lot of default settings that will work just fine. Make any changes you’d like to customize your YouCanBook.Me calendar. Below I show you the settings I use and explain why.
Before you get started, you’ll need a Google calendar account. I sync my Google calendar with Outlook; any changes I make to one are changed in the other.
After creating a YouCanBook.Me account, you’ll be prompted to create a new calendar. You can create as many calendars as you’d like. I have five: fall quarter, winter quarter, spring quarter, meet-and-greet, and a general calendar with no fixed start or end dates. My main calendars are my quarter calendars, so I’ll show you what the dashboard to my fall quarter calendar looks like.
Basic Tab
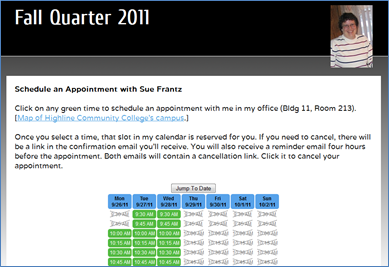
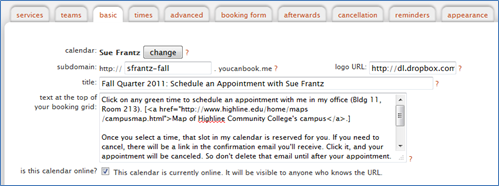
Once you create your new calendar, you’ll be taken to the basic tab on the dashboard. This tab lets you customize the look of the main calendar page, what’s picture in the image above.
[Note: Below each dashboard area YouCanBook.Me will display what this area will look like to the users of your calendar. I didn’t include them in this post to reduce clutter.]
[Another note: Any time you’re unsure what a particular area does, in YouCanBook.Me click the little red question mark next to it. A new window will pop up with more information.]
Next to calendar you can see that my Google Calendar named “Sue Frantz” is being used. My free and busy times will be pulled from that calendar, and any appointments YouCanBook.Me makes on my behalf will be added to that calendar.
For subdomain, you can change that to anything you’d like. It will default to the first half of the email address that you used when you created your YouCanBook.Me account. Here I’ve changed mine to sfrantz-fall since it’s my fall quarter calendar. That is the URL I give my students: http://sfrantz-fall.youcanbook.me.
Enter the title you’d like to give your calendar. This will appear at the top of your calendar page.
Enter the text you’d like to appear above your calendar times.
Any changes you make are automatically saved. No need to worry about losing your settings.
Times Tab
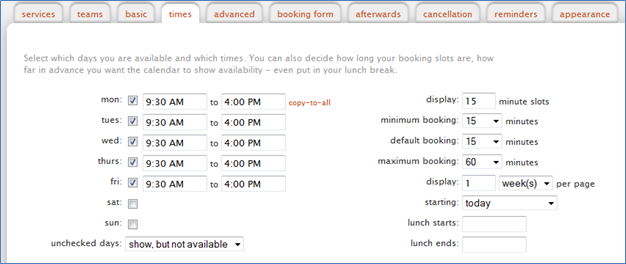
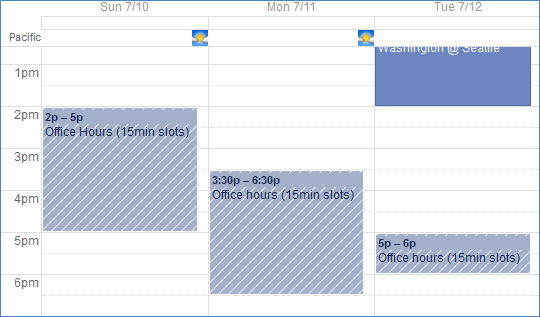
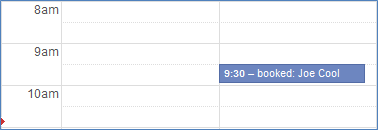
Select your start and end times for each day. While my personal calendar shows that I’m free at 6am, my YouCanBook.Me calendar doesn’t start looking at my Google calendar until 9:30am.
Times are available every 15 minutes (9:30, 9:45, 10:00, 10:15, etc.). The minimum amount of time available for making an appointment is 15 minutes and the maximum is 60 minutes. This means that a student could select a 9:45am appointment time and then reserve 15, 30, 45, or 60 minutes.
My calendar is set to display one week per page starting today (today plus the next 6 days). You can choose to display as many weeks or as many days as you’d like. And you can choose to start the calendar on any day of the week. For example, if you chose Sunday, then Sunday through this Saturday would be displayed, even if today were Wednesday.
If you have a set lunch time, you can block that time out here. Or you can leave these times blank, as I have done, and block out time in your Google calendar.
Advanced Tab
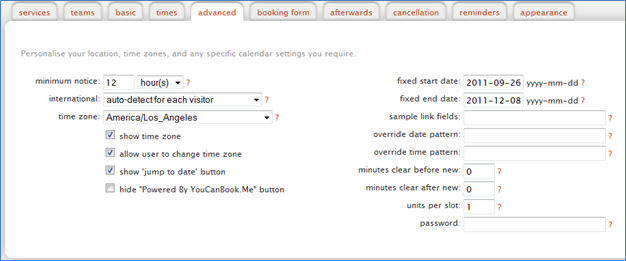
Minimum notice is how soon from now an appointment can be made. Mine is set at 12 hours. If a student is looking at my YouCanBook.Me calendar at 11pm, the earliest appointment the student can make is at 11am the next day. The 9:30am – 10:45am slots will be unavailable.
While I have the time zone set to my own time zone, YouCanBook.Me will use the time zone set on the appointment-maker’s computer. YouCanBook.Me knows that my calendar starts at 9:30am PT. If someone who is on central time accesses the calendar, the times will change so that the earliest time would be 11:30 CT. I also let users change the time zone from their default. Let’s say that I have a student visiting family in Chicago. When the student calls up the calendar, the times will all show as central time. The student can change the time zone to pacific as he or she considers an appointment time upon returning to the pacific time zone.
The ‘jump to date’ button allows users to jump to a future date instead of using the arrow to click through weeks.
Since this is my fall quarter calendar, I have set the fixed start and end dates to correspond to the quarter.
Minutes clear before new and minutes clear after new are useful if you need time to get from one place to another. Since most appointments will be in my office, I don’t need time before or after an appointment. If I were a clinical psychologist seeing clients, for example, I would give myself 10 minutes ‘after new’ to write up my client notes.
‘Units per slot’ allows you to let more than one person schedule in a time slot. Let’s say that you had a computer lab with 5 computers and students could reserve time at those computers in advance. Set ‘units per slot’ to 5. Any given time will show as being free until 5 appointments have been made for that time.
Add a password if you’d like. Only those who have the password can make an appointment on your calendar.
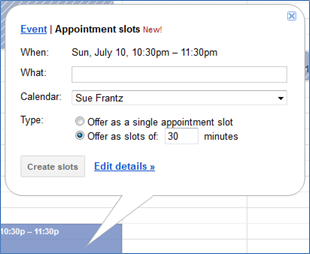
Earlier I mentioned that I have a meet-and-greet calendar. This calendar has a fixed start date at the beginning of the quarter and a fixed end date three weeks later. The appointment slots are 5 minutes each. I haven’t done this yet, but I plan to invite students to visit me in my office for a quick chat. I’m thinking of offering 2 points extra credit (out of 400+ points available in the course) to those who accept the invitation. If a student uses this calendar to schedule an appointment from 9:30 to 9:35, slots 9:35 and 9:40 will remain open. On my fall quarter calendar where the minimum appointment time is 15 minutes, the 9:30 to 9:45 time slot will show as unavailable.
Booking Form
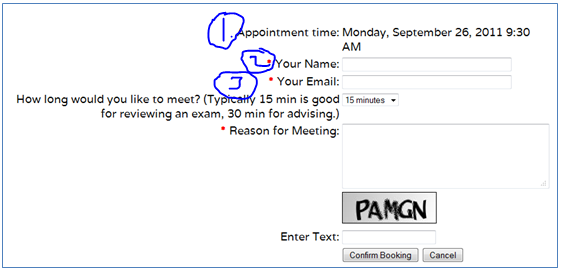
After students have selected an appointment time, say 9:30am on September 26th, they get this page.
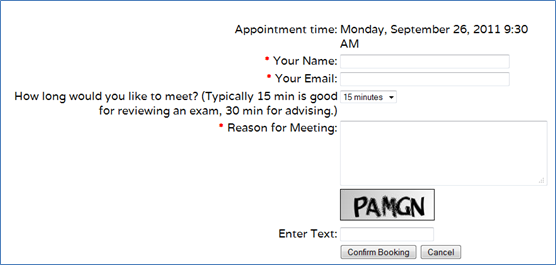
The fields on this page are customizable using the booking form tab.
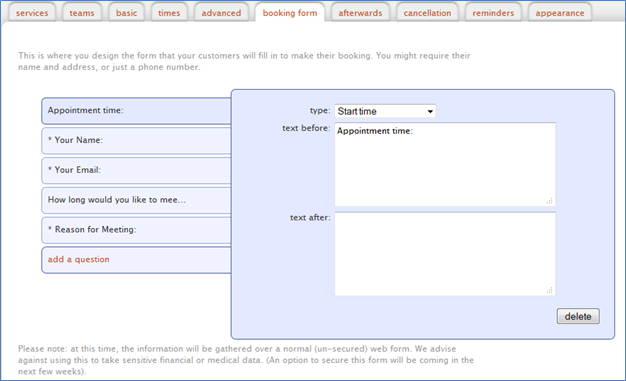
The appointment time will be set to the ‘start time’, that’s the time the student clicked to get to the booking form. In this case, 9:30am on September 26.
‘Your Name’, ‘Your Email’, and ‘Reason for Meeting’ are all required fields as denoted by the asterisk.
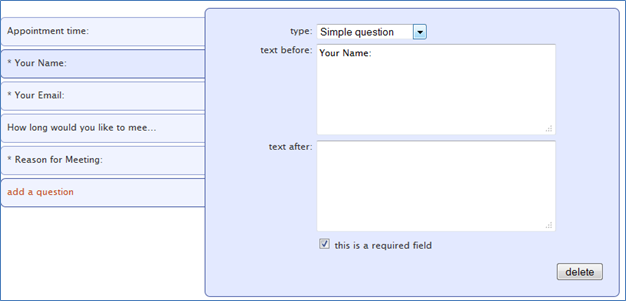
As you can see in the image above, this is the ‘Your Name’ field. It’s a ‘simple question’ where the text is just ‘Your Name’, and I’ve checked the box next to ‘this is a required field.’
For the ‘Your Email’ field, the question type is ’email address’. By using ’email address’ as the question type, YouCanBook.Me will use what the student enters here to email the confirmation and reminder emails.
For ‘Reason for Meeting’, the question type is ‘multi-line question’. That just gives the student a bigger box in which to write.
For ‘How long would you like to meet’, the question type is ‘booking duration.’ This question type refers back to the times tab where you entered information about the minimum booking (I said 15 minutes) and maximum booking (I said 60 minutes). When the question type is ‘booking duration’, the student will see a dropdown menu that gives four options: 15 minutes, 30 minutes, 45 minutes, and 60 minutes.
To add a new question, click ‘add a question’, choose the question type, and add the text you’d like the student to see.
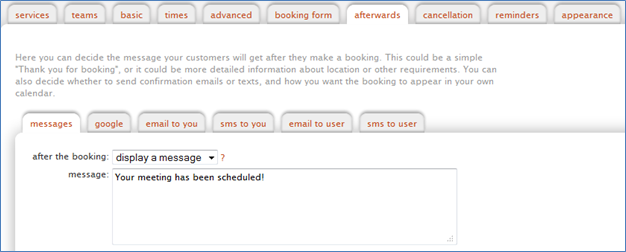
Afterwards Tab
This is what the student sees after making the appointment.
The screen that appears simply says “Your meeting has been scheduled.” As you can see below, the messages tab is where that text goes.
The Google tab controls what is entered in your Google calendar.
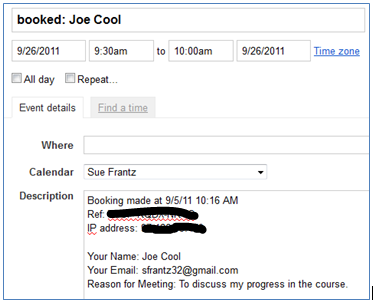
I created an appointment using YouCanBook.Me for a half hour appointment on September 26th.
These settings…
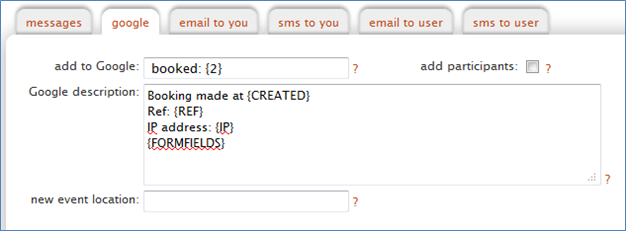
… generated this entry in my Google calendar:
{CREATED} enters the time the appointment was made. {REF} is the unique reference number YouCanBook.Me assigned to this particular appointment. {IP} is the IP address of the computer that made the appointment. {FORMFIELDS} are the fields you asked the appointment-maker to complete when they made the appointment. In this case, I asked the student to enter their name, their email address, and the reason for meeting. Those get entered in the order in which they are listed on the booking form.
‘Add to Google’ is what gets entered in the main calendar line. When I look at my Google calendar, this is what I see.
YouCanBook.Me defaults to entering the email address here: ‘booked: {EMAIL}’. Having the person’s name here is more valuable to me than their email address. I replaced {EMAIL} with {2}. Why {2}? Let’s look at the booking form again.
The first field is the appointment time. The second field is name. I’m telling YouCanBook.Me to enter that second field next to ‘booked:’ for my Google calendar entry.
On the ’email to you’ tab, I checked the box to say that I want an email when a new appointment is made, and I include the email address I want the message sent to. If you want it sent to multiple email addresses, add as many as you’d like, separated by commas.
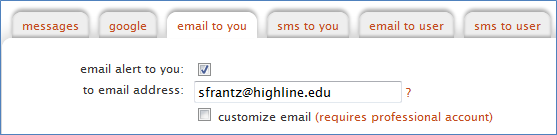
Use the ‘sms to you’ tab if you want a text message sent to your phone when a new appointment is made. I don’t use this since my minimum advanced notice is 12 hours and I’m getting messages via email.
The ’email to user’ tab is for sending a confirmation email to the appointment-maker.
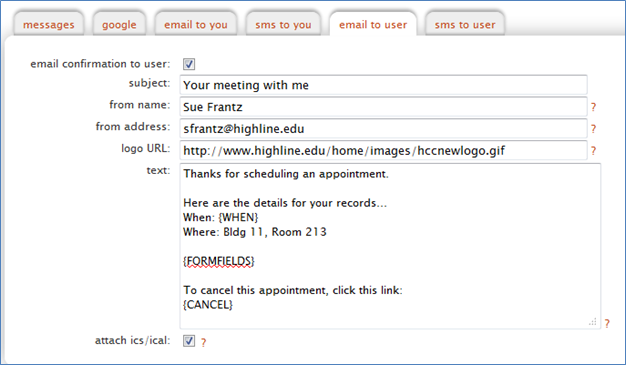
Enter the subject line for the email, your name, the ‘from’ address (if the appointment-maker hits ‘reply’ in their email program, the email will go to this address), a logo URL (totally optional — I use my college’s logo), and then whatever text you’d like. {WHEN}, {FORMFIELDS} (what the student entered on the booking form when the appointment was made), and {CANCEL} option are all automatically entered here. I would advise not changing them. Feel free to add any text you’d like though. For example, I included ‘Where’ so students know where they are going.
The ‘sms to user’ tab allows YouCanBook.Me to send a confirmation text to the appointment-maker. To use this feature you need to ask students for their cell phone number on the booking form. You also need to have sms credits in your account. Each credit is 16 cents. Email is fine for me.
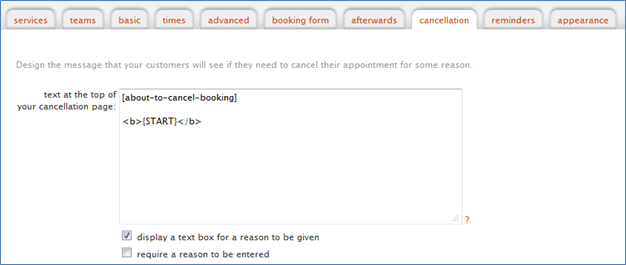
Cancellation Tab
In the confirmation and reminder emails appointment-makers get a URL to follow if they need to cancel. The URL takes them to a page that displays the following.
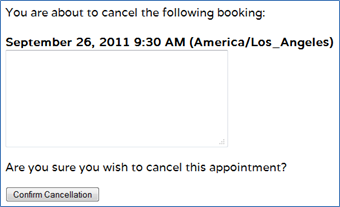
The content of this page is controlled by the cancellation tab. Add your own text to the box if you’d like. {START} enters the date and time of the appointment that’s to be canceled.
Reminders Tab
Before the appointment, the appointment-maker will receive a reminder email if you activate this option.
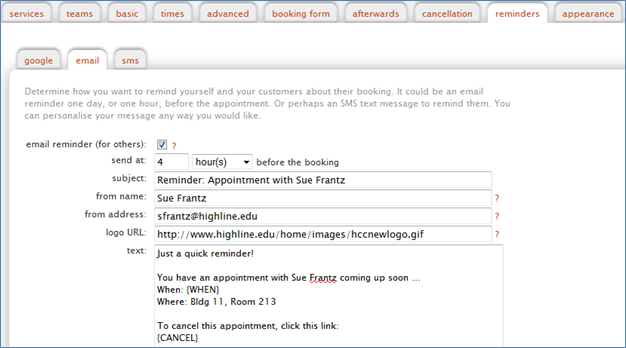
Check the box next to ’email reminder (for others)’. Set the time you want the email sent. Enter the subject line, your name, your email address, a logo URL if you’d like, and the text. {WHEN} and {CANCEL} are automatically included just like in the confirmation email.
Appearance Tab
Use this tab to customize the look of your YouCanBook.Me calendar.
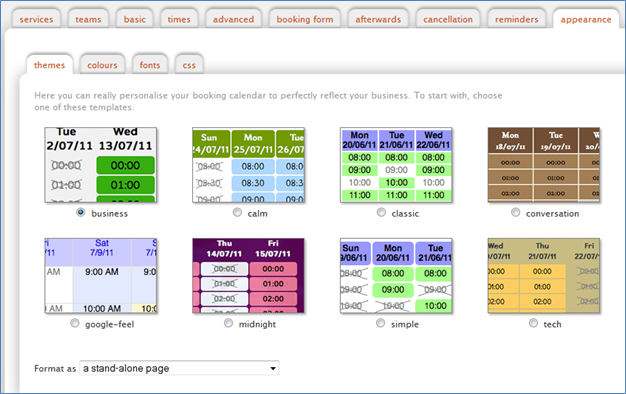
Choose from one of the standard designs. Choose ‘format as’ ‘a stand-alone page’ if you intend to just point students to your YouCanBook.Me calendar. If you want to embed it in an existing page, say, inside your course management system, select ‘a component to embed on a bigger page’. Select the colours and fonts tabs to change the colors and fonts. Use the css tab if you want to create your own css template.
Conclusion
The YouCanBook.Me developers frequently add features. For example, at this writing, the teams and services tabs are new.
Let’s say that your department has four tutors for one of your courses. Each tutor could create a Google calendar for tutoring, each one sharing that calendar with you. Each tutor blocks off the times they are unavailable in their tutoring calendar. In YouCanBook.Me, under the team tab, enter the information for each tutor. You will have one YouCanBook.Me URL to give to students who are looking for a tutor. Each tutor’s name will appear. The student looking for tutoring can click on the name of the person they want, and then make an appointment on their calendar.
For services, if you had specific services that required specific times, this tab is a nice addition. Let’s say I added ‘advising’ and ‘test review’. I could designate advising as a 30 minute appointment and test review as a 15 minute appointment. The YouCanBook.Me URL would take students to a page where they’d choose from the services offered, in this case advising or test review. Instead of choosing the length of the appointment themselves, YouCanBook.Me would automatically do it.
If you try out YouCanBook.Me, let me know how it works for you!