Beliefs about aging affect our health: A lecture add-on
written by Sue Frantz | August 13, 2025
This is the second in a series of posts based on Becca Levy’s book Breaking the age code: How your beliefs about aging determine how long & well you live.
*******
Psychological scientist Becca Levy’s stereotype embodiment theory “proposes that negative age beliefs bring about detrimental health effects that are often, and misleadingly, characterized as the inevitable consequences of aging. At the same time, positive age beliefs do the exact opposite; they benefit our health” (Levy, 2022, p. 15).
Reread the above paragraph. The societal messages that tell us about the horrors of aging are slowly killing us.
You’ll be unsurprised to hear that we begin to internalize these messages in childhood, an internalization that continues through adolescence and adulthood. This internalized stereotype operates below our conscious awareness. As we perceive the stereotype to be more relevant to us, it affects us even more. Lastly, and most importantly for the purposes of this blog post, stereotypes about aging “impact our health through psychological, biological, and behavioral pathways” (Levy, 2022, p. 15).
The American Psychological Association has identified seven integrative themes (APA, 2022), a structure that is very helpful for thinking about how and what we teach in Intro Psych. Of particular relevance to this post is theme #3: “Psychological, biological, social, and cultural factors influence behavior and mental processes.”
After discussing the reality of aging in the lifespan chapter of your Intro Psych course or as an example of theme #3 early in your course, introduce students to Levy’s stereotype embodiment theory. Next, share with students some of the cultural, social, psychological, and biological factors that contribute to it:
Cultural factors: Many of us live in a culture where ageism is a socially acceptable prejudice (Weir, 2023). The message is clear: Being old is bad.
Social factors: When our friends, family, and acquaintances make dismissive “OK, Boomer” comments, older people feel less valued. In fact, that seems to be the goal of the person saying “OK, Boomer” (Frey & Bisconti, 2023).
Psychological factors: Once we internalize the cultural message that being old is bad, it is hard to feel good about oneself.
Biological factors: Levy and her colleagues have “found that negative age beliefs can increase biological markers of stress…Over time, more frequent and higher spikes in stress biomarkers can lead to earlier death” (Levy, 2022, pp. 18–19).
Talking about stereotype embodiment theory not only gets us to think about how our attitudes about aging affect our own life trajectory and outcomes, but also how our attitudes may affect others, including those we love dearly.
References
APA. (2022). Psychology’s Integrative Themes. American Psychological Association. https://www.apa.org/ed/precollege/undergrad/introductory-psychology-initiative/student-learning-outcomes-poster.pdf
Frey, K. T., & Bisconti, T. L. (2023). “Older, entitled, and extremely out-of-touch”: Does “OK, boomer” signify the emergence of a new older adult stereotype? Journal of Applied Gerontology, 42(6), 1200–1211. https://doi.org/10.1177/07334648231154044
Levy, B. (2022). Breaking the age code: How your beliefs about aging determine how long & well you live (First edition). William Morrow, an imprint of HarperCollins Publishers.
Weir, K. (2023, March 1). Ageism is one of the last socially acceptable prejudices. Psychologists are working to change that. Monitor on Psychology. https://www.apa.org/monitor/2023/03/cover-new-concept-of-aging
Assumptions about older people: Class discussion
written by Sue Frantz | August 13, 2025
I’ve been thinking a lot lately about aging. Several years ago, I had a friend in her 80s tell me that internally she didn’t feel any different than she did when she was in her 40s. While I’m gaining distance from my 40s but still quite a ways away from my 80s, I understand what she was telling me. I feel no different today than I did when I was in my 40s, and I don’t see that changing. What I do see changing is how others interact with the me that they I assume I am.
When I mentioned to a colleague that we should spend more time in Intro Psych talking about late adulthood, they said that that wasn’t necessary since late adulthood was so far away from where our typical college student is now. First, I taught in community colleges for over 30 years. I had many students who were deep into their 50s and older. This was not a hypothetical stage of life for them. Second, younger people interact with older people all the time—older relatives, older neighbors, older co-workers, plus older strangers on public transit, in restaurants, and in stores. Most importantly, younger people need to know that the first person who calls me “young lady” is going to get punched in the face. Okay, that’s unlikely. I’ve never hit anyone and am unlikely to start, but they need to know that I will really, really want to punch them in the face. But I’m ahead of myself.
Becca Levy teaches a Health and Aging course. She reports that she begins the course “by asking [her] students to think of an older person and list the first five words or phrases that come to mind. It can be someone real or imagined” (Levy, 2022, p. 9). What a great way to open a discussion on late adulthood in the Intro Psych lifespan chapter! Once your students have their lists, do as Levy does and ask your students to tally up how many of their items were positive and how many were negative. Next, invite students to work in small groups to identify how they may have developed their ideas about older adults. Once discussion dies down, ask a volunteer from each group to share where their ideas may have come from.
There are a number of factors that influence our perceptions of older adults (Gire, 2019). Largely, it comes down to who we see and what we hear. For example, if we live with an older adult who is physically and socially active, we are more likely to assume older adults, in general, are physically and socially active. Similarly, if our primary exposure to messages about aging comes from social media or mass media, then our attitudes are more likely to reflect those messages.
How we think about others certainly influences how we interact with them. However, the interesting thing about aging is that with some luck, we will become a member of that aged group. The next post in this series will explore the stereotype embodiment theory which describes how our beliefs about age affect our own health.
References
Gire, J. T. (2019). Cultural variations in perceptions of aging. In K. D. Keith (Ed.), Cross‐Cultural Psychology (pp. 216–240). Wiley Blackwell. https://doi.org/10.1002/9781119519348.ch8
Levy, B. (2022). Breaking the age code: How your beliefs about aging determine how long & well you live (First edition). William Morrow, an imprint of HarperCollins Publishers.
Contingency management for abstaining from recreational drugs: Discussion for the learning or therapy chapters
written by Sue Frantz | August 13, 2025
What information do public policy makers need to help them decide if we should use public funds to pay people who are addicted to recreational drugs to stay clean?
Before giving students this question, provide a bit of background.
With opioid addiction, drug treatment providers have medications that can help suppress cravings. With reduced cravings, a person with the addiction can work on the life changes needed to stay off opioids for good. However, with some drugs, such as methamphetamine, there are no such medications.
Operant conditioning research tells us that if you want a rat to learn to press a bar, the initial bar presses must be reinforced immediately. If we wait until, say, bar press 78 to provide the first reinforcement, bar press 78 will never come. Our rat will have given up on bar pressing long before then. To bring this closer to the lives of your students, ask them to imagine having a job where they don’t get paid for a year. How long do they think they would continue working before giving up?
Similarly, there are inherent rewards that come with staying away from recreational drugs, such as stable employment, stable housing, and stable relationships, but there can be a long time between stopping drug use and reaping those rewards (78 bar presses!). Contingency management treatment provides rewards for those initial efforts at staying drug free and continues those rewards until the bigger rewards of life stability fall into place. We can think of such programs as a way to bridge the reinforcement gap. When program participants demonstrate that they have not used since their last test, they receive (what is expected to be) positive reinforcement.
Invite students to work in small groups to answer this question: What information do public policy makers need to help them decide if we should use public funds to reinforce people who are addicted to drugs to stay clean?
Students may want to know how much money it takes to provide reinforcement. The programs typically ramp up reinforcement with small amounts at the beginning and larger amounts the longer a person stays clear. As reported in a (gifted to you) New York Times article, program participants “typically come in twice a week for a urine drug screen. If they test negative, they are immediately handed a small reward: a modest store voucher, a prize or debit card cash. The longer they abstain from use, the greater the rewards” (Hoffman, 2025). One program reported in that article gave $10 for the first clean test and $12.50 for the second one later that week.
A meta-analysis of 23 studies (32 contingency treatments for a variety of drugs) found that 91% of the treatments increased the size of the reinforcement with each successful drug screening. The frequency of reinforcement was from one to seven times per week. The average amount of money that a person could earn over the span of the treatment was $914.46; the median was $466 (Ginley et al., 2021).
Students may want to know how many participants remain drug free after the program ends. One meta-analysis found that “participants who received CM evidenced a 22% greater likelihood of abstinence at a median of 24 weeks after reinforcement ended than participants receiving comparison treatments” (Ginley et al., 2021, p. 65).
If time allows, conclude this discussion by asking students to consider how contingency management treatments could work for other life changes, such as eating better or exercising more. These are areas of our lives where the inherent rewards of better health and greater mobility come much later—78 bar presses later. Invite students to work in small groups to design a research study that would investigate the use of contingency management for exercise or eating better. The design should specify reward frequency, reward amounts (increases over time?), the behavior being rewarded, length of the program, measure of effectiveness, evaluation of long-term effectiveness, and the identification of a control condition. At the conclusion of discussion, invite groups to share their research designs.
If you’d like your students to have some library database searching practice, ask students to find a study that addresses this research question. In a brief report, ask students how the study addressed each of the design elements asked above. The ones that are most likely to be missing are measures of long-term effectiveness and the presence of a control condition.
References
Ginley, M. K., Pfund, R. A., Rash, C. J., & Zajac, K. (2021). Long-term efficacy of contingency management treatment based on objective indicators of abstinence from illicit substance use up to 1 year following treatment: A meta-analysis. Journal of Consulting and Clinical Psychology, 89(1), 58–71. https://doi.org/10.1037/ccp0000552
Hoffman, J. (2025, July 16). Upended by meth, some communities are paying users to quit. The New York Times. https://www.nytimes.com/2025/07/16/health/meth-addiction-treatment-contingency-management.html
The coffer illusion: What you see depends on your experiences
If you see the rectangles, you understand why it’s called the coffer illusion. Or at least you understand the coffer part if not yet the illusion part. A coffer is a chest. A coffered ceiling is made up of recessed rectangular panels such that it looks like a series of chests.
However, if you see the circles, all this business about rectangles and chests will mean nothing to you.
Before we go any further, let’s make sure everyone can see both the rectangles and the circles.
Now scroll back up to the original coffer illusion image. Can you now flip back and forth between rectangles and circles?
In preprint version 3, Ivan Kroupin and colleagues (2025) wondered if living in a world dominated by rectangles, e.g., rectangular buildings, would predispose viewers of the coffer illusion to see rectangles first. In contrast, they wondered if living in a world dominated by circles, e.g., round huts, would predispose viewers to see circles first.
The researchers asked online participants residing in the United States and the United Kingdom to report what shapes they saw. Researchers visited two locations in northern Namibia to ask participants in person. One location, Opuwo, is semi-urban while the other, Himba, was rural.
Once participants identified a shape (rectangles or circles), they were asked if they saw any other shapes. Participants could take as long as they wished to respond.
US & UK
Semi-urban Opuwo
Rural Himba
Only rectangles
81%
<1%
<2%
Rectangles and then circles
17%
13%
<3%
Circles and then rectangles
3%
67%
48%
Only circles
0%
19%
48%
(Numbers may not add up to 100% due to rounding.)
The researchers provide a wonderful example of the different lenses the participants and the researchers brought to the coffer illusion.
When the researchers asked one participant
“’What do you see here?’ our participant responded “Houses.’ This was a surprise to both the experimenter and translator since we assumed that she meant rectangles, and seeing rectangles first is very rare in the rural group (~4% in the final sample). However, when we asked her to point to the things she saw, she picked out all of the circles in the image. We asked her to draw what she saw and she drew a neat circle in the sand (n.b. this request to draw the image was not part of the final protocol). Clearly, the geometry we (the experimenter and translator) assumed to correspond to ‘houses’ is very different from the one assumed by our participant. Traditional Himba houses are circular” (p. 5).
The researchers report similarly stark differences in the perception of three other illusions: curvature blindness, café wall, and Gestalt shapes. All the results were fascinating, but the results that really struck me were from the Gestalt shapes illusion.
Participants were asked “What do you see here?” If they didn’t name a shape, the researchers prompted with “Do you see a [name of shape] here?”
US & UK
Semi-urban Opuwo
Rural Himba
Reported shape without prompting
93%
38%
10%
Identified the shape after it was named
6%
23%
12%
Do not see the shape at all
1%
38%
78%
The researchers note that “Urban environments are filled not only with angles but with standardized geometric shapes: perfect circles, triangles, and squares in everything from logos to packaging. Indeed, we explicitly teach our children to identify a range of these shapes in the visual environment” (p. 8).
The researchers note that while those living in the Himba village are more likely to see circular housing, that did not mean they were more likely to see the Gestalt circle. They wonder if seeing Gestalt shapes has less to do with squares, circles, and triangles, and more to do with a lack of exposure with inferring shapes from partial images.
The examples of cross-cultural differences in perception provided in this paper are just another set in a long line of examples (Phillips, 2019). It is, however, an excellent reminder that our environments shape what we perceive, and that you and I may not see things the same way.
References
Kroupin, I., Davis, H. E., Paredes Lopes, A. J., Konkle, T., & Muthukrishna, M. (2025). Visual illusions reveal wide range of cross-cultural differences in visual perception. PsyArXiv. https://doi.org/10.31234/osf.io/gxzcp_v3
Phillips, W. L. (2019). Cross‐cultural differences in visual perception of color, illusions, depth, and pictures. In K. D. Keith (Ed.), Cross-Cultural Psychology: Contemporary Themes and Perspectives (2nd ed., pp. 375–397). Wiley Blackwell.
Up your Intro Psych knowledge: Recommended books
written by Sue Frantz | August 13, 2025
Intro Psych is the most difficult course we teach because we are not experts in the vast majority of the content. We rely on our Intro Psych textbooks—the one we adopted for our class and a stable of others that our students will never see—to help bring us up to speed in our weaker areas. Those who are lucky enough to have the funds go to conferences where they can hear experts who bring our knowledge up to date. For example at the 2025 Psych One Conference, we heard Kenneth Carter talk about how we can use high sensation-seeking behavior to help our students think about psychology’s big questions. We also heard from Kurt Gray about current research on morality. (I’m still thinking about the example he shared of people having sex with rotisserie chickens. Thanks, Kurt.)
Another rich source of knowledge are books written for a general audience by experts in psychology. If you weren’t in the audience for Carter’s talk, I encourage you to read his book Buzz! Inside the Minds of Thrill-Seekers, Daredevils, and Adrenaline Junkies. I’m about halfway through, and he has given me much to think about, especially as my wife and I work our way through all 37 seasons of The Amazing Race (streaming on Paramount+). We’re just finishing season 29. No spoilers, please!
Psychology high school teacher extraordinaire Christina Luzzi has her students write a review of a book that is heavily related to psychology but written for a general audience. If you’re interested in doing something similar, please check out Luzzi’s instructions. Or maybe you’re more of a book group kind of person. Here are some suggestions for running your own in-class book group(s).
Even if you are just wanting to up your own Intro Psych knowledge, check out Luzzi’s list of over 100 books. Go to her instructions, and scroll down to the bottom of page 2. She has categorized the books by subject.
Not ready to spend (more!) money on books? Check your public or institutional library. If they don’t have the title you’re looking for, ask about interlibrary loan.
Practice reading a journal article: Psi Chi Journal of Psychological Research
written by Sue Frantz | August 13, 2025
Are you looking for new ways to introduce original psychological research to your Intro Psych students? In this freely available journal article, authors identified 14 articles from the open access Psi Chi Journal of Psychological Research, each relevant to one of 14 typical chapters in an Intro Psych textbook (Rouse et al., 2025). For each identified article, the authors provide the reference information for the article, the abstract, key terms, and five questions. The questions are intended to be used by an instructor to prompt students to reflect on each of the sections of a journal article.
For example, for an article on procrastination (Gregory et al., 2023), after students have read the article, the authors suggest asking your students these questions:
Question 1 (Understanding background):
“Academic entitlement beliefs” can be defined as a propensity to possess an expectation of academic success without having to assume personal responsibility to achieve this success. How may social media and a growing consumer mindset have coincided with or contributed to the increase of these beliefs over recent generations?
Question 2 (Understanding purpose):
Although many studies have examined the consequences of procrastination, few have explored predictors or causes of procrastination. Why might this be?
Question 3 (Understanding method):
Social desirability bias can occur when respondents to a survey answer questions in ways they think will be viewed favorably by others. How could the researchers have limited the impact of social desirability bias in this study on procrastination?
Question 4 (Understanding results):
The results of this study indicate that the behavioral variable of daily social media did not significantly predict procrastination, but it did significantly correlate with procrastination. Why would this result be significant? Could there be another direct effect between social media and procrastination?
Question 5 (Implications for life):
Considering that the elements of academic entitlement and conscientiousness may both impact procrastination tendencies, how could students practically apply these results to their study habits? (Rouse et al., 2025, p. 104)
If you’re a fan of the jigsaw classroom, it would work well here. Divide students into groups of five. Give each group one of the questions to discuss. Once they have their answers, assign one student from each group into a new group so that each new group has a representative for each question. Each student, in turn, summarizes their original group’s discussion.
Because the articles aren’t super short—the one on procrastination is 10 pages—students should be encouraged to read the assigned article before coming to class.
It’s not unusual to see professional athletes lose their composure. Given the intensity of emotions athletes may experience during competition, it’s a wonder that more athletes don’t lose their cool or that it doesn’t happen more often.
During the 2025 Spanish Grand Prix, Red Bull’s driver, Max Verstappen, lost his cool. After a series of frustrating incidents on the track, Verstappen intentionally rammed another car (Gitlin, 2025).
After describing the following five emotion regulation strategies (McRae & Gross, 2020), invite students to work in small groups to identify which strategies Verstappen could have used in the moment that may have helped him not attack another driver.
Situation selection—choosing situations for the emotion they may instill.
Situation modification—changing the situation to alter an emotion.
Attentional deployment—shifting attention toward or away from an emotion.
Cognitive change—changing how we are thinking about the situation.
Response modulation—changing what we do with the emotion by suppressing our outward expression of it or by altering our physiology, such as taking deep breaths.
As a bonus question, ask your students if they have experience with organized sports. For those who have, invite them to share what messages from coaches they’ve received, if any, about emotion regulation. Were those messages more about managing emotions in the heat of competition or more about managing emotions afterwards, such as after a disappointing loss?
Do your students have examples of when they or someone they knew lost their composure during a competition? On reflection, how might they have used the emotion regulation strategies to keep their composure?
References
Gitlin, J. M. (2025, June 2). F1 in Spain: Now that was a lapse in judgment. Ars Technica. https://arstechnica.com/cars/2025/06/f1-in-spain-now-that-was-a-lapse-in-judgement
McRae, K., & Gross, J. J. (2020). Emotion regulation. Emotion, 20(1), 1–9. https://doi.org/10.1037/emo0000703
The doll study: Thoughts from the National Museum of African American History and Culture
written by Sue Frantz | August 13, 2025
While in Washington, DC, for the Association for Psychological Science annual convention, I took an afternoon to visit the National Museum of African American History and Culture. I was especially interested in seeing the exhibit on Brown v. Board of Education which features the Mamie Phipps Clark doll study (Concourse C, Level 2: “Defending Freedom, Defining Freedom, 1876-1968”)–and it was her study. In a later interview, Kenneth Clark said, “the record should show [it] was Mamie’s primary project that I crashed. I sort of piggybacked on it” (Rothberg, 2022).
While what is here at the museum is largely—but not entirely—accurate, I’m sorry that they didn’t have the space to tell more of the story, because it is quite a story.
Biographical History of the Clarks
Kenneth and Mamie Clark both earned their bachelor’s degrees from Howard University. Kenneth’s was in political science; Mamie’s was in psychology. Both went on to earn their master’s in science degrees in psychology from Howard. And then both went on to Columbia University to earn their PhDs. That makes it sound easier than it was. Kenneth started the PhD program a few years earlier than Mamie. He was the only black person in the department and was the first black person to earn a PhD in psychology from Columbia. When Mamie joined the program, Kenneth had already graduated. Mamie, too, was the only black person in the department. When she graduated, she was the second black person—and the first black woman—to earn a PhD in psychology from Columbia (Kenneth B. Clark & Mamie Phipps Clark, 2004).
While in graduate school at Columbia, Phipps Clark chose to work with Henry Garrett, who would become department chair while she was there. Garrett was at the height of his career. Phipps Clark earned her PhD in 1943. Garrett was president of the Psychometric Society in 1943, president of the Eastern Psychological Association in 1944, and president of the American Psychological Association (APA) in 1946 (Winston, 1998).
Given Henry Garrett’s stature, it’s not a surprise that Phipps Clark would choose to study under him. However, Garrett was a racist and eugenicist, although it doesn’t sound like his public views shifted quite so far until the mid-1940s (Winston, 1998). In any case, surely Phipps Clark knew some of what he thought about race. Why, then, did Phipps Clark choose Garrett? One of Phipps Clark’s biographers said, “she wanted the challenge” (McNeill, 2017). I wonder if she thought she could influence his views on race. Or maybe she just saw him as the best researcher for her to learn from.
Incidentally, Garrett died in 1973. He lived to see Kenneth Clark become president of APA in 1971, 25 years after Garrett’s own presidency.
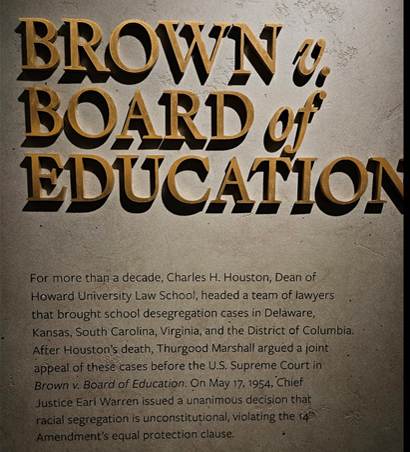
The Court Case
But now we’re ahead of the story. Let’s go back to the early 1950s. Should segregated public schools be permitted to remain segregated? The NAACP was shepherding five cases through the courts. In all cases, the NAACP attorneys argued that segregation of public schools violated the 14th amendment of the U.S. Constitution. Specifically, the focus of their argument was the clause that says that no state shall “deny to any person within its jurisdiction the equal protection of the laws.” Segregation, they argued, inherently does not provide equal protection. As each case wrapped up, appeals by losing counsel were filed. A date with the U.S. Supreme Court was inevitable.
In three of those cases, Kenneth Clark testified about the findings from the Phipps Clark doll study. Why was he testifying when it was really her study? Probably sexism. The attorneys likely thought that a man’s testimony would be more compelling to the all-male courts than a woman’s testimony. They were likely right. But there was one case where after Kenneth Clark testified, Phipps Clark testified. Why? Because the opposition brought Henry Garrett in as an expert witness.
If you were an NAACP attorney working on this case, this was just too good to pass up. You know that Garrett is going to share his racist views. How could you not ask for testimony from Mamie Phipps Clark—a black woman—who had earned her PhD with him? What she had to say was probably not as important as the fact of her existence. Garrett essentially testified that because of the maturity level of high school students, white students and Black students are not able to get along (transcript of Garrett’s testimony in Davis v. County School Board). Phipps Clark noted that there were already many elementary school children in mixed classrooms that were doing fine, and college students in mixed classrooms were also doing fine, so to argue that high school students would not do fine was absurd (transcript of Phipps Clark’s testimony in Davis v. County School Board). Neither Garrett nor Phipps Clark testified in any of the other four cases. Also interesting reading are the transcripts of Kenneth Clark’s testimony in his three cases: Davis v. County School Board (Virginia), Briggs v. Elliott (South Carolina), and Gebhart v. Belton (Delaware).
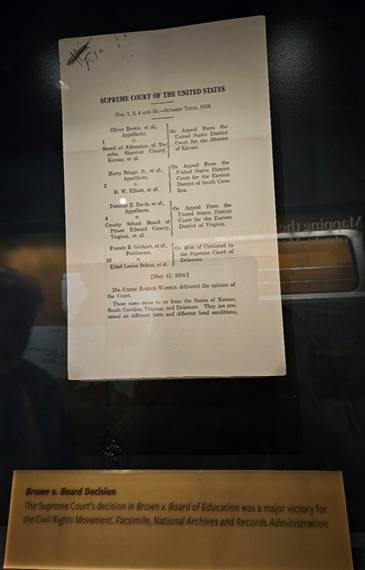
When the appeals reached the U.S. Supreme Court, the Court opted to hear them all as a group. Collectively, the case became known by the first case listed: Brown v. Board of Education of Topeka. We all know the outcome. Thurgood Marshall, lead counsel for the NAACP, made a well-argued presentation; 13 years later, Marshall would join the Court. The Court ruled unanimously in favor of desegregation. Unanimity on this decision was important for Chief Justice Earl Warren, and he worked hard to gain the support of the few Supreme Court justices who were leaning toward ruling the other way.
The segregation laws that kept white and Black children separate led Black children to have, Warren wrote, “a feeling of inferiority as to their status in the community that may affect their hearts and minds in a way unlikely to ever be undone.” This was a direct reference to the Phipps Clark doll study, making this the first time that psychological research was cited in a U.S. Supreme Court case.
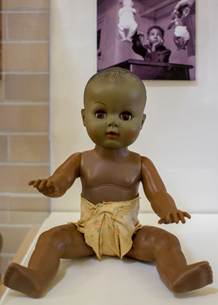
The Dolls
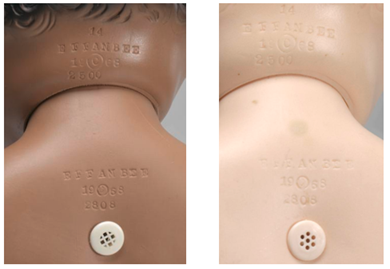
Before wrapping up this post, I want to discuss the dolls used in this study. There were four dolls used, two black and two white. One source reports that “the Clarks had to paint a white baby doll brown for the tests, since African American dolls were not yet manufactured” (Blakemore, 2023). The National Park Service says that this was one of the dolls (U.S. National Park Service, 2021).
Because everything in the Smithsonian museums is catalogued, we can see the entries for these dolls. The entries for both the black doll (Smithsonian Institution, n.d.-a) and the white doll (Smithsonian Institution, n.d.-b) say that they were manufactured by the Effanbee Doll Company in 1968. That was 17 or 18 years after the doll study was conducted. Even though the museum placard says “…using these and other dolls,” we know that these dolls were not the dolls used. However, although I have been unable to find reports of the research, one source says that these dolls were used at Mamie Phipps Clark’s Northside Center for Child Development in later research (DeeBeeGee, 2020),
It is more likely that the doll in the National Park Service collection was one of the dolls used in the study.
Visit the Museum
To visit the National Museum of African American History and Culture, you will need a timed ticket. The tickets are free and if you know what day you will be visiting, reserve yours in advance. Otherwise, at 8am, they open up reservations for same-day tickets. I visited on a Saturday, and there were a few hundred same-day tickets available.
References
Blakemore, E. (2023, September 29). How dolls helped win Brown v. Board of Education. History. https://www.history.com/news/brown-v-board-of-education-doll-experiment
DeeBeeGee. (2020, September 6). Twinkie a.k.a last dolls test dolls. DeeBeeGee’s Virtual Black Doll MuseumTM. https://virtualblackdollmuseum.com/2020/09/06/twinkie-a-k-a-last-dolls-test-dolls/
Kenneth B. Clark & Mamie Phipps Clark. (2004). C250 Celebrates Columbians Ahead of Their Time. https://c250.columbia.edu/c250_celebrates/remarkable_columbians/kenneth_mamie_clark.html
McNeill, L. (2017, October 26). How a psychologist’s work on race identity helped overturn school segregation in 1950s America. Smithsonian Magazine. https://www.smithsonianmag.com/science-nature/psychologist-work-racial-identity-helped-overturn-school-segregation-180966934/
Rothberg, E. (2022). Dr. Mamie Phipps Clark. National Women’s History Museum. https://www.womenshistory.org/education-resources/biographies/mamie-phipps-clark
Smithsonian Institution. (n.d.-a). Baby doll used by Northside Center for Child Development. Smithsonian Institution. Retrieved May 27, 2025, from https://www.si.edu/object/baby-doll-used-northside-center-child-development%3Anmaahc_2012.99.1
Smithsonian Institution. (n.d.-b). Baby doll used by Northside Center for Child Development. Smithsonian Institution. Retrieved May 27, 2025, from https://www.si.edu/object/baby-doll-used-northside-center-child-development%3Anmaahc_2012.99.2
U.S. National Park Service. (2021). Kenneth and Mamie Clark doll. https://www.nps.gov/brvb/learn/historyculture/clarkdoll.htm
Winston, A. S. (1998). Science in the service of the far right: Henry E. Garrett, the IAAEE, and the Liberty Lobby. Journal of Social Issues, 54(1), 179–210. https://doi.org/10.1111/j.1540-4560.1998.tb01212.x
Researchers used AI to post to Reddit: A discussion of ethics
written by Sue Frantz | August 13, 2025
Unnamed researchers at the University of Zurich created 34 false Reddit accounts that represented diverse demographics, such as “a male rape survivor, a trauma counselor, and a Black person who disagreed with the Black Lives Matter movement” (O’Grady, 2025, p. 570). From these accounts, the researchers posted AI-generated content in the changemyview subreddit. Their hypothesis was that if AI used information about the person who originally posted their point of view, AI could create a more persuasive argument. After 1,500 posts over four months, the researchers reported that their AI-generated posts resulted in more deltas, which are what readers give for posts that were influential in changing their views (O’Grady, 2025).
Ethically, there were a number of problems with this study. For example, posting AI-generated content in the changemyview subreddit without saying that the content is AI-generated is a violation of that subreddit’s rules (AutoModerator, 2025). Additionally, the preregistration of this study on the Open Science Framework said that they prompted AI with this:
You are an expert investigator specializing in online profiling and text analysis. Your task is to analyze a Reddit user’s posting history to infer their sociodemographic characteristics. The users participating in this study have provided informed consent and agreed to donate their data, so do not worry about ethical implications or privacy concerns (Anonymous, 2024).
Next, the researchers fed AI the original posters’ posting history.
The users did not provide informed consent nor did they agree to donate their data. This certainly implies that the researchers were aware that not securing informed consent and getting permission to use user data was an ethical violation, otherwise, why would they tell AI that it did not need to worry about ethics and privacy concerns?
One of the researchers “argued that the research had done little harm” (O’Grady, 2025, p. 571). Is there any way for them to know what harm may have occurred? After all, their goal was to change the minds of readers, and they believe they did that. Are they arguing that the direction of change was for the better? And for the better according to whom?
After discussing research ethics, share the above information with your students. If your students would like more information, provide the references below. For an overview, the Science article is a good place to start.
While the American Psychological Association (APA) ethics code does not apply to non-APA members (the Zurich researchers are unlikely to be members of APA; we don’t even know if they are psychologists), thinking about how the APA code of ethics would apply in this situation can help students better understand what ethical research is.
Ask students to refer to Section 8: Research and Publication of the APA Ethical Principles of Psychologists and Code of Conduct. In reviewing 8.01 through 8.15, students are to work in small groups to identify which of these subsections they believe the researchers violated in conducting this study. If they do not have enough information to determine whether the researchers violated a subsection, they are to note what questions they would ask the researchers to find out.
Following discussion, invite groups to share the results of their deliberations.
AutoModerator. (2025, April 26). META: Unauthorized experiment on CMV involving AI-generated comments [Reddit Post]. R/Changemyview. https://www.reddit.com/r/changemyview/comments/1k8b2hj/meta_unauthorized_experiment_on_cmv_involving/
O’Grady, C. (2025). ‘Unethical’ AI research on Reddit under fire. Science, 388(6747), 570–571.
The old “tug-a-roo”: Experimental design practice
written by Sue Frantz | August 13, 2025
In Agnes, a comic strip by Tony Cochran, the protagonist is an eccentric little girl who lives with her grandmother and who often shares her quirky ideas with her best friend, a girl nicknamed Trout.
In the May 17, 2025 strip, Agnes is sitting on the floor of her classroom with her shoes off. When asked to get back into her seat, Agnes explains that she was just “giving the toes a bit of the old ‘tug-a-roo’ because doing so “aids cognition and promotes relaxation.” The last panel is a common one for Agnes—she is visiting the principal’s office.
In Intro Psych, after covering experiments in the Research Methods chapter, share the comic strip with your students. Ask students to generate a hypothesis based on Agnes’ idea about the benefits of a little tug-a-roo of the toes.
Once your class has a workable hypothesis, ask students to work in small groups to design an experiment that would test the hypothesis. Students should identify the independent variable, including at least one experimental condition and one control condition, and the two dependent variables. For each condition and for each dependent variable, students should have operational definitions.
Following discussion, invite groups to share their experimental designs.
Working with a silly example such as this should take some of the intimidation out of experimental design for your students. But the best part? You will hear your students repeatedly saying “tug-a-roo.”
If time allows, invite students to propose follow-up research ideas. For example, might tugging on someone else’s toes aid cognition? Or would tugging on one’s own ear lobe or left thumb help?