EDUCAUSE Live! ECAR National Study of Undergrads and Information Technology 2011: Liveblog
12/15/2011
11:46am
The presentation has moved into the Q&A session, so I’m going to wrap up here. Be sure to check out the report and the 2011 study infographic. As we slide into the winter break, I hope to have time to read the report myself and write about some of their findings in this blog.
___________
11:41am PT
Where do students say they learn the most?
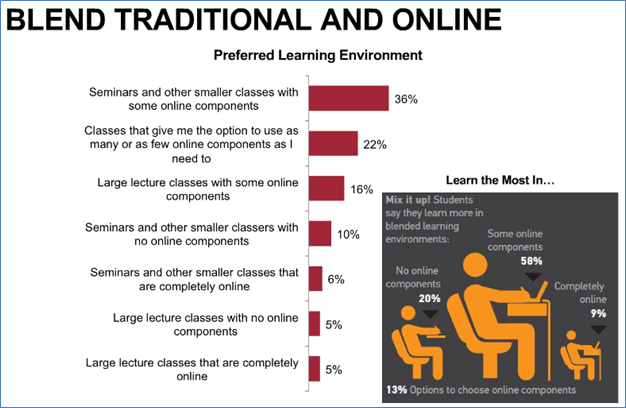
Source: EDUCAUSE Live Presentation, 12/15/2011
___________
11:34am PT
Basically, students don’t think instructors are using technology effectively. How can we make better use of the technology we have?
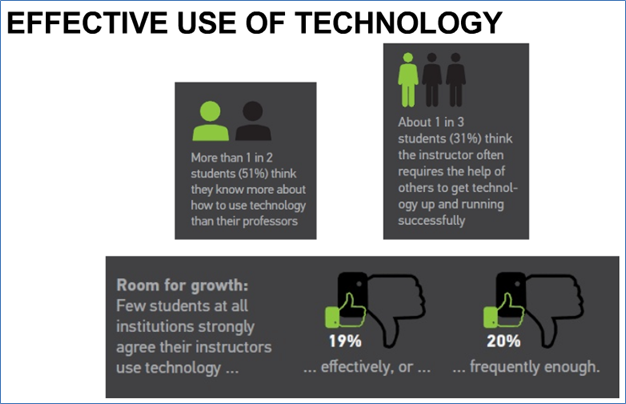
Source: EDUCAUSE Live Presentation, 12/15/2011
___________
11:29am PT
What do students want instructors to use more often? The top three.
Email: 39%
Course management system: 32%
Ebooks/etextbooks: 31%
Interestingly, Facebook: 15%.
___________
11:26am PT
How are students using their smartphones?
How about registering for courses? 22% have. Does your institution have a mobile-friendly registration process?
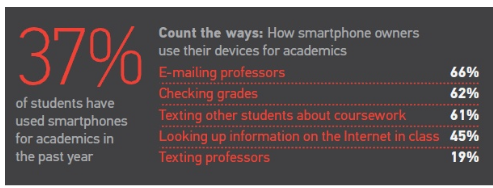
Source: EDUCAUSE Live Presentation, 12/15/2011
___________
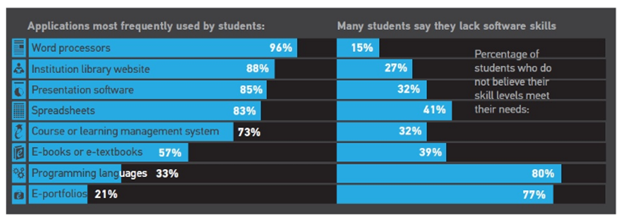
11:24am PT
The most valuable technologies for the students in the survey sample?
Word processors: 76%
Presentation software: 66%
College library website: 45%
Skipping down the list…
Ebooks or etextbooks: 25%
Online forums: 16%
___________
11:20 am PT
Source: EDUCAUSE Live Presentation, 12/15/2011
___________
11:18am PT
How many of these devices do you have?
(“Susan Grajek, EDUCAUSE: It is uneven. As you’ll see later, more students at masters and doctorals use mobile devices; more at community colleges use desktops”)
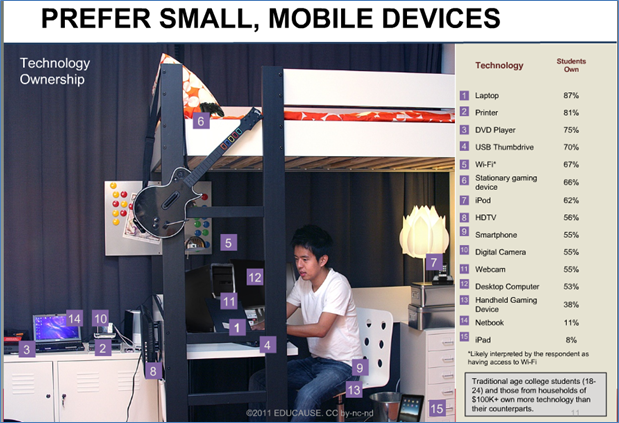
Source: EDUCAUSE Live Presentation, 12/15/2011
___________
11:14am PT
Source: EDUCAUSE Live Presentation, 12/15/2011
___________
11:11 am PT
Check out the 2011 study infographic.
___________
11:08am PT
Two studies conducted in 2011: Traditional study with 145 institutions participating and a “national sample of undergraduates drawn from a consumer panel.”
___________
11:03am PT
___________
11am PT
“In this free hour-long session, “ECAR National Study of Undergraduates and Information Technology, 2011,” Susan Grajek and Eden Dahlstrom will discuss the groundbreaking year for the EDUCAUSE Center for Applied Research’s annual National Study of Undergraduates and Information Technology and plans for 2012.”