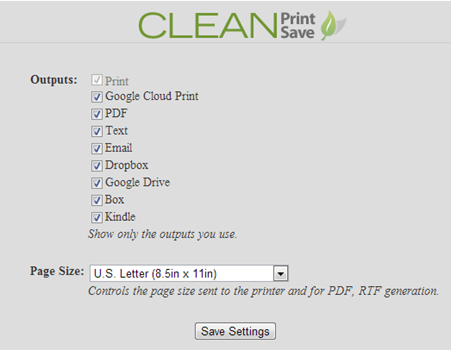
In March 2012 I wrote about SendHub, a platform for texting a group of people all at once. Cel.ly is a similar service with a free space for educators. Unlike SendHub, with Cel.ly, students do not see my phone number and I do not see their phone numbers.
When I started texting students en masse – first with SendHub, now with Cel.ly – I wasn’t sure what to think of it. Should I insist that the only acceptable means for electronic communication between students and me be email? Well, why? There are certain communications where email is appropriate, but sometimes a quick question/answer is better handled via text. Last week after class, I emailed my students a questionnaire that I wanted them to fill out and bring with them to class. I texted my students to tell them to check their email. At the same time I scheduled another text to go out a few days later asking if they had completed the questionnaire yet, and I scheduled another one to go out the morning of class reminding them to bring the completed questionnaire with them to class. This is more hands-on than I generally am with my students, but it was really important to me that they bring the completed questionnaire to class because of what I wanted to do during class time – and I didn’t want to spend class time waiting for students to complete the questionnaire.
I have to tell you, it’s a pretty powerful feeling to know that when I hit send on a text message to my class all of my students will likely be reading that message within seconds. Granted, may be doing it during class with one of my colleagues. In that case, Me: 1, Colleague: 0.
You could make use of the testing effect by periodically texting students questions relevant to your course material. Attach points to it or not. All correct responses received within 60 minutes earn one point with five points going to the best answer. Schedule the questions to go out at different times of the day so that students aren’t disadvantaged because you’re sending out questions when they’re always in Chemistry or, worse yet, driving home.
Let’s take a look at Cel.ly
While I wish that the Cel.ly interface looked a little more like it was for grown-ups, it is possible to do everything you need to do via text message (or the smartphone app) and never visit the website. If you use the website or the app, it’s intuitive. If you want to manage it all from your phone, you’ll need this list of commands. Of course you can mix and match. Use Cel.ly when you’re at your computer, but use the Cel.ly app or your text messaging app when you’re on the go.
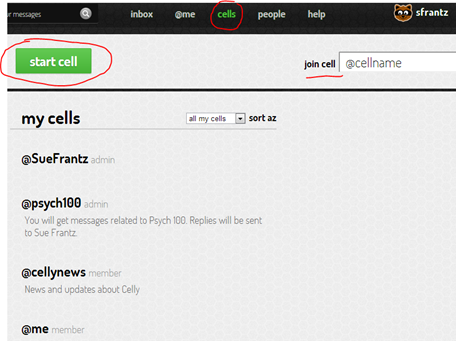
In Cel.ly, you create different “cells.” You may have a cell, for example, for each of your classes, a cell for the club you advise, and a cell for your department.
Creating a cell
After creating a Cel.ly account, click on “cells” at the top of the screen. Click “start cell.”
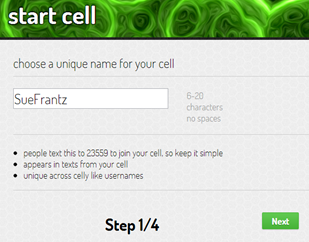
In step one, choose a cell name.
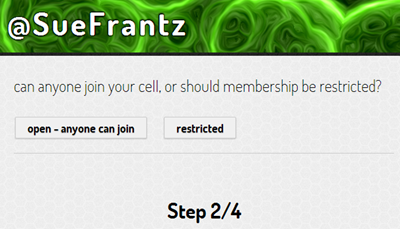
In step 2 decide who can join. If you choose “restricted,” you can decide what sort of information you want the person to provide, such as a username or short bio. Or you can enter a password, so that only those with the password can join. My class cells are open. Who wants to get announcements for my class if they’re not actually in the class? Of course as the cell administrator, I can kick out whomever I’d like.
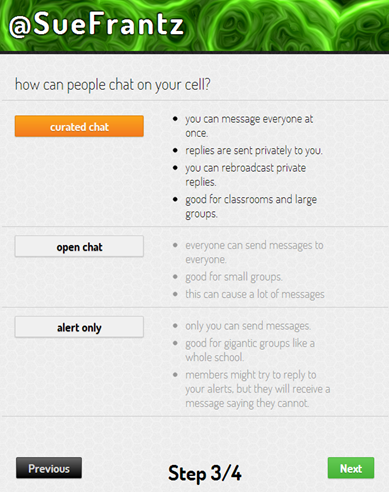
In step three decide how you want to manage texts that are coming and going. If you are using this for your class, curated chat is the safest bet. This is the setting I use for my classes. When students reply, the messages come to me privately. I can choose to respond to just that student or to the entire class.
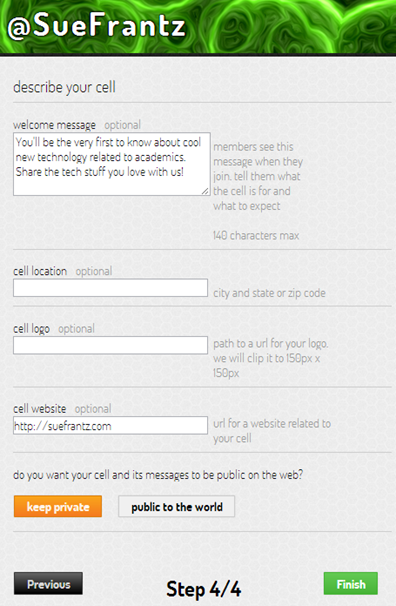
In step four provide some information about your newly created cell.
How others can join your cell
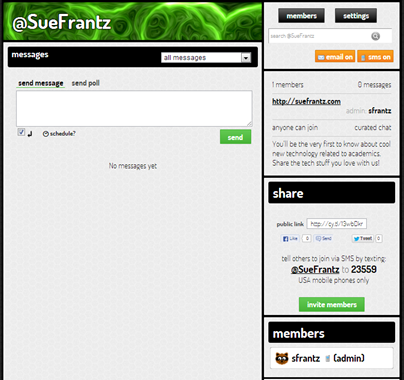
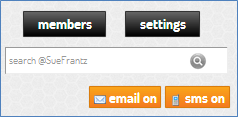
Now when you click the “cells” link at the top of the page, you will see a link to your cell. This is the page for my new cell. In the share box on the right, you can see there are a couple ways people can join this cell. You can just give people the public link, in this case http://cy.tl/13wbDkr. Or you can give them the texting instructions below that. For my class cells, I put the texting directions on my syllabus. (You are welcome to join this cell to see how it works from a student perspective. It is easy to leave the cell when you are ready. Just reply to a text from the cell with the word stop in the body of the message.)
Receiving messages
In the top right corner, you see two orange buttons: “email on” and “sms on.” Every time a text is sent to this cell, you will get both an email message and text message (sms) by default. If you don’t want text messages sent to your email, click the “email on” button, and it will turn to “email off.” If you choose to not get messages to either email or text message, you’ll need to use the smartphone app or the web interface.
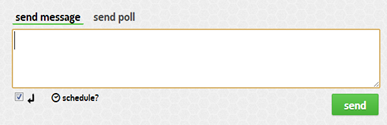
Sending messages
Messages can be sent from the Cel.ly web interface just by entering your message in the message box. Or you can send them from either the Cel.ly app or from your text messaging app. In the latter case, I would send a text message to 23559 with @SueFrantz in the message, and that message will be sent out to everyone in the cell. If I just wanted to send to one person, I would enter there Cel.ly @username.
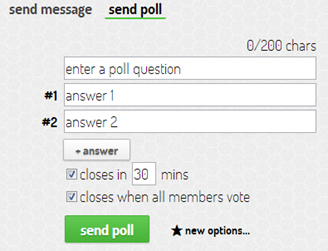
Sending a poll
Clicking “send poll” in the web interface gives you this screen. Here I have the question set to close in 30 minutes or “when all members vote”.
This is a question I sent out to my students.
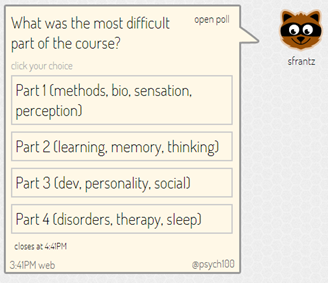
This is what it looked like in the Cel.ly app on my phone after two answers arrived.

This is what the final poll results looked like on the web interface.
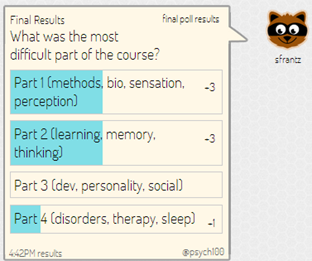
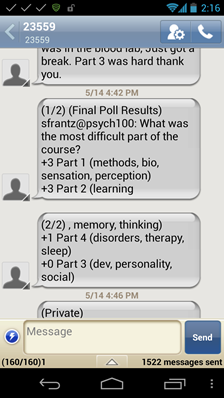
When the poll closed, the results were automatically texted to everyone in the cell. This is what they looked like in text form.
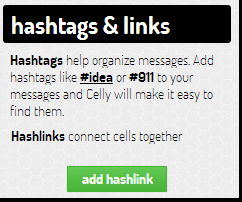
Hashlinks
If you have separate cells for each of your courses, you might want to create a hashlink so you can communicate with both classes with one message. For example, if you have two sections of a course, and you have information you want to share with both sections, you can create a hashlink so any time you include that hashlink in the message, it will shared with students in both sections.
This “hashtag & links” box is on the right side of your cell’s page.
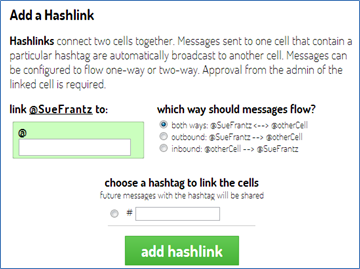
Click the “add hashlink” button to get this screen. Choose what other cell you want to link to your current cell. And then choose a hashtag. Let’s say that I had two cells, one for each section of a course. Let’s say that they are named @psycha and @psychb. I can create a hashtag, say #psy that will allow me to post to both cells with just one text message.
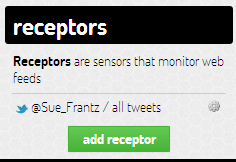
Receptors
You can add an RSS or Twitter feed, so that new content from that feed is texted to everyone in your cell. Here I’ve add my twitter feed so that any tweet I send out will automatically sent as a text message to everyone in the cell. Instead of sending out all tweets, I can add a “search filter,” like a twitter hashtag, so that only tweets from me that contain that hashtag will be sent out to everyone in the cell. (If you decide to join this cell just to see what it’s like, know that I’ve deleted this “receptor” – you won’t get a text message every time I tweet!)
Conclusion
Try it out. Encourage your students to join your class cell. You may discover all kinds of uses for it. Just don’t get too carried away with your new-found power!