Are You Safe and Secure?
Your computer files. Are they locked away from prying eyes? Are they backed up? Are they backed up offsite, away from fire and flood danger?
For the most part, I don’t have super-secret data on my computer. I teach psychology.
My work computer is a laptop that I tote around with me. I have never had my laptop stolen, but that was true for everyone who had their laptop stolen for the first time.
Security I already have in place
If I left my computer sitting on the roof of my car, it blew off on the 405 and rendered junk by a passing Kenworth, I would still have access to my files through Dropbox.com. I used to have an external hard drive at home I would use for backup, but it occurred to me that this would not help in case of, say, a fire at home. I’m a big fan of offsite backup.
In the case of mischievous riffraff, the thief needs to get into my laptop by guessing or bypassing my computer login. Once in, if they go into my web browser, they won’t be able to automatically log in to sites like Barnes and Noble or, more problematic, Wells Fargo. None of that username/password information is stored in my browser. All of that is stored in LastPass (see this blog post). When I travel with my laptop, I tell LastPass to log me out every time I close my browser. Even so, if I discovered my laptop stolen, I would immediately hop on my smartphone, tablet, or someone else’s computer and change my LastPass password. Just in case.
But all of my files and folders are theirs to see. Granted, I don’t much care if they want to read my syllabus, in fact, that would be kind of nice. I can’t imagine anyone being interested in committee meeting minutes. Reading those might be punishment enough for stealing my laptop. Student grades and assignments are more problematic. Realistically, does the average computer thief really care what Jane or John Doe got on their first psych exam? Probably not. But that doesn’t mean I’m not nervous about it.

Folder Lock ($39.95, free trial).
With Folder Lock, I can lock or encrypt files or folders. There is a lot of encryption software out there. Folder Lock gets high marks for both security and usability.
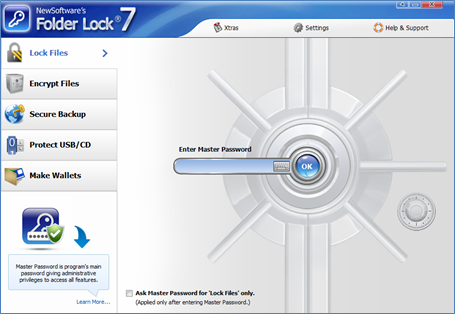
After downloading and installing Folder Lock, you’ll be asked to create a master password. Make it good. And do NOT forget it. Repeat: Do NOT forget it. And do NOT write it on a sticky note you put on your monitor. Nothing kills security faster than handing the keys to the thief. I have my password saved as a “secure note” in LastPass.
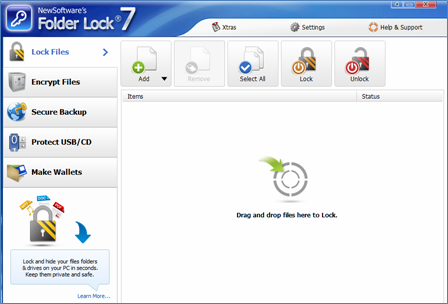
Locking a file or folder
Folder Lock is ridiculously easy to use. To lock a file or folder, navigate to the file or folder location, then drag and drop into Folder Lock.
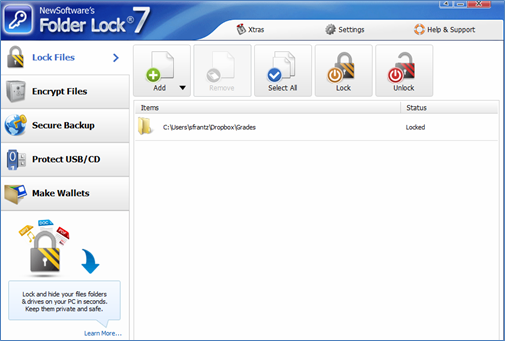
Here I have added a folder. With the folder “locked,” it no longer appears in the original folder. It’s there, but it’s hidden. In fact, since this is a Dropbox folder, I still have access to it everywhere I have Dropbox installed. [That means that I had better have good security on my mobile devices – at minimum a lock screen. Save yourself the worry and install Lookout Mobile Security ($30/year and worth every dime) – locate your mobile device or wipe it clean.] If I want to access this folder from this computer, I have to go into Folder Lock and double-click on the folder. If I click on it once, I can unlock it (it will be visible again) or remove it (it will also be visible again). Which option I choose depends on whether I’m going to want to lock it again or not.
Encrypting a file or folder
This is upping the security significantly. Encryption scrambles the file data so that it’s unreadable to everyone except the person who holds the key. In this case, your key is your Folder Lock master password. If you are going to be storing sensitive data in the cloud, say in Dropbox or any other web-based storage service, encrypt it before storing it.
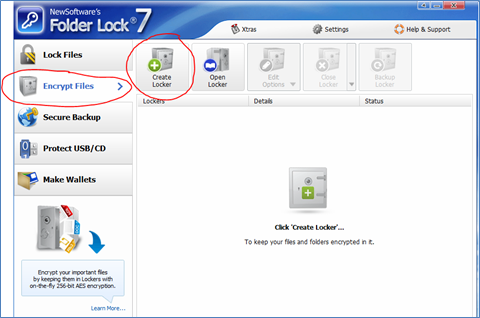
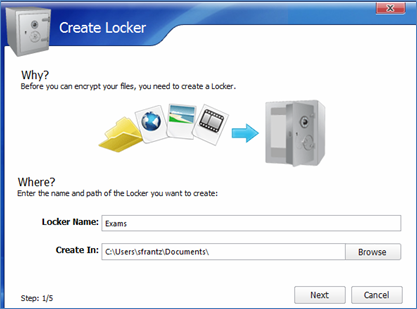
In Folder Lock, encrypted files or folders are stored in “lockers.” Click “Encrypt Files” and then “Create Locker.”
Name your locker and identify where you’d like that locker to be stored.
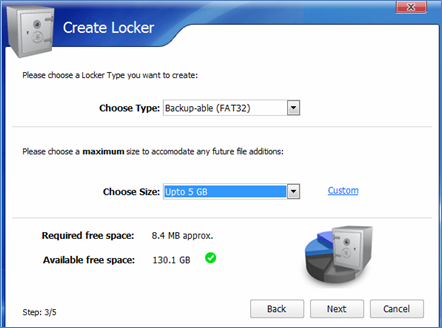
Next you’re asked to create a password for the locker. Don’t forget this one, either. (Create another secure note in LastPass!). Now choose “type” – the default is fine. Choose the maximum size for this locker – how much crap are you going to want to store in here?
After the very satisfying congratulatory message at having set up your locker, let’s go back to the main Folder Lock program. We see the locker we just created.
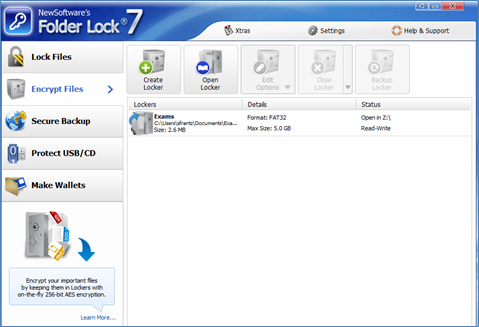
In fact, Folder Lock has created a whole new drive on my computer. It acts just like any other drive. Copy or move stuff into it like you would any other folder.

When you exit Folder Lock, you will be asked if you want to close this locker. Say yes. With Folder Lock closed, the drive will disappear. To access it, you need to run Folder Lock again. Here you can see my locker status shows that it’s closed. To open it, double-click on the locker and enter your locker password.
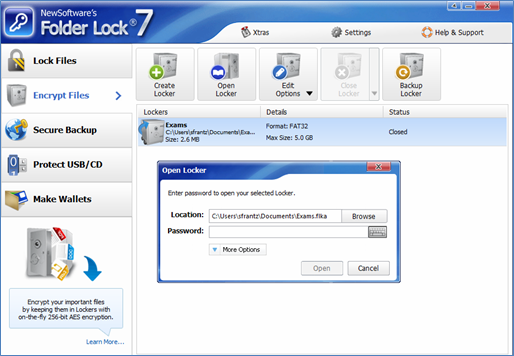
The folder with the locker contents will open, and the new drive will appear again.
Backup
If you don’t want to save your encrypted files or folders in Dropbox or some other cloud-based storage service, you can use Folder Lock’s secure backup. Folder Lock will not be able to access your files. They were encrypted (scrambled) on your computer. The only way to unscramble them is to have your password, which Folder Lock doesn’t have. That’s why you can’t ever forget your master password! There’s a storage fee depending on how much space you want. The smallest amount, 10 GB, is $5/month.
Backups are done automatically. All you have to do is save your files like you normally do, and Folder Lock will drop them in the queue for uploading.
Protect USB/CD and encrypt email attachments
Need to take your encrypted files with you on a flash drive? Use this option to copy your existing lockers or create new lockers on a flash drive or other portable media. If you lose your flash drive, no worries. No one can get into your files without your master password.
When you encrypt email attachments, Folder Lock compresses them into a password-protected zip file. The recipient will need to extract the files using a zip program like the free 7-Zip. The recipient will be prompted to enter a password – give them the password you attached to the file when you created it. For obvious reasons, it’s best not to do this in the same email message as the password-protected file.
A quick note on email. Email is the least secure method of sending information. In fact, at many institutions, email is considered public communication. Your IT staff – and the IT staff of your recipient(s) – can easily read your email. They probably aren’t as a matter of course because, frankly, your email is as exciting as your committee meeting minutes. That and they have plenty of their own email to read.
Folder Lock isn’t the only tool that can password-protect attachments. The aforementioned 7-Zip can password-protect zip files. But if you’re already in Folder Lock, you can do it with a couple clicks of the mouse. This feature alone, however, is not a reason to purchase Folder Lock.
Make wallets
Keep all kinds of stuff in this password-protected space – like your credit card information. This isn’t a feature I use; anything I would store in here I already have stored in LastPass.
Xtras and settings
With these buttons at the very top of the Folder Lock screen, you can do things like shred files, or go into “stealth mode” where it’s not obvious that you even have Folder Lock installed. When you go stealth, you’ll be asked to set a hotkey combination. That’s the keyboard combination you’ll use to run Folder Lock. Don’t forget that, either!
Conclusion
Up your security. You’ll sleep better at night.