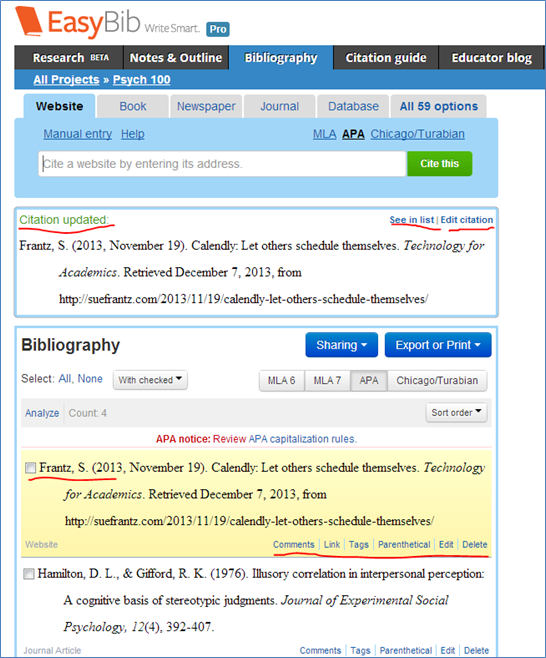
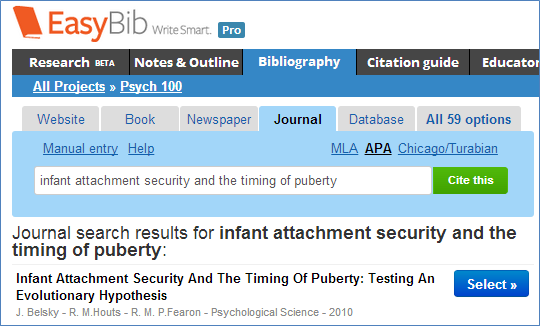
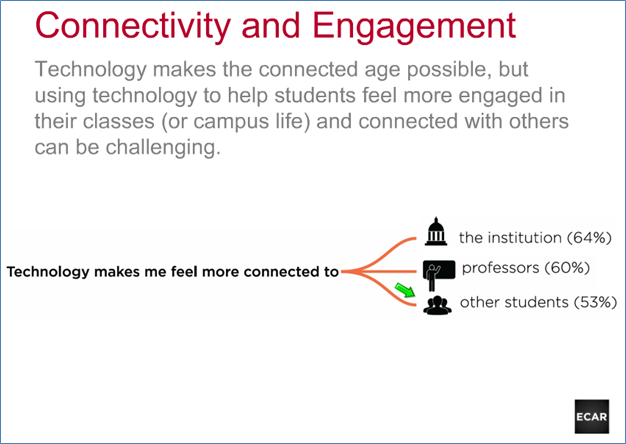
In 2011 I wrote about YouCanBook.Me (see this blog post), the very cool service that lets others schedule themselves into your calendar. YouCanBook.Me has business as its target audience, so many of its features are more than what the run-of-the-mill academic needs. Calendly has arrived on the scheduling scene with a manageable set of features in a user-friendly interface. Like YouCanBook.Me, Calendly will sync with your Google Calendar. Those who have been intimidated by YouCanBook.Me will find Calendly to be as approachable as a golden retriever puppy.
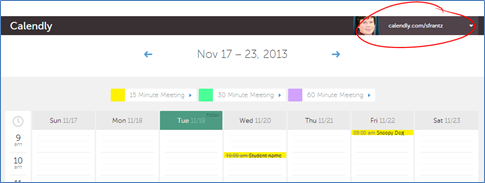
What Calendly looks like from the student’s perspective
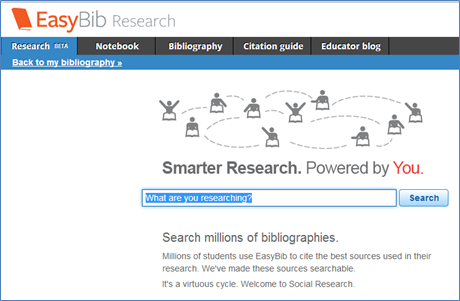
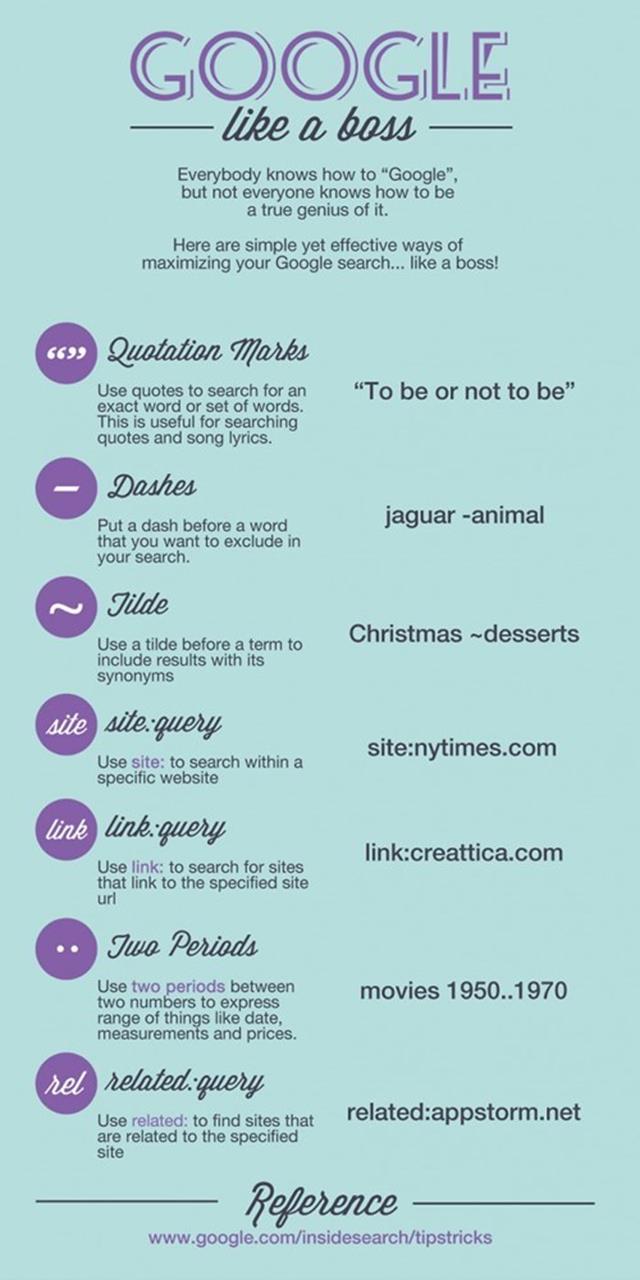
A student goes to my Calendly calendar: http://calendly.com/sfrantz.
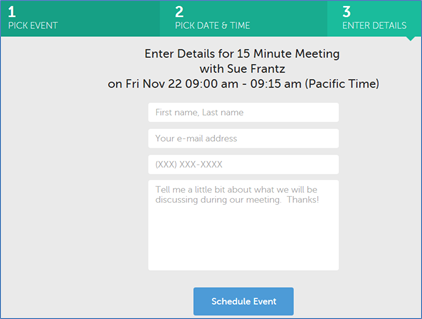
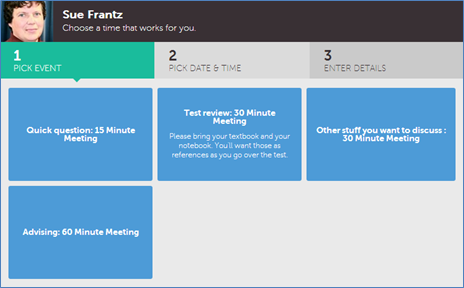
In step 1, students click on any of the 3 (customizable) meeting options. I selected “15 Minute Meeting” for this example.
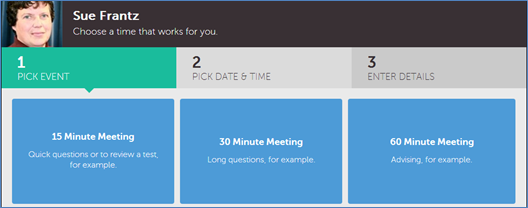
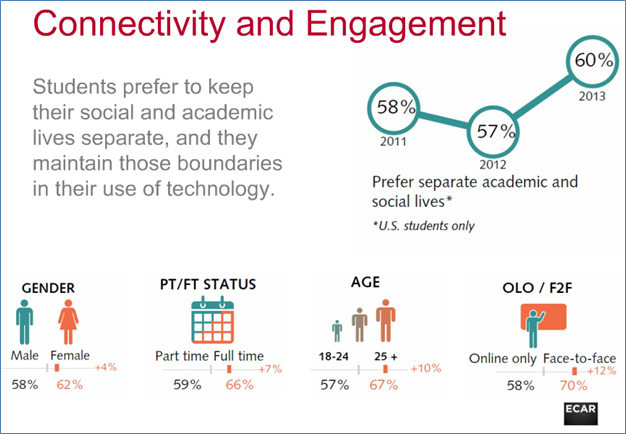
In step 2, students see today’s date blocked in green. The available options show in blue. The student can navigate to a different week. While the time zone defaults to whatever time zone the student’s computer is set at, the student can select a different one.
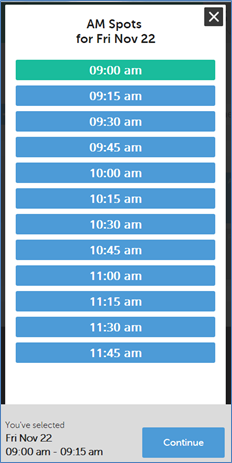
A student clicking on the Friday AM option generates this popup where the student has chosen 9:00 am. The selection turns green, and the choice is noted at the bottom of the popup screen. The student clicks “Continue.”
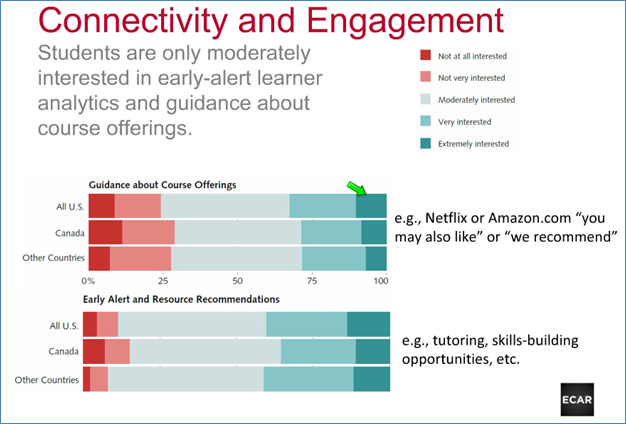
In step 3, the student enters their name, email address, phone number, and answers an open-ended question. In the settings you’ll see below, the name, email address, and phone number are questions built in to the program. The open-ended question is optional and customizable.
Here are the responses for a sample student.
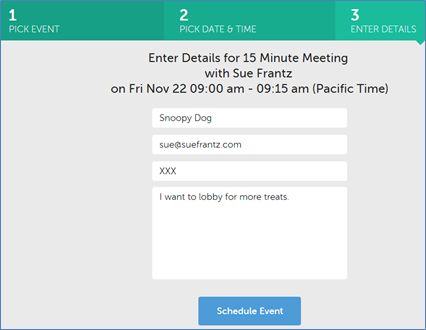
I apparently moonlight at a dog obedience school.
This is the confirmation screen. I like that students are able to add this appointment directly to their own calendar.
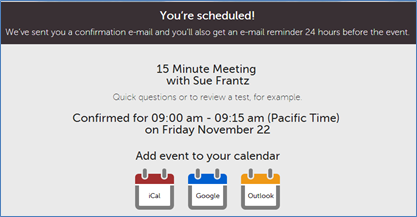
This is what’s generated when the student selects “Google.”
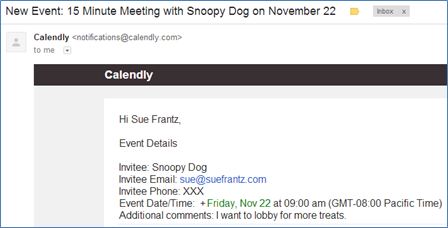
Regardless of whether the student adds the event to a calendar, the student gets an email with the pertinent meeting information as well as another opportunity to add the meeting to a calendar. And, like YouCanBook.Me, there is a link for canceling the meeting. If the student cancels, there will be a text box where the student can add a comment. The event will be removed from my Google Calendar and an email will be sent to me. [Correction: The event isn’t removed. “Canceled” is added to the front of the event name and the event is marked as “free” instead of “busy.” I like this even better than having the event completely disappear.]

As the owner of the calendar, I also get an email about this appointment. The email gets sent to my gmail account since that’s the email account that was used to create the account. While I’d rather have Calendly notifications sent to my college email address, at this writing there is no mechanism to change it, however one of the developers tells me that they are working on adding that feature.
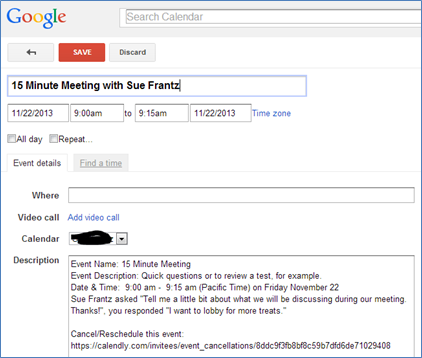
And, of course, the genius of the whole system is that it’s automatically added to my Google Calendar.
And here’s what the entry looks like. Pay particular attention to the note at the bottom: “Should you need to cancel the event, Calendly recommends you use the event cancellation feature in Calendly.” Later in this post I’ll return to why you would want to cancel this way and how to do it.
Setting up Calendly
When setting up your account, because Calendly uses your Google Calendar, you will be asked to give Calendly permission to connect to your Google account. Granting permission takes a couple of steps but it’s painless.
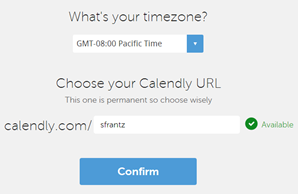
Next, fill in your time zone and your Calendly URL. This URL is what you’ll be giving to students.
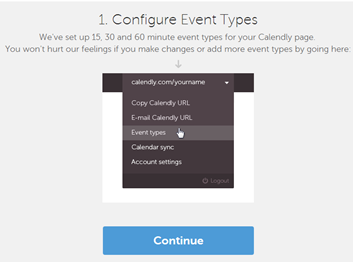
The next couple screens tell you what to do once your account has been set up. You won’t do any actual configuration at this point.
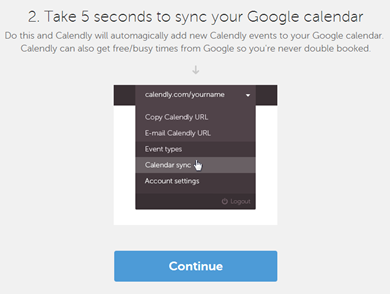
No configuration here either.
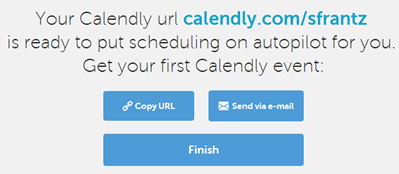
Now you’re ready to go. You can skip the “copy URL” and “Send via e-mail” buttons. Until you do some customization, you’re not going to be ready for anyone to use your Calendly scheduler. Click “Finish.”
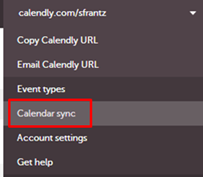
Synching with Google Calendar
Use the dropdown menu in the top right corner of your Calendly dashboard. (You can always get back to your dashboard by going to Calendly.com and clicking on “Go to Calendly dashboard” in the top right corner of the screen. Your dashboard is actually a calendar that shows all of your Calendly appointments and only your Calendly appointments. Even though my calendar is synched with my Google calendar, none of my other Google calendar appointments appear here. While Calendly does know my free and busy times from my Google Calendar, it doesn’t look like that here.
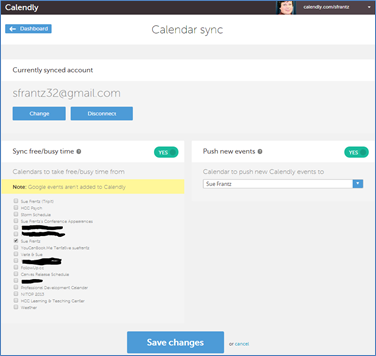
Let’s start by synching Calendly with Google Calendar. After selecting “Calendar sync” click the “Sync” button and tell Google that you’re giving Calendly permission to access your calendar.
Once Google knows you’re fine with Calendly, you’ll get this screen. On the left you can choose which of your Google calendars you want Calendly to check for free/busy times; choose as many as your like. On the right, tell Calendly which calendar you want your appointments to appear on. When done, click “Save changes.”
Customizing event types
From the dashboard dropdown menu, select “Event types.”
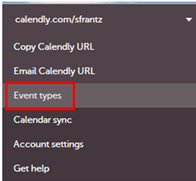
“Event type” is Calendly-speak for “appointment options.” They start you off with 3 options, but you can edit, delete, and add to your heart’s content.

After doing some editing, these are the options my students how have.
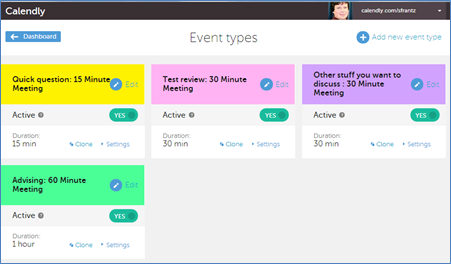
The color coding only appears in the dashboard because these are the colors that will be attached to these appointments in the Calendly dashboard. The color coding does not carry over to Google Calendar. And the color coding doesn’t carry over to the Calendly student view. The blue boxes that students appear in row order by length of meeting. They cannot be moved, although this would be a very desirable feature. Don’t be surprised if this functionality appears in a later version of the service.
In dashboard view, click “edit” for the “event type” you’d like to edit. Here are your options.
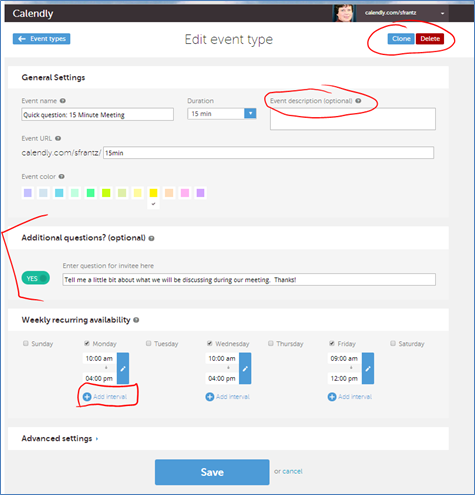
Clone/delete. Clone will copy the event exactly as is, and it will add “clone” to the event name. You can then change the name of the event and any other features you’d like to be different.
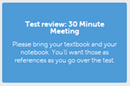
Event name/duration/event description. The event name will be the blue box that appears in the student view. Name it whatever you’d like, but it’s probably a good idea to keep the length of the appointment in there so students know from the beginning what kind of time commitment they’re making. In “Duration” choose how long you’d like this particular appointment to be. Your shortest option is 15 minutes; your longest is 12 hours(!). The optional event description is a subtitle that appears in the student view blue box. I used an event description in the “Test review” event.
Event URL. The event URL will default to something based on the event name. Here’s a nifty feature. If I’m sending out an email to my advisees reminding them that it’s time to make an appointment, I can just send them the advising appointment URL. That URL will take them directly to that event; my advisees won’t have to select from the array of boxes. By giving them the URL, I have effectively selected the “advising” box for them.
Event color. Choose the color you’d like for the event. But remember, color-coded events will only appear in the Calendly dashboard calendar and no where else.
Additional questions. If you toggle this to “Yes,” you’ll be able to enter your additional question. This question appears at the point of making the appointment when the student is entering their contact information.
Weekly recurring availability. Choose the days you’re accepting appointments. This could be different for each event type. Maybe you only want to accept advising appointments on Thursday and Friday mornings. For that event type only select Thursday and Friday mornings. This means that even though your Google Calendar shows you’re available at other times, anyone who selects the advising blue box will see that the only options are Thursday and Friday mornings. The “add interval” option is handy. If you always want to have 2pm to 3pm on Wednesdays set aside for nap time, you can either schedule into your Google Calendar showing that you’re busy at that time, or you can have your available times on Wednesday be 10am to 2pm and “add interval” for 3pm to 5pm. The in-between time of 2pm to 3pm on Wednesdays would be blanked out by Calendly.
In “Advanced settings”…
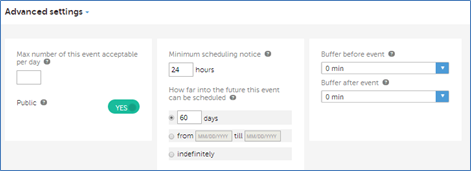
Max number of this event acceptable per day. If this is your advising event type and you can only handle advising no more than 4 students per day, then enter 4 in this box. While it’s an interesting feature, I’m not sure that I have a use for it.
Scheduling notice. Calendly defaults to 24 hours. This means that the earliest appointments available to students are 24 hours from the time they look at your Calendly page. I generally prefer 12 hours, but again, this can be customized for each event type. Perhaps for test reviews, you need 24 hours advance notice but for advising, you may only need 12 hours advance notice. Choose when those appointments can be made. One term I did a “meet and greet” for extra credit. If students made an appointment and came by my office within the first two weeks of the term, it was worth a couple points extra credit (out of the 1,000 points in the course). I could create an event type where I set the from/till dates for the first two weeks of the term. After the two weeks passed, I could go into this event and switch “Public” from yes to no, making it invisible – until the next term when I can flip the switch to yes to make it publicly visible again.
Buffer. The buffer option is nice if you need time to prepare before an appointment or, say, make notes after an appointment. If I had a 10-minute buffer before an advising appointment and a 15-minute afterwards, anyone setting an advising appointment for 10am to 11am would also block off 9:50am to 10am and 11am to 11:15am on my calendar ensuring that no one else could schedule during those times.
Decide what kind of “event types” you want, and then customize each to meet your needs.
How to cancel a meeting
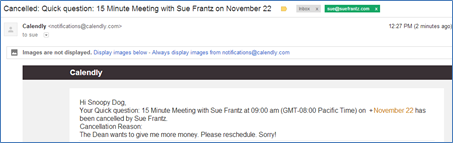
You’ve set up Calendly, given the URL to your students (or a particular event URL to a particular group of students), and students are making appointments. All is working according to plan. And then your Dean requests a meeting with you – completely bypassing your Calendly calendar, something about a pay raise – at a time you’re scheduled to meet with a student. Go to your Calendly dashboard. Click on the appointment in question. At the very bottom of the popup screen click “Cancel.” A textbox will open giving you the option to add a note to the student. Click “Cancel event.” The event will still appear on your Calendly calendar, but the text will have a line drawn through it. (What’s the past tense of strikethrough? Struckthrough?)

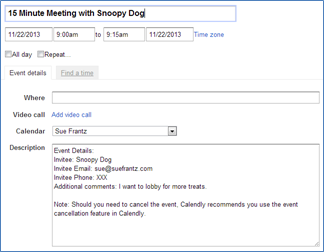
The event will be deleted from your Google Calendar. And the student will receive an email. [Correction: Again, not deleted. “Canceled” is added to the front of the event name, and the event is marked as free.]
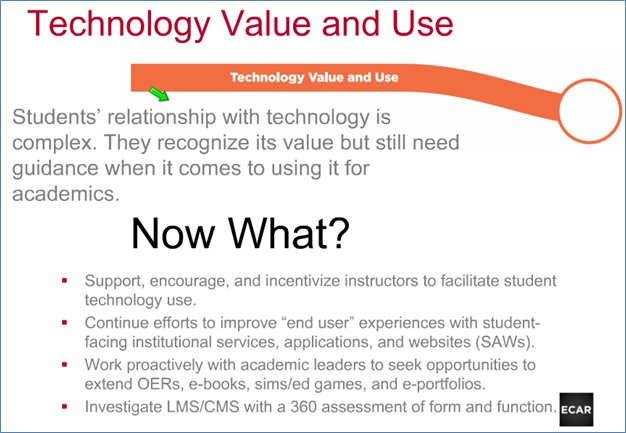
Conclusion
If you had the time to read this blog post, you have the time to set up a Calendly appointment calendar. Once you have your calendar set up, in the comments section I’d love to hear the event types you’ve created and any special settings you have for them. If you’re a YouCanBook.Me user and have decided to try Calendly, what Calendly features were the most persuasive in influencing your decision?