MaxLauncher [Windows]
I’m a big fan of keyboard shortcuts – any shortcuts, really. I want to spend less time running my computer and more time doing what needs to get done.
For Windows users, hold down the Windows key and press S. Your cursor will jump down to the Windows search box. Type in what you’re looking for, and you’re in business.
MaxLauncher ups your search and launch game. Use a keyboard shortcut to run MaxLauncher (I use CTRL – ‘), and then press a key on your keyboard to run a program, open a folder, or open a file.
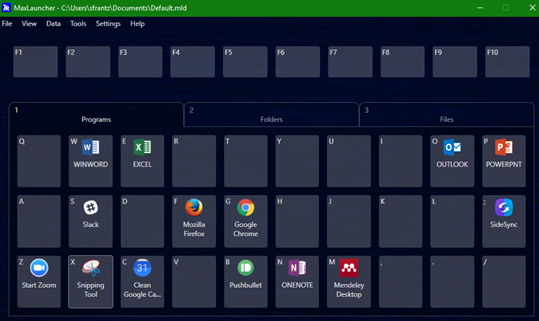
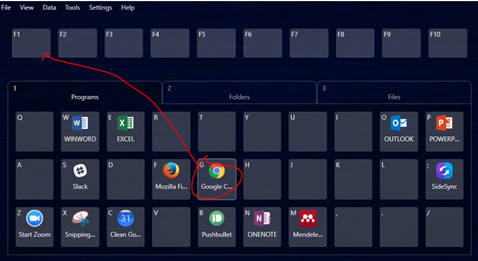
I have my programs on the first tab. To open Chrome, on my keyboard, I press CTRL – ‘ (to run MaxLauncher) then g.
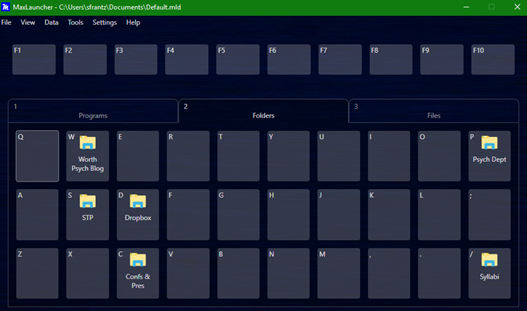
I have my commonly used folders on the second tab. To open the Psych Dept folder, CTRL – ‘ (to run MaxLauncher), then 2 (switches to the second tab), then p.
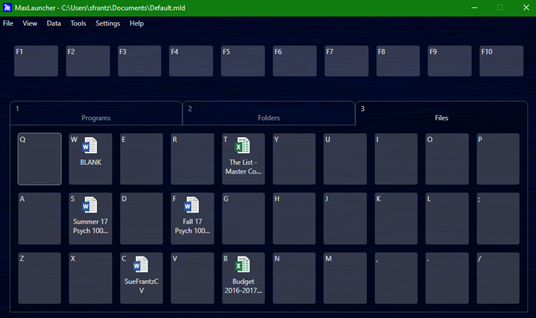
I have my commonly used files on the third tab. To open my fall syllabus, CTRL – ‘ (yep, that still runs MaxLauncher), then 3 (switches to the third tab), then f.
How cool is that?
Running MaxLauncher
Download MaxLauncher and run the installer program.
Run MaxLauncher and let’s get you set up.
-
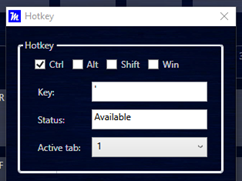
Click “Settings” and select “Hotkey”. This will be the keyboard shortcut you use to run MaxLauncher. I like CTRL – ‘ because nothing else in Windows uses that keyboard shortcut. “Active tab” tells MaxLauncher which tab you want opened when it first runs. The first tab is a perfectly fine choice.
-
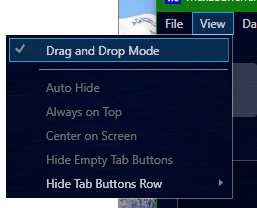
Now let’s add some programs. Click “View” and select “Drag and Drop Mode”. This allows you to, well, drag and drop stuff onto the MaxLauncher keys.
To add Chrome, we need to find it in your file and folder structure. Go to the Windows search box (mouse down or type CTRL – S) and search for Chrome. When the result pops up, right-click on it and select “open file location”.
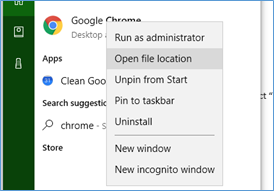
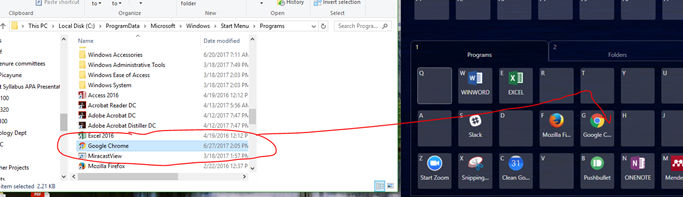
When the folder launches, Chrome will already be highlighted. Click and drag onto the key in MaxLauncher you want to use as the keyboard shortcut for launching Chrome. I chose g for Google, but any key will work. Just make sure the key makes sense to you so you’ll remember it.
Change your mind and want to use a different key? Click and drag to a different key. Want to move it to a different tab? Click and drag over, say, the second tab. You’ll see the keys for that second tab, and drop onto one of those keys.
It’s exactly the same procedure for folders and files. Find what you want and drag it onto a key.
- Rename your tabs by right-clicking on the tab and choosing “rename”.
-
Click “View” and click “Drag and Drop Mode” to unselect it. This will allow MaxLauncher to “Auto Hide” – meaning after you use your keyboard shortcut to launch, say, a program – MaxLauncher will minimize itself so it’s not hanging out on your screen.
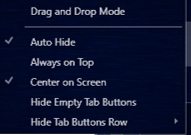
IMPORTANT: When you want to go back to adding programs, folders, or files to MaxLauncher, switch back to “Drag and Drop Mode”.
A special note about Microsoft Office
When you do a Windows search for any of the Office products, like Word, your search will give you a shortcut to Word, not the program itself. MaxLauncher needs the program; it can’t do anything with shortcuts.
In the Windows search box, type winword.exe. Right-click on the search result, and choose “open file location”. All of the Office programs should be in this folder.
Drag and drop these exe files onto MaxLauncher:
WINWORD.EXE to open Word
EXCEL.EXE to open Excel
ONENOTE.EXE to open OneNote
OUTLOOK.EXE to open Outlook
POWERPNT.EXE to open PowerPoint
Go slowly
You’re going to be tempted to put absolutely everything into MaxLauncher. Don’t – at least not right away. Choose the content you use all the time first. Once you get the hang of it – and are remembering to use it – then expand your shortcuts.
Amaze your family and coworkers
You’ll be sitting at your computer when a coworker walks in. “Hey, do you have a copy of that file we were working on?” You’ll press CTRL-‘ then F, and up will pop the file. And your coworker will say, “Whoa! What did you just do there?” Magic – just a little magic.


 Years ago you created a Dropbox account and installed Dropbox on your home computer, your work computer, your personal laptop, and maybe even a work laptop. It was, and is, a great way to access all of your files wherever you may be. Do you remember when you used to email files to yourself? Or tried to remember whether the newest version of a file was on your home computer, your work computer, or a flashdrive – wherever you might have left that flashdrive, whichever flashdrive it was? Dropbox has even more powerful functionality with Microsoft integration. You can now edit documents with others, live, via Dropbox.com. But that’s not what this post is about.
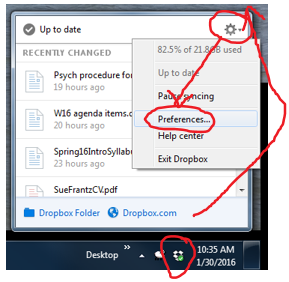
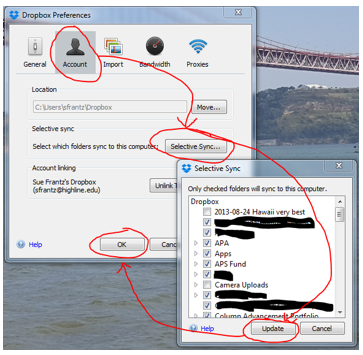 Dropbox will delete the unchecked folders from your work computer, but they will still exist at Dropbox.com. I promise. Those unchecked folders will also still sync with any other computers you have. If you want to remove, say, 2009 committee minutes from your home computer, repeat this process from your home computer.