There are two things on my computer I have open at all times: My email and my calendar. While I use the Outlook calendar, I sync it with Google Calendar so that any changes I make in one appear in the other. (How to sync Outlook and Google Calendar.)
There are a few advantages to using Google Calendar, such as.
- It syncs easily with my Android phone.
- I can use YouCanBook.Me so my students can create appointments with me on their own. (See this blog post.)
- I can see all of my scheduled FollowUp.cc reminders. (See this blog post.)
- I can share a calendar with my partner. All of our social engagements and travel go there.
Here’s another advantage. I can create a calendar for my class schedule that way I don’t have to dig out my syllabus to see what’s coming up. I can just look at my calendar. By creating it as a separate calendar, I can turn it off when I’m not using it so it doesn’t clutter up my day-to-day calendar. I can also create is as a publicly-accessible calendar so my students can also access it in their own calendars without having to dig out their syllabus.
And that’s what I did for my class. After creating the calendar, I put all of my course dates into a CSV file which I created in Excel, and uploaded to the calendar.
On the left you can see my calendars.
“Sue Frantz” is my personal calendar that I sync with Outlook. To the right you can see my “Sue Frantz” calendar items are displayed in blue.
“Psych 100” is the public calendar I created for my course. The “Psych 100” calendar items are in blue-green. (The colors are customizable.)
The “Tasks” calendar is shut off.
“Verla & Sue” is the calendar I share with my partner.
Other calendars:
“FollowUp.cc” displays my FollowUp.cc reminders.
“Weather” gives me the weather forecast for the next few days.

Create a Google Calendar
Click the “Add” link to generate this page. Put in your calendar name (I called mine Psych 100). Include a description and location if you’d like.
Crucially important: Select your time zone. When we import all of your calendar data from the CSV file, if you haven’t selected a time zone, all of your times will be off by 5 hours or so.
Check the box next to “Make this calendar public.” Or, if you’d rather just share it with the students in your class, set the permissions to “See all event details” then copy and paste all of your students’ email addresses at once. (It doesn’t much matter to me if the greater internet public knows on what date I’m covering chapter 7. Besides, my syllabus is on my website.)
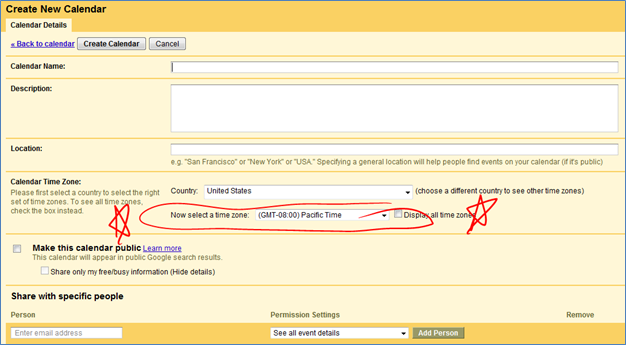
When you click “Create Calendar” at the top of the page, the page will disappear, and you’ll be returned to your main calendar page. If your new calendar isn’t there, count to five, and reload the page.
Now, just because you have a calendar doesn’t mean that anyone knows about it. Even the people you’ve given permission. Let’s do some tweaking and then get the URL to give to our students.
Click the down arrow next to your calendar. Select the color you’d like. Appearance is important.

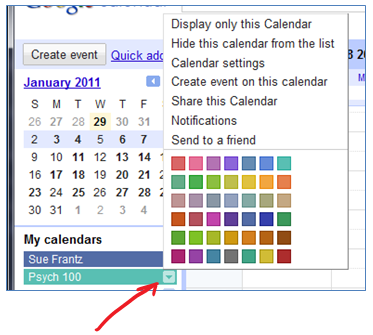
Now select “Calendar settings.” On that page, scroll to the bottom to see this.
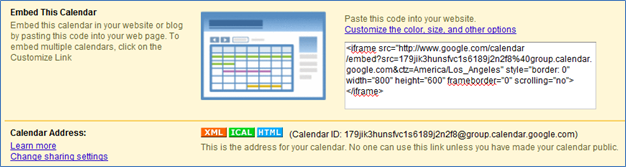
If you want to embed your calendar on a webpage, copy the html code, edit your webpage in html view, and paste the code where you want it the calendar to appear. A word of warning: Some browsers don’t allow iframes, so any visitor with such a restriction won’t see your calendar.
Alternatively, provide a link to your calendar. In the “Calendar Address” section, click “HTML” to get the URL.
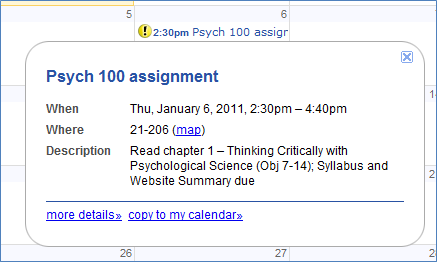
This is what the public calendar looks like.
Clicking any of the events calls up more information about the event.
At the very bottom right of the calendar is this icon. For your students who have Google Calendar, clicking will add your class calendar to their calendars.
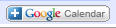
Create the CSV file
While you could click on each date and time to enter your calendar events, it would be tedious. Instead, we’re going to create a CSV file to upload to the calendar. It’s still a little work, but less tedious.
Open Excel (or any other spreadsheet program). Save the file as CSV file so the file has a .csv extension. For example, I opened Excel, went to “Save As,” typed in Psych100 and selected CSV from the dropdown menu.
Google Calendar allows no room for error. The calendar headings have to be written like this. The only two that you absolutely need though are Subject and Start Date. (To use as a template, download this CSV file here.)
Uploading the CSV file
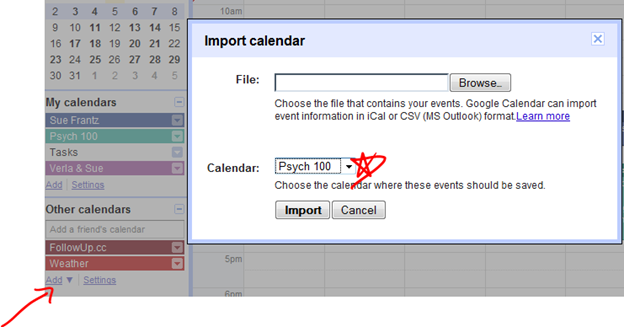
When your file is ready, go to Google Calendar, and click the “Add” link under “Other Calendars.” Select “Import Calendar.”
Before you do anything else, change the calendar to the one you want to import to, in this case I was importing to the Psych 100 calendar. You do not want to accidentally upload to the wrong calendar. If you do, there is no way to reverse the import. You will have to delete each entry manually.
Browse to the location of the CSV file you’d like to import. Then click “Import.”
Tips
Make sure the time and date cells in the CSV file are formatted as time and date. (Right click on the cell, select “Format Cells,” then click on time or date and choose the appropriate formatting. In the template, the time is set to a ‘custom’ setting. That’s okay.)
If you upload the file and the events don’t display as you’d like, you have to remove them from Google calendar manually, one at a time. You may want to only put a couple events in your CSV file to start. If they show up okay, go ahead and enter the rest.
I chose to keep my Subject entries short. Those are what will appear on the calendar when you’re looking at the week or day view. If they’re long, they’ll be truncated.
If you delete events and then try to upload them again without making any changes to the entry, you’ll get an error saying that Google Calendar wasn’t able to upload a certain number of events. The easiest solution is to make a small change to each event in the Subject column. On the subsequent upload, Google Reader will interpret it as a brand new event and upload it.
If your course pretty much stays the same from term to term, for the next term all you need to do is change the dates.
Google Calendar bonus tip
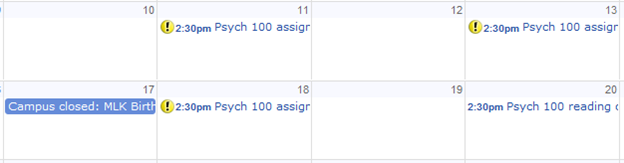
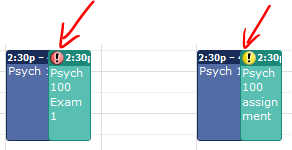
You can add icons to your events. Here are how the icons appear with my calendar. Yellow icons for dates when assignments are due; red icons for exams.
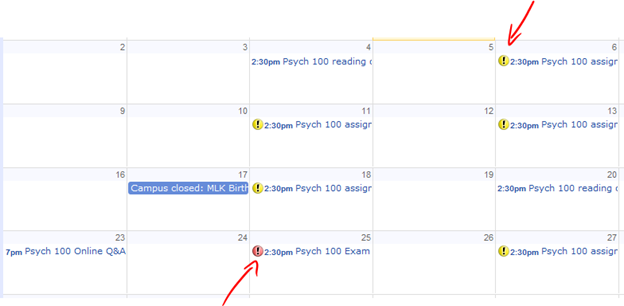
And here’s how they appear when you follow the public link to the calendar.
To get the icons, from your Google Calendar page, look in the top right corner. Click on the green beaker to go to Google Labs.

Enable the one called “event flair.” Go back to your calendar. When you click on an event, the icon palette appears on the right. Select the appropriate icon. Remember, in public calendars, everyone who accesses the calendar can see the icon.
While you’re poking around in Google Labs for calendar gadgets, check out “year view,” “dim future repeating events,” “jump to date,” and “world clock.”
Conclusion
If you’ve read this entire post and don’t use Google Calendar yet. Consider it. It provides some nice flexibility. It certainly makes it easy to change the schedule at the term progresses. Of course you still need to let students know what the changes are, but you’ll know that everyone has the same information on their calendars.
