I first wrote about the YouCanBook.Me scheduling tool in 2010. YouCanBook.Me checks your web-based calendar to see when you are free, and then makes your free times schedulable by others, such as students. To access YouCanBook.Me’s full power, you need a pro account ($9/month, billed yearly). For what it can do, the money may be worth it to you. It was to me—until Office 365 Bookings.

Recently, Microsoft developed a tool with similar functionality as part of its Office 365 suite. If you have Office 365, you have Bookings. Because Bookings and Outlook are in the same suite of tools, Bookings automatically has access to your Outlook calendar. (If you live in Google Calendar like I do, consider using Outlook4Gmail to sync your Outlook and Google calendars.)
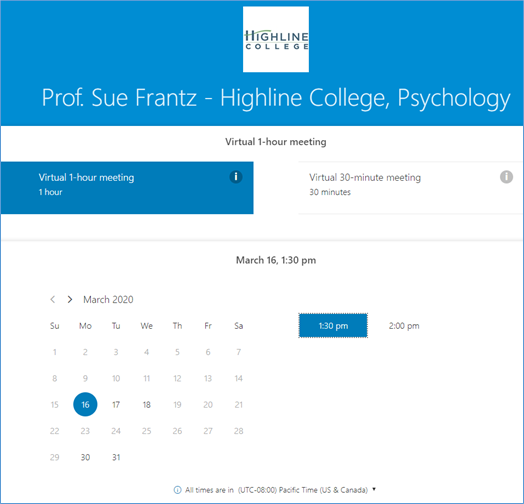
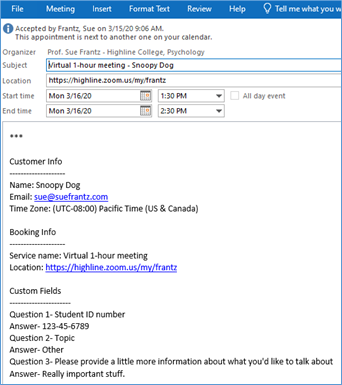
When I send students to my Bookings calendar, they can choose between a “virtual 1-hour meeting” and a “virtual 30-minute meeting”. Once students select one (the 1-hour meeting in the screenshot below), the calendar will show students my next available times. On March 16th, I see that there are two times available 1:30pm and 2:00pm. If those times don’t work for the student, they can choose a different day. Days that are in black (17, 18, 30 and 31) have available time slots and are clickable. The type of meeting must be selected in order to see the available time slots.
In this case, the student has chosen a virtual 1-hour meeting on March 16th at 1:30pm.
Now the student can scroll further down the page.
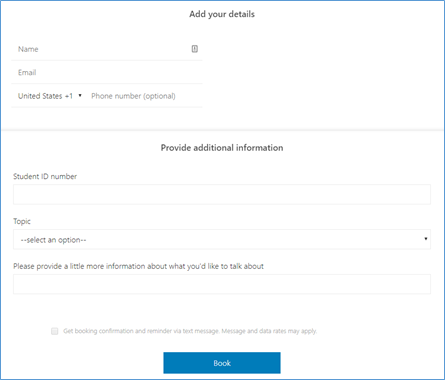
I ask the student to enter their name, email address, phone number (optional). If students enter a phone number, the checkbox at the bottom of the page is automatically checked: “Get booking confirmation and reminder via text message.” Then I ask for “additional information”: student ID number, a topic (from a drop-down menu: advising, question about a psych course you are taking, other), and a little more information about why we’re meeting.
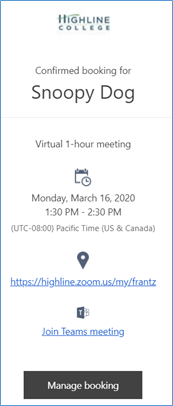
After the student clicks the “Book” button, the student will get this confirmation page.

Also, the student will get an email, such as the one below. In that email, if the student clicks on the “Manage booking” button, the student will be taken to the booking confirmation webpage above where they can reschedule or cancel their appointment.
I also get an email. Most importantly, the appointment is automatically added to my calendar.
If I need to cancel the appointment, I go to Office 365, click on Bookings, then select the “Calendar” from the left navigation menu. I click on the appointment, then click “Cancel.” Now I can enter an “email message to customer”—again, Bookings is built for business, not education—and click “Cancel Booking.” The student will get an email saying the appointment was canceled. On your Outlook calendar, the appointment will now say “Canceled” and the time will switch from busy to free.
If this looks like a tool that would be useful to you, let’s get you set up.
Getting started
Go to Office 365 and log in, if you are not already. If Bookings is not in your list of apps, click the “All apps” arrow. Click on Bookings.
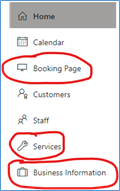
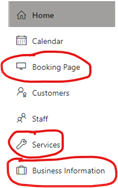
 In the Bookings left navigation menu, there are three areas we’ll be using.
The Booking Page contains the settings for your booking calendar. That includes color schemes, the url for your bookings page, time increments (such as 30-minute blocks of time for appointments), and customization for the dates when your students can make an appointment when you are free.
The Services page is where you can enter the form information you want people to fill out to make an appointment. Since the Bookings tool was built with businesses in mind, they used the word “services.” Perhaps you would want customers to fill out one form if they wanted a new dishwasher installed but a different form if they want their current dishwasher repaired. For instructors, you may want students to be able to schedule a face-to-face meeting with you in your campus office or perhaps you may want students to be able to schedule a virtual office hour with you via Zoom. Or maybe even an old-fashioned phone call.
The Business Information page is where you can enter your contact information, such as your office location. Your “business hours” also go here. Think of these as times when you’re okay with students making an appointment with you – if you have free time on your calendar.
Let’s take a look at each of these in turn.
Booking Page
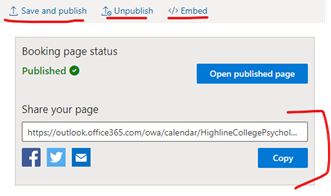
 Here you can find your Bookings page url. Give this your url to your students; post it in your course management system, for example, or add it to your email signature. Students—or anyone else—can use it to make an appointment with you.
Once we have all of our settings done, we’ll come back here to “Save and publish” thereby making our bookings calendar available. Any time you want to take your Bookings page offline, click “Unpublish”.
Click “Embed” to get the html embed code. Your course management system, for example, may give you the option to enter html code. If so, paste your Bookings embed code there. Students will be able to book an appointment with you from inside your course management system.
I want to give a shout-out to Tom Pollard, Highline College’s database-master. In our staff directory, he created space for an extra tab that can handle embedding. All we need to do as faculty is enter our Bookings url.
Visit my staff directory page. Click on the “Schedule an appointment” tab to see my Bookings calendar.

Scroll down the Bookings Page to the “Scheduling policy” area.
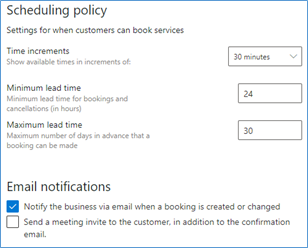 “Time increments” refers to the times students can choose from to start an appointment. Since mine is set to 30 minutes, students see times like 12pm, 12:30pm, 1pm, etc. If this were set to, say, 15 minutes, students would see 12:15pm, 12:30pm, 12:45pm, etc. This doesn’t affect how long the appointment may be. We’re not there yet. This just shows when an appointment can start.
The “minimum lead time” is how many hours in advance an appointment can be made/cancelled. Mine is set to 24 hours. That means that regardless of the availability I have on my calendar, the next 24 hours do not show any free times for me. Unfortunately, the same is true for cancellations. A student may want to cancel a few hours before their appointment, but they can’t do it through the Bookings email they received if it’s within this same 24-hour window. I hope in some future iteration of the Bookings tool, Microsoft separates the lead time for appointments from the lead time for cancellations.
The “maximum” lead time is how many days in advance you’ll let people make appointments. Mine is set to 30 days. Today is March 15, 2020, so the latest availability anyone sees on my Bookings calendar is April, 14, 2020.
Under “email notifications,” check the box to “notify the business [me] via email when a booking is created or changed.” If this is unchecked, appointments will still be added to or canceled from my calendar, but I like getting the emails. I don’t like to be surprised when I look at my calendar.
Scroll down the Bookings Page even farther to the “Availability” area.
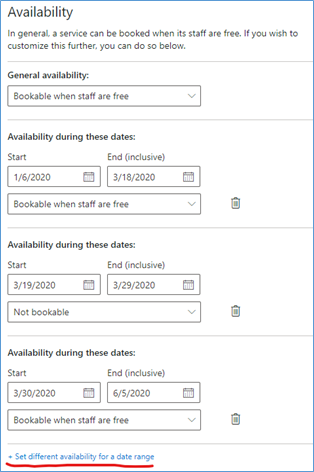
The Bookings tool will always check your calendar to see when you are free. Additionally, you can set the dates when you want the Bookings tool to use/not use your calendar.
In the first area, you can see that I’ve told Bookings to show students my free times between Jan 6, 2020 and March 18, 2020 – those are our winter quarter dates. In the next section, I’ve told Bookings to make the dates March 19, 2020 through March 29, 2020 as not bookable. That’s the end of finals week and spring break. In the last box, I give the dates for our spring quarter as bookable.
Clicking the link at the very bottom of the page allows me to add more blocks of time that are bookable/not bookable. [Side note: I have a set a Nudgemail for June 5th to remind myself to set the next round of availability dates.]
Services
 The “Services” page is where you create the different kinds of appointments students can make.
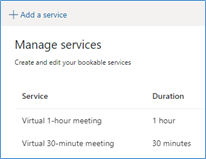 Here, you can see that I have two “services”: virtual 1-hour meeting and virtual 30-minute.
Before the coronavirus drove us off campus, I had two other meeting options here: in-person 1-hour meeting and in-person 30-minute meeting.
At the top of the page, click “Add a service” to, well, add additional meeting times.
Let’s add a “service.”
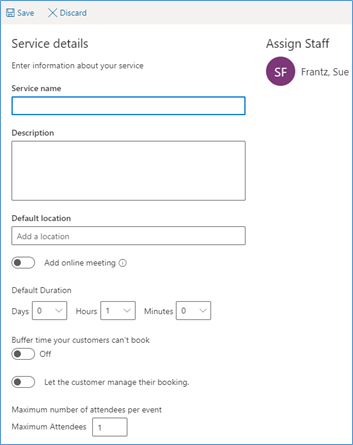 The “service name” is what you want to call this type of appointment, such as “virtual 30-minute meeting.”
Add a short description, if you’d like.
Enter your office location or your virtual location, such as your Zoom room url.
The default meeting time duration is 1 hour. If you wanted to make this a 30-minute appointment, change it to 30 minutes.
You can add a buffer time before and/or after the appointment. Let’s say that up above you set your calendar time increments to 15 minutes and here you set the buffer to 10 minutes after the appointment. If a student made a 30-minute appointment with you from 12pm to 12:30pm, the 10-minute buffer at the end would make you busy until 12:40pm. The next open time increment when someone could make an appointment then would be at 12:45pm.
At the very bottom of this section is “Maximum Attendees.” If this appointment is for, say, individual advising, you may only want a maximum of one. If you were holding review sessions for the next exam in a nearby conference room that holds 8 people including yourself, you could set the maximum number of attendees at 7. If one person books the time slot, it will still show as available on your calendar for this appointment. For all other appointments it would show you as busy. Once 7 people booked this time slot, it would no longer show as available on your Bookings calendar.
Now we’re getting to the real power of Bookings. Scroll down the Services page to “Custom Fields.” Click the “Modify” button.
These are the questions that go in the form students fill out when they choose this appointment option. Bookings will always ask for a name. I’ve checked “Customer email,” so that will be included on the form. The “Custom Fields” are questions I’ve created before. Clicking on one will add it to the form. Choose them in the order you want them to appear on the form. Here, I clicked on Student ID number, then “please provide…” and I have made the “please provide…” question required. Students will not be able to submit the form without typing something in this box.
If you want to add a question, click “add a question” at the top of the page. Your question choices—as of this writing—are a text box answer or a dropdown menu.
When you’re good with the questions, click Ok at the top of the screen.
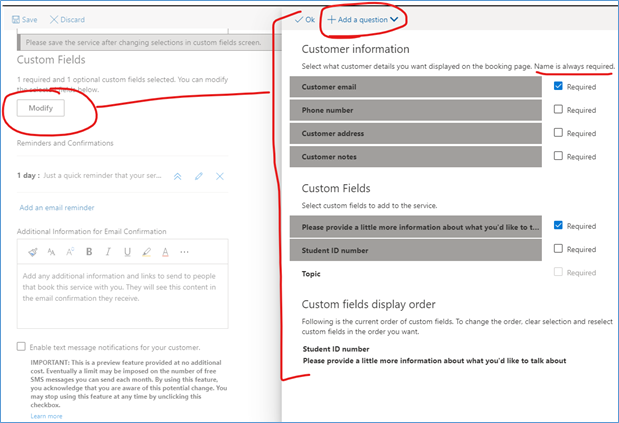
On this screen, you can also decide when you’d like a reminder to go out to the person who made the appointment. The default is one day. Add more information to their email confirmation, if you’d like.
Business Information
 Remember, as far as Office 365 Bookings is concerned, you’re a business. The “Business Information” page is all about you.
Enter your contact information.
At the bottom of the page, enter your “logo.” It could be your institution’s logo or your photo.
On the right side of the page are your “Business hours.” These are the times during the week when you open for appointments.
For example, Monday, I’m “open” from 12pm to 5pm. Even though my Outlook calendar says I’m free at 9am, Bookings will ignore that time. It will only look between 12pm and 5pm. If I have something on my calendar that says I’m busy between 2pm and 3:30pm this Monday, Bookings will not show those times as bookable.
Once you have your times set, click “Save” at the top of the screen.
Let’s publish!
Go back to the Booking Page and click “save and publish” at the very top of the page. That’s it. You are now open for business. All you need to do now is let people know your Bookings url.