Do you need to keep track of receipts for reimbursement or for your taxes? Danae Hudson and Brooke Whisenhunt of Missouri State University recommend Expensify. Expensify is free. If you need more power, you can pay a small monthly fee.

In the past I’ve used CamScanner to turn my phone’s camera into a scanner, scanning my receipts to pdf and then uploading the pdf to Dropbox for safekeeping. Expensify uses the same technology, but to a very specific end. I should also add that those of you with flip phones are not left out. The web interface for Expensify works just fine. Use whatever scanner you have to scan your receipts, and then upload them to the Expensify website.
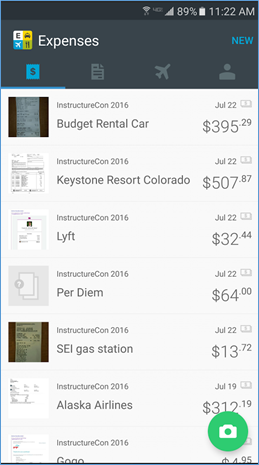
For those with phones with cameras, install the mobile app. This is what Expensify looks like on my phone right now. You can see that I have a number of items for a trip I named InstructureCon 2016. To the left of each item is a thumbnail of my receipt. Because I don’t have receipts for per diem because, well, it’s per diem, there is no thumbnail.
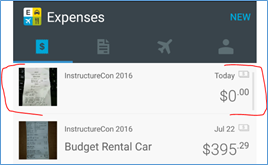
To add a new receipt, just tap the green camera icon in the bottom right corner of your phone’s screen. You can also tap “NEW” in the top, right corner and select “receipt”. In either case, your phone’s camera turns on, and you can take a photo of your receipt. You can do that sitting right at your restaurant table. If it’s one of those ridiculously dark restaurants – one where you need your phone’s flashlight app to read the menu – you can turn on the flash. The photo of the receipt will automatically appear at the top of your receipts list. Expensify guesses that your most recent trip is the trip you want the receipt attached to. If that’s not right, it’s easily changeable.
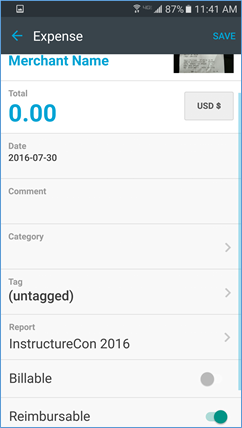
Tap on that newly-added item to add important information, like merchant name and how much you paid. Expensify enters today’s date by default, but you can change it. Include a comment – I note the reason for the expense. Tap on “Category” to assign the receipt to lodging, meals, transportation, etc. You can create your own tags to mean whatever you’d like. Since I use Expensify to keep track of all of my travel expenses, both reimbursable and, for those that aren’t reimbursable, tax deductible, I have tags called “Reimbursable” and “Tax deductible”. I also have a tag named “Non-reimbursable/non-tax deductible” that I use when, for example, my wife is traveling with me on a work trip and my portion of the meal is reimbursable (or tax deductible), but hers is not. (Expensify allows the splitting of receipts that makes this easy to track.) Be sure the receipt goes with the correct report. Tapping on “Report” will show you your active reports and allow you to create a new one. Finally, toggle the switches for “Billable” and “Reimbursable” as needed. [“Hey, Sue, if there’s a ‘Reimbursable’ toggle, why do you need a ‘reimbursable’ tag?” Good question. In the report Expensify generates, tags are prominently displayed, so it’s just easier to see.]
Expensify has an easy-to-navigate web interface. On the “Expenses” tab, you can sort by date, merchant name, amount paid, category (e.g., transportation, lodging), tag (which you’ve created), or comment. On the left side of the screen, you can search and filter as you’d like. Click on an expense to edit it. If you click on the paper (or +) icons between the total column and the category column, you can edit the details for the item, and do things like split the expense and upload pdfs. Uploading pdfs is very helpful for emailed receipts, for example. Save the emailed receipt as a pdf, and then upload to Expensify. [Want to add/remove categories and tags? Click on your icon in the top, right corner of any Expensify webpage, and click the “Personal settings” button.]

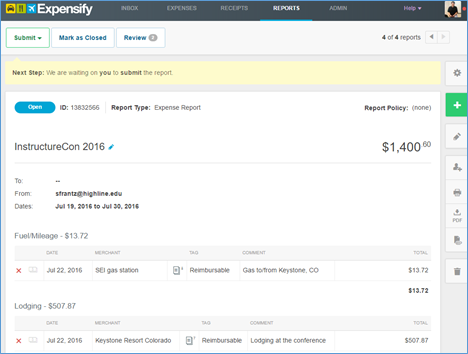
When you’re done with your trip, click on “Reports” in the top navigation menu. Click on the report you want.
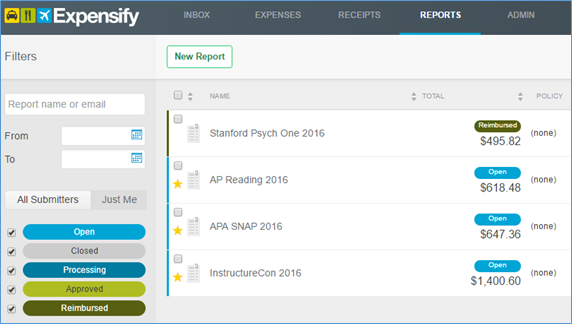
Use the right navigation menu to edit expenses, share with others, print, download a pdf, add an attachment to the report.
Since my college doesn’t officially use Expensify, I don’t use the “Submit” button. Instead I download the pdf report. The pdf includes a summary of all expenses, thumbnails of each receipt, plus a full image of each receipt. Because my college accepts photocopies of receipts, I just fill out my college’s travel reimbursement form and then attach this report as the record of my receipts. Even if my college didn’t accept copies of receipts, I’d probably still submit the report along with the original receipts. When the report includes tax deductible items, I also print out a copy for my records. (Ok. My wife’s records – she handles our finances.)
