If you have had students who have submitted particularly good work or work that illustrates common errors, you may want to share the work with your current students. Since the students’ names are not on their files—or you have removed them—you think you are sharing the work is anonymous. It may not be, but you can make it so.
Metadata
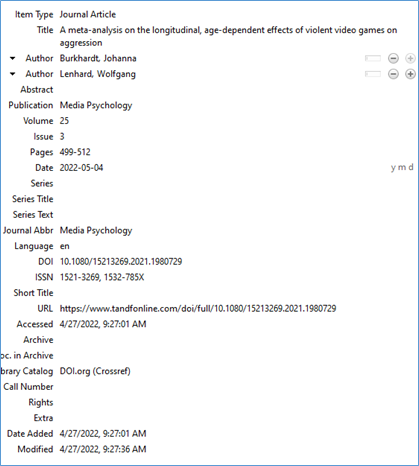
Most files have metadata—data that is attached to the file but is not visible. For example, PDFs of journal articles contain metadata about the article. PDF managers, like Mendeley and Zotero, pull that metadata into their own databases. Those programs then rearrange the data however the user asks for it.
For example, here is the metadata Zotero pulled from a Media Psychology journal article I downloaded from my college library’s database.
Zotero, then, is happy to rearrange the data it found along with any corrections I made to give me a pretty reference. Here are a couple examples.
APA, 7th
Burkhardt, J., & Lenhard, W. (2022). A meta-analysis on the longitudinal, age-dependent effects of violent video games on aggression. Media Psychology, 25(3), 499–512. https://doi.org/10.1080/15213269.2021.1980729
Chicago, 17th
Burkhardt, Johanna, and Wolfgang Lenhard. 2022. “A Meta-Analysis on the Longitudinal, Age-Dependent Effects of Violent Video Games on Aggression.” Media Psychology 25 (3): 499–512. https://doi.org/10.1080/15213269.2021.1980729.
Checking documents for and removing metadata (Windows)
First, remove any identifying information from the text of the document. Some students type their name at the top of their documents. Save the file and close it.
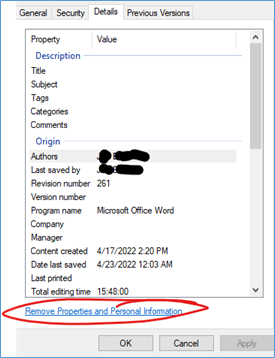
In your file folder, right click on the file of interest, and select Properties. Select the Details tab. Here we can see all of the metadata associated with the file.
Below are the property details from a file that a student submitted for an assignment in my course. The student’s name was listed in both the “Authors” and the “Last saved by” fields. If you edited the file and saved it, your name will appear in the “Last saved by” field. Be sure to scroll down. The very last field is “Computer,” and some computers are named with identifying information. For example, the computer I’m typing on right now has a name that begins TBSFRANTS.
To remove the identifying metadata information, click the Remove Properties and Personal Information link at the bottom of the window.
In the next popup, take the easy route and “Create a copy with all possible properties removed.” If you’d rather “Remove the following properties from this file,” select that button, and then check whichever boxes contain content you want to remove, again, being sure to scroll all the way to the bottom.

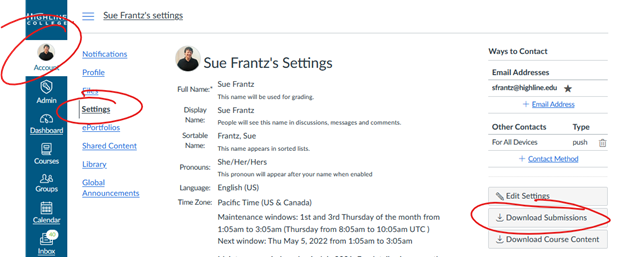
Lastly, check the file name. Many students include their name when they name their files. Or if your downloading student submissions from your learning management system (LMS), the files may have been renamed according to the LMS conventions. In Canvas, for example, when you download all submissions for an assignment, Canvas names the file as <student’s last name><student’s first name><LATE (if the submission was late><long number><original name of the file>.
Ethical and legal considerations
Is it legally okay to share anonymized student work? Your institution may have a policy about this. For example, Rutgers has a policy: “”Students typically will own the copyright to works created as a requirement of their coursework, degree, or certificate program. The university, however, retains the right to use student works for pedagogical, scholarly, and administrative purposes.” To me, a pedagogical purpose includes being able to share anonymized examples of student work with other students as illustrations of both good and less good work.
From a FERPA standpoint, student records may not be shared. Is student coursework, though, considered a student record? Apparently, that depends on how your institution defines student record. (Read more about this from the Online Learning Consortium.)
While I am many things, I am most assuredly not a copyright or educational rights attorney. If you have legal questions regarding sharing student work, please consult with your institution’s legal team.
If your institution does not have a policy, consider including a statement in your course syllabus regarding your intentions to share anonymized student work with future students as a pedagogical tool. It seems only sporting—ethical even—to give students fair warning. And to give students an opportunity to opt out.
Also consider asking for student permission up front. Here is a sample form. If you’d like all students to complete the form at the beginning of a course, make it, say, a three-point assignment. If you do, be sure to include the option of “No, I do not grant permission to share my work.” Assure students they can change their minds later by resubmitting the form.