In what feels like eons ago, I wrote a blog post on protecting your data when in public. I looked up that post. I published it on January 20, 2020, just three months before most of us stopped going out in public. Good timing, eh? Now that most people are out and about, here is that post again revised with updated information from the FBI regarding juice hacking. Read on!
USB condoms
Let’s start with USB condoms, because, frankly, that’s why you decided to read this post. It’s okay to be honest. We’re friends.
The cable you use to charge your phone and your tablet serve as both a power cable and a data cable. Electricity and information flow through this same cable. As long as you are home, you are safe. When you venture out into public, however…
Let’s say you’re at the airport with a long layover and a low phone battery. You plug your USB cable into one of those now-ubiquitous charging stations. Unfortunately, someone with nefarious intent has been there before you. Once you plug in your USB cable, the nefarious person begins to steal any data that flows through your cable, such as passwords, or sends malware to your phone.
This is called juice jacking, and the FBI officially recommends not using USB outlets in public spaces.
Option 1. Do what the FBI recommends, and don’t use public USB outlets (including in your hotel room). Instead, use your device’s charge adapter and only plug into electrical outlets.
Option 2. Use a charge-only cable rather than a data/charge cable. It took some effort to find the right search term for Amazon to give me what I was looking for. I had success with “usb data blocker charge cable.”
Option 3: Use a USB data blocker adapter. A USB condom, if you will. Plug your USB cable into a device that’s about the size of a flashdrive then plug the device into a public USB outlet. You can purchase two PortaPow Data Blockers from Amazon for about $10.
Another risk
In addition to juice hacking there is a lot of risk with using public wifi. Every time you connect to public wifi, such as at a coffee shop or airport, a nefarious person may be lurking on that same wifi. With the right skills that nefarious person could swipe any data you send over that connection, such as your login names and passwords.
VPNs
Like a USB data blocker, you can put a layer of protection between you and public wifi. In this case, the solution is software, not hardware.
A virtual private network (VPN) is well, a kind of private network. After installing the VPN on each of your devices (phone, tablet, laptop – anything that may leave your home and connect to the Internet), every time you connect to public wifi, sign into your VPN with your username and password. That login provides the layer of protection you need. All of the information flowing between your device and the Internet will be encrypted. No one can read it without knowing your VPN username and password.
There are several very good VPNs out there. I use Private Internet Access (PIA), but ExpressVPN is always on the lists of excellent VPNs. A good VPN costs a few dollars a month, but most occasionally run big sales or offer year-long or multi-year purchases. You can install the VPN on all of your devices, but there is a limit to how many devices can connect to the VPN simultaneously from that same account. There are free VPNs, but they may not be as fast or may limit how much data you can send through their servers each month. If you want to go that route, I recommend checking out Hotspot Shield Free or TunnelBear.
On your device, when you connect to a VPN, you can choose where the server is that you’d like to connect through. Going through a VPN will always be slower than traveling the Internet naked. The VPN is a password protected gateway. You first have to go through the gate, don your virtual hazmat suit, and then head out to the Internet. It takes a little bit of time to do that.
For fastest speeds, connect through a server that’s physically closest to you. From my home router, I generally don’t use a VPN. My password protected router gives me the shielding that I need. Here are some sample Internet speeds I just ran today; check yours with Speedtest.net.
From my home router without a VPN: download speed was 113 Mbps; upload speed was 12Mbps
Connected to PIA VPN going through server in Denver, closest to where I live: download 42 Mbps; upload 11 Mbps
You can connect to servers just about anywhere in the world. This is very handy if you’re traveling in, say, Europe, and want to spend an evening watching Netflix. You may, though, only watch Netflix shows for a European audience. If you want access to all of the Netflix shows you watch in the United States, you can use a VPN, and choose a server location in the United States. Netflix will think your device is in, say, Chicago even though you and your device are actually in Vienna. If you intend to use your VPN in this way, choose ExpressVPN as your VPN provider. Netflix isn’t fooled by all VPNs, but ExpressVPN, at least as of this writing, can pull it off. (Here is a short list of other VPNs that can, too.) ExpressVPN is a little more expensive than other VPNs; you get what you pay for.
Travel router
If you travel a lot and are frequently connecting several devices to, say, a hotel’s wifi, it can be a hassle. You (and your spouse, and your kids) have to connect each of your devices, and then—as you now know—run a VPN on each of your devices. Some hotels limit the number of devices that can connect to their wifi. One hotel I stayed in had a limit of six devices. Since it was just me, I came in well under their limit. If I added my wife and a couple teenagers (fyi, I don’t have any teenagers, and, no, I don’t want yours), we’d easily be over the six-device limit.
Consider purchasing a travel router. The travel router connects to the hotel wifi just like any device does. The router works by adding a new password-protected wifi signal. My travel router uses the same name and password as our home wifi. As soon as the travel router is up and running, all of my devices see the home wifi name and will connect to it automatically. And what about that hotel device limit? The hotel sees the travel router as one device; it won’t see all of the devices connected to the router.
With a travel router, there is no need to use a VPN since it comes with the built-in protection of a username and password and encryption. (If your router doesn’t come with encryption automatically enabled, enable it.)
I use the TP-Link N300 travel router. Setting up the software and connecting can be intimidating, although TP-Link’s Tether app for phones makes setup and connecting much easier. It’s been five years since I bought it, and other travel routers have since come on the market. Try this GL.iNet travel router for about the same price.
Conclusion
A number of years ago, I wrote about password security. Still, the number one threat to your online security are your passwords. Strong, unique passwords for every site you log into will provide you with the best protection. In that post I advised using a password manager. I still do. Here are PCMagazine’s recommendations. For your most important sites—such as banking and email—use two-factor authentication. If someone does get your password, they still won’t be able to log in without access to, say, your phone.
VPNs, travel routers, and data blockers keep your passwords protected as they flow from your device out onto the Internet.
Stay safe out there.


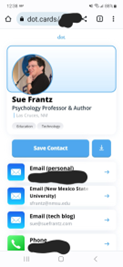
 Are you ready to stop carrying around business cards? Or, perhaps more accurately, are you ready to stop forgetting your business cards at home?