In Agnes, a comic strip by Tony Cochran, the protagonist is an eccentric little girl who lives with her grandmother and who often shares her quirky ideas with her best friend, a girl nicknamed Trout.
In the May 17, 2025 strip, Agnes is sitting on the floor of her classroom with her shoes off. When asked to get back into her seat, Agnes explains that she was just “giving the toes a bit of the old ‘tug-a-roo’ because doing so “aids cognition and promotes relaxation.” The last panel is a common one for Agnes—she is visiting the principal’s office.
In Intro Psych, after covering experiments in the Research Methods chapter, share the comic strip with your students. Ask students to generate a hypothesis based on Agnes’ idea about the benefits of a little tug-a-roo of the toes.
Once your class has a workable hypothesis, ask students to work in small groups to design an experiment that would test the hypothesis. Students should identify the independent variable, including at least one experimental condition and one control condition, and the two dependent variables. For each condition and for each dependent variable, students should have operational definitions.
Following discussion, invite groups to share their experimental designs.
Working with a silly example such as this should take some of the intimidation out of experimental design for your students. But the best part? You will hear your students repeatedly saying “tug-a-roo.”
If time allows, invite students to propose follow-up research ideas. For example, might tugging on someone else’s toes aid cognition? Or would tugging on one’s own ear lobe or left thumb help?
Grandfamilies: An end-of-course discussion
written by Sue Frantz | May 26, 2025
In this New York Times article (gifted to you), the writer Frances Dodds tells us the tragic story of how her sister’s four children came to live with the writer’s parents, the children’s grandparents (Dodds, 2025). Grandparents being responsible for raising their grandchildren is not an unusual occurrence. The U.S. Census Bureau estimates that in 2023, 2.1 million grandparents were doing so. With very little effort, I can think of many “grandfamilies” I currently know or have known, including neighbors, my extended family, colleagues, and students. In my teaching and writing, I try to honor such families by referring to caregivers rather than parents.
When Dodds’ sister got swept up in substance abuse, Dodds’ parents stepped in to care for the children. At first it was temporary, while everyone hoped that the children’s mother would get clean and stay clean. When it became clear that that was not going to happen, at least not any time soon, the children’s grandparents went to court to make their custody official. “The older two children were 8 and 7. The twins were 6. They had been living with my parents for nearly five years” (Dodds, 2025). This makes it sound much easier than it was.
As an end-of-term small group discussion for Intro Psych, invite your students to read the article. Provide students with these instructions:
This article reflects several of the topics we’ve covered in this course. Working together, identify at least five chapters that are represented in the article. For each of those five chapters, describe how content in the article connects with one or more concepts in the chapter. Please be specific.
Here are some examples that I found. And if you’d rather not have a discussion, the examples work for your lectures.
Research methods: survey data
Consciousness: fentanyl
Development: attachment, social clock
Learning: operant conditioning
Emotions and motivation: emotion regulation, stress
Social psychology: family roles, intimate partner violence, cognitive dissonance
When discussion has abated, invite each group to share one example that they found. How many chapters were your students able to cover?
Reference
Dodds, F. (2025, May 18). My parents expected to be retired. Instead, they are raising my sister’s kids. The New York Times. https://www.nytimes.com/2025/05/18/magazine/grandparents-families-children-kids.html
Some Tesla owners are experiencing cognitive dissonance
written by Sue Frantz | May 26, 2025
Regardless of which side of the political divide you or your students stand on, here is a real-world example of cognitive dissonance.
“[F]rom 2012-2023, about half of all new [electric vehicle] registrations in the U.S. went to the 10% most Democratic counties” (Davis et al., 2025, p. 1). However, an early 2025 poll found that only 12% of Democrats have a favorable opinion of Elon Musk (Kiley & Asheer, 2025), the owner of Tesla, Inc. Those data make it unsurprising that Tesla sales are in down in states that lean politically toward Democrats, such as California (Sriram, 2025).
If the politics of a company’s owner don’t mesh with your own, it’s usually pretty easy to avoid buying that company’s products. But what if you already own the product?
Tesla owners who don’t like Musk’s political stance are experiencing cognitive dissonance.
“I paid tens of thousands of dollars for this car. A portion of that money went directly into Musk’s wallet.”
“I am completely opposed to what Musk has done as head of the Department of Government Efficiency (DOGE).”
After explaining cognitive dissonance, explain the dissonance left-leaning Tesla owners may be experiencing. Next, invite students to work in small groups to generate ideas as to how Tesla owners may be resolving their dissonance.
After groups have had a chance to discuss, invite each group to share one dissonance-resolving idea.
Complete this activity with some examples of dissonance reduction strategies discussed in this New York Times article (Knight, 2025).
Change A. Sell the car and donate the proceeds to charity. While a Tesla owner cannot go back in time and not buy the car, they can offset the money that went to Musk in the sale by giving the money to a charity that aligns with their own beliefs and politics.
Change B. Conclude that the good that Musk has done outweighs the bad.
There are some ingroup/outgroup dynamics happening here, too, that you may want to share with students. Tesla owners are concerned that they will be perceived to be—by virtue of Tesla ownership—in agreement with Musk’s politics. Those who are not in Musk’s camp are looking to distance themselves from him.
Display an anti-Elon bumper sticker (to make it clear that the Tesla owner is not in Musk’s ingroup).
Remove the Tesla logo from the car (also to make it clear that the Tesla owner is not in Musk’s ingroup).
References
Davis, L. W., Li, J., & Springel, K. (2025). Political ideology and U.S. electrical vehicle adoption (No. 33591; NBER Working Paper Series, pp. 1–54). National Bureau of Economic Research. http://www.nber.org/papers/w33591
Kiley, J., & Asheer, N. (2025). Public anticipates changes with Trump but is split over whether they will be good or bad (pp. 1–49). Pew Research Center. https://www.pewresearch.org/wp-content/uploads/sites/20/2025/02/PP_2024.7.2_views-of-trump_REPORT.pdf
Knight, H. (2025, April 26). In Marin County, there’s trouble in Teslaville. The New York Times. https://www.nytimes.com/2025/04/26/us/marin-tesla-owners-musk.html
Sriram, A. (2025, April 16). Tesla’s market share in California sinks amid backlash against Elon Musk. USA Today. https://www.usatoday.com/story/money/business/2025/04/16/teslas-california-collapse-market-share-drops/83132456007/
A strategy for actually implementing the 20-20-20 rule to reduce eye strain
written by Sue Frantz | May 26, 2025
I am spending so much time looking at my computer screen these days that I was really feeling it in my eyes. Eye strain is real. My eyes were feeling tired and achy. I’ve known how to prevent eye strain for years, but I’ve never needed it.
The 20-20-20 rule is straightforward. Every 20 minutes, look at least 20 feet away for at least 20 seconds. Easy peasy. I have a big window in my home office, so it’s easy to look 20+ feet away. I can count to 20, so I had the 20 seconds covered. Now, how best to remind myself to do this every 20 minutes?
I needed a timer of some sort. I first tried setting the alarm on my phone. The alarm would go off—so far so good—and I’d pick up my phone to turn off the alarm. “Oh, a couple text messages. Here let me do some quick replies.” A half hour later and I was still texting. Okay, a phone alarm is not going to work.
What about a web browser extension? There are certainly plenty of those, but I didn’t even bother trying one. I usually have my computer speakers on mute; I wouldn’t even hear it. I also work in both Firefox and Chrome and plenty of my work is in my email app, Word, and Excel. Having an alarm sound (if my volume was up) while trying to find Chrome or Firefox just felt much too annoying.
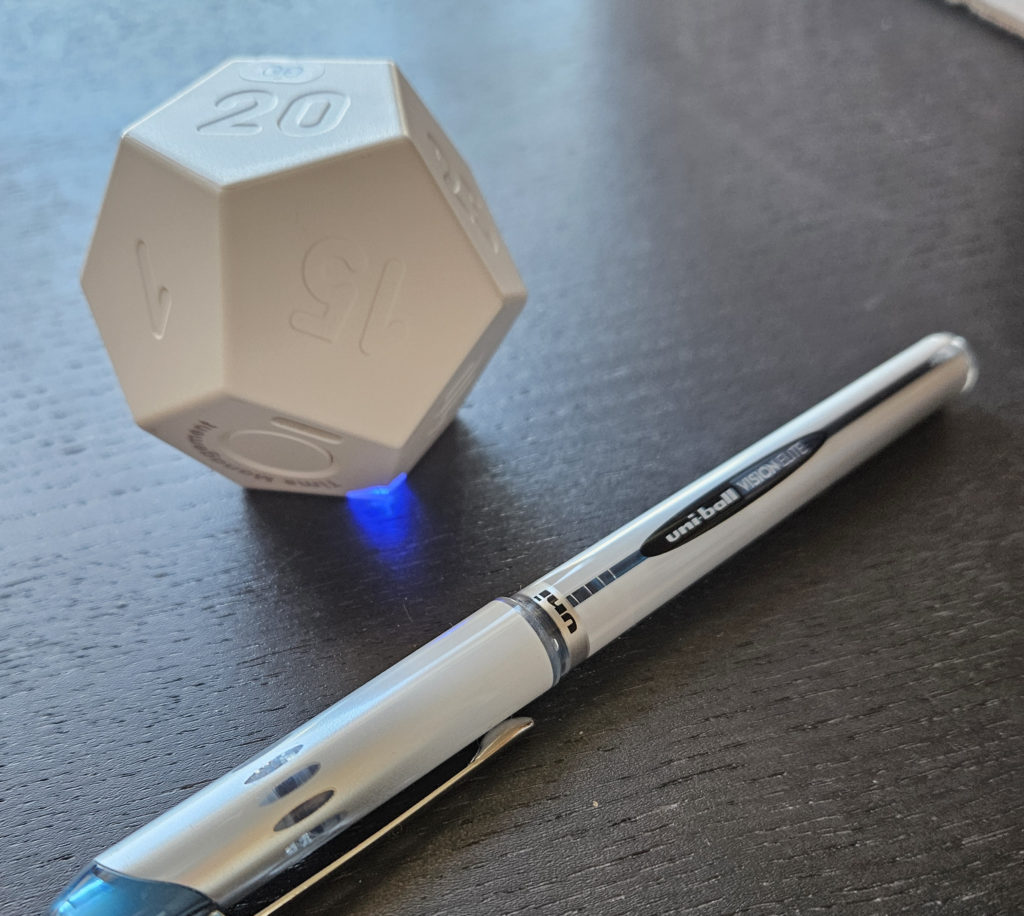
And then I discovered flip timers. The one I chose (pictured below) was the KADAMS Pomodoro Timer (Amazon). I didn’t choose this particular one because it has 12 sides; I chose it because it has a 20-minute option.
The operation of the timer could not be simpler. To turn the timer on, press and hold the button. In the photo, the button can be seen at the bottom left of the cube. (Okay, it’s not a cube; it’s a dodecagon, but cube is easier to type.) Once the timer is on, the blue light will illuminate.
You can choose what kind of alarm you would like. Give the button a quick press, and the cube will vibrate. Another quick press, and the light will blink. One more quick press, and the cube will beep. For my alarm, I prefer vibrate because it’s enough to get my attention (which the blinking light doesn’t) without annoying me (which the beep does).
To set the timer, flip it so the time you want is on top. That’s it. The countdown has started. When the alarm goes off, give the timer a quick turn to a different side, and then flip it back to the time you want, and the countdown will begin again. If, while in the middle of my 20 minutes, I find myself staring out my window, I’ll give myself a new 20 minutes when I turn back to my computer.
When I go to lunch or at the end of my work day, I flip the timer so the button is on top. That deactivates it. When I come back to my desk, I flip the timer to 20 and start again.
As expected, by following the 20-20-20 rule my eye strain is gone.
It has been really surprising to me how quickly 20 minutes flies by. No wonder I was experiencing eye strain! I had no idea how long I was looking at my computer screen. However, the timer interrupts my work flow. I mean, of course it does; it’s an alarm. But when I’m in the middle of a fiddly spreadsheet, or muddling my way through a complex journal article, or taking my fifth pass through writing a gnarly paragraph, the interruption is usually not welcome. While I sometimes flip the timer and think, “I’ll just finish this one thing first,” I always stop myself. “No, my eyes are too important. Look out the window. And take a deep breath, too.” It may take me a minute to get back into my train of thought, but it’s a minute and 20 seconds well-spent.
While I use the timer as an eye-saver, fans of the pomodoro technique use it to help them reduce their procrastination. “No, I don’t want to work on this paper, but I’m going to commit to working on it for 15 minutes with no interruptions. My phone is on silent and in my backpack. My flip timer is set to 15. Here I go!” When the 15 minutes is up, they can flip the timer to, say, three minutes to time their break. After the break, maybe 20 minutes feels possible this time, so they flip the timer to 20.
This could be a quick two-for-one in Intro Psych. When covering the 20-20-20 rule in the vision section of the sensation and perception chapter, mention flip timers (bring one for show and tell!), and then as an off-hand comment explain how flip timers can also be used to help conquer procrastination.
Working with my chronotype: Better use of a task manager
written by Sue Frantz | May 26, 2025
When I cover chronotypes in Intro Psych, I tell my students about the research that found that employees whose work schedules match their chronotypes have higher work satisfaction (Amini et al., 2021).
I’ve always been a morning person. Even as an adolescent, I routinely awakened at 6am without an alarm. Now, deep into adulthood, I routinely awake around 4:30am. Interestingly, to me anyway, that time had been 5:30am, but my brain seems to have never adjusted after last fall’s time change. So, 4:30am it is.
As a college student, I preferred taking the early morning classes. As a college professor, I preferred teaching the early morning classes. When I changed colleges, the new course schedule was very different. The early morning classes were 50 minutes each and five days a week. The afternoon and evening classes were longer sessions and met twice a week. I had to choose between my chronotype and my preferred teaching schedule. I went with my preferred teaching schedule. It worked out fine. At the beginning of the term, I could muster quite bit of energy for class. As the term wore on, my energy waned, but my students were anticipating a high energy class, so they brought the energy, and that was enough to carry me through. Thanks, everyone!
One term, I taught an evening class that started at the ungodly (for me) hour of 7:30pm. When I covered chronotypes, I asked my students if evening classes were a match or a mismatch for their chronotype. Every student said it was a match. Good for them!
As the new executive director for the Society for the Teaching of Psychology, I have a lot more items on my to-do list–currently 49 recurring tasks and counting–so I needed a more robust tracking system than I’ve ever needed before. (Most of those recurring tasks are monthly or yearly; only a couple are weekly) For my new task manager, I opted for Todoist, which seems to be working really well. Todoist allows me to tag each task. When I started creating tasks, I was tagging by task type, such as Membership for any task having to do with managing the STP membership database or Website for any tasks having to do with updating pages on the STP website. That was fine, but those tags weren’t feeling particularly useful. If I needed to do it today, did it matter if it was a Membership task or a Website task?
My greatest challenge is not being executive director; it is keeping up with my writing schedule (currently, that means revising my Intro Psych textbook). That’s been a challenge with the 20+ hours I need to devote to my executive director role. What I had been doing was getting all of my small tasks done first thing in the morning so I could leave the rest of the day for writing. Too often, though, those small tasks would eat up my entire morning, and in the afternoon, I was too mentally drained to write. It felt like death by a thousand cuts.
When I was telling a friend (shout out to Ellen Carpenter at Virginia Commonwealth University!) about my tagging system, it hit me that I was using tags all wrong. I really only need two tags: Morning and Afternoon. Because—thanks to my chronotype—I’m mentally stronger in the morning and weaker in the afternoon, any task that is cognitively demanding needs to be tagged as a Morning task. Any task that is lighter needs to be tagged as an Afternoon task. If I look at my to-do list and everything is tagged as Afternoon, then I don’t even bother reading what the tasks are: I go directly to writing. I’ve been really happy with how this working.
The next time you cover chronotypes, consider sharing this time management strategy with your students. They don’t have to use Todoist. Even if students are putting their tasks in their calendars, the morning people can add their cognitively demanding tasks to the morning hours, and the night people can add their cognitively demanding tasks to the evening hours—you know, when I’m already asleep.
Reference
Amini, F., Moosavi, S. M., Rafaiee, R., Nadi Ghara, A., & Babakhanian, M. (2021). Chronotype patterns associated with job satisfaction of shift working healthcare providers. Chronobiology International, 38(4), 526–533. https://doi.org/10.1080/07420528.2020.1869028
Talking to strangers can be hard, but it is worth it
written by Sue Frantz | May 26, 2025
The National Institute on the Teaching of Psychology (NITOP) is later this week.
I’ve previously written (Frantz, 2023):
I’ll confess that well before I retired my primary purpose for attending conferences was to meet with my friends and make new friends. In SPQR: A History of Ancient Rome, the author and Roman historian Mary Beard tells us that Polybius (200 BCE – 118 BCE) supposedly advised a young man, “Never come back from the Forum…until you have made at least one new friend” (Beard, 2016, p. 184)
I was reminded of this recently when I read the (freely available) Working Life essay at the end of the November 22, 2024 issue of Science (Suresh, 2024). The author tells us that while she understood the importance of networking, it terrified her. Part of her terror came from thinking she had to impress people. After having good intentions of networking at a conference, she left the conference with no new connections. In reflecting on her experience, she realized she was focusing on the wrong thing. Rather than trying to find ways to impress, she needed to find ways to connect. Not that that was easy for her, either!
I took every opportunity to attend events, and networking became a nonnegotiable part of my agenda. My palms would sweat and I’d lose my train of thought, stumbling over my words as I tried to piece together coherent sentences. I often ended up rambling, unsure I was making any sense at all. My voice would occasionally tremble and I’d become painfully self-conscious, worried I was coming across as unprepared or awkward. But I kept showing up, determined to push through, hoping eventually it would start to feel natural. And it did (Suresh, 2024).
What a great example of sympathetic nervous system arousal to share with our students. Speaking to strangers can be anxiety-producing, but it gets easier with time.
As Polybius knew, there is tremendous value in making new friends. Almost all –if not all—of the opportunities that I’ve had in my work life I can trace back to a specific person whom I had met. And I’ve had the good fortune of being able to pass along opportunities to others. There is also much joy in having a plethora of friends who text me fun photos—and who, more importantly, tolerate me doing the same.
This year, I will be NITOP, MAESTRO, APS, APA, and ACT. If you’re going to be at any of these, let’s chat. Even if you’re not sure what to say, you say, “In your blog, you said that you wanted to chat.” I’ll take it from there. I promise. I’m looking forward to meeting you!
References
Beard, M. (2016). SPQR: A history of ancient Rome. Profile Books.
Frantz, S. (2023, September 10). Retirement on the near horizon? Some thoughts. Macmillan and BFW Teaching Community. https://community.macmillanlearning.com/t5/psychology-blog/retirement-on-the-near-horizon-some-thoughts/ba-p/19300
Suresh, A. (2024). Connection, not perfection. Science, 386(6724), 934.
**The image that accompanies this post was generated by AI. I was going for an ancient Roman forum. This was AI’s fifth try. The first one included a few people in modern dress and what I am pretty sure was a pterodactyl. In retrospect, I should have used that one.
Does the U.S. have a national dance? The basis for a class activity…of sorts
written by Sue Frantz | May 26, 2025
My wife and I took a cruise in 2024. On the last evening, several members of the crew put on a show. Groups of crew members who shared a home country performed popular national dances. This got me thinking about whether the United States had something that could be considered a national dance. If you’d like, take a few minutes to discuss. Does the U.S. have something that could be a national dance?
Years ago, we had a friend who visited India. The group she was visiting showed her how to do one of their national dances. Afterwards, they asked her to teach her a national dance from the United States. I have spent a lot of time thinking about this. In the moment, I probably would have said we don’t have one. Our friend, however, was quick on her feet. She showed them how to do the Hokey Pokey.
Now, I’ve had a lot of time to consider this question. For a short time, the Chicken Dance was on my list of U.S. national dance contenders. In terms of folk dances, yes, the Hokey Pokey and the Chicken Dance should be on the list. We should also include the Electric Slide, the Macarena, and the Hustle.
But do any of those rise to the status of a national dance? I don’t think so. But I do have a national dance nominee: Y.M.C.A. by the Village People. Performed in stadiums, at weddings, and just about any other gathering (save funerals and memorial services, although I would not be surprised to hear that someone requested that their attendees perform it). As further evidence of its worthiness as the national dance, the song Y.M.C.A is on the Library of Congress’s National Recording Registry list.
That’s pretty remarkable for a song about men picking up men.
On its surface, Y.M.C.A is a song about wholesome activities, which is certainly what the actual YMCA would prefer we think. The lyrics have plausible deniability. The YMCA does have “many ways to have a good time,” and they do indeed “have everything for young men to enjoy.” Such as basketball and swimming. But the double entendre is hard to miss. The album that features the song is called Cruisin’. And the original music video is worth a watch. At the 2:35, 2:53, and 3:11 marks, they dance on the sidewalk with the Greenwich Village Ramrod bar in the background. If Ramrod sounds like a gay leather bar, you would be right.
And, sure, Macho Man is about getting in shape and In the Navy is about the importance of military service. But back to my nomination for a national dance.
When I first watched the Y.M.C.A music video, I was surprised to discover that the Y.M.C.A. dance had not yet been born. The Y is there, but the other letters are not. That didn’t happen until the Village People performed the song on American Bandstand in January 1979. At the 6:25 mark, Dick Clark cues the audience to do the dance. According to a Spin magazine article, at that particular taping were “a bunch of kids bused in from a cheerleader camp” (Pearlman, 2008). Cheerleaders gave us the dance.
Anyway, performing the Y.M.C.A (national?) dance with a group of strangers gives us about three and half minutes to all be part of the same ingroup. For this brief time, we can ignore our political differences, our sports team allegiances, and our divisive family disagreements.
If you have the right class for it—before covering ingroups—play Y.M.C.A and encourage your students to dance along. To close your discussion of ingroups, point out how the dance created a temporary ingroup. Ask your students to work in small groups to identify other ways temporary ingroups can be created. Finally, if you haven’t yet, show your students the TV2 Denmark All That We Share video.
And that show that the ship’s crew performed? They included Y.M.C.A. Perhaps its an international dance.
Reference
Pearlman, J. (2008, May 27). “Y.M.C.A.” (An Oral History). Spin. https://www.spin.com/2008/05/ymca-oral-history/
The social psychology of viral eateries: A class discussion
Apollo Bagels in New York City’s West village has become so popular that the lines stretch to 100 feet. And that was before the November 30, 2024 New York Times story.
After covering the social psychology chapter in Intro Psych, ask your students to read the story (the link is gifted to you, so your students do not need a New York Times account). And, then, as your students to work in small groups to answer these questions.
One patron said, “If it’s gone viral on Instagram, I’ve stood in the line and waited for it.” Which of Robert Cialdini’s six principles of persuasion best account for this behavior: reciprocity, scarcity, authority, commitment and consistency, liking, consensus? Explain.
The article states that there is a chance that Apollo’s Bagels will be evicted from this location. What does the persuasion principle of scarcity will predict will happen with the lines? Will they get longer, shorter, or no change? Explain.
After standing in line, a patron declared that the bagel she purchased was “phenomenal.” From the story, we don’t know how long she waited in line, but let’s imagine she waited 20 minutes. Explain how cognitive dissonance could have made an objectively average bagel exceptionally good.
In the comments to the article, Daneil Kfoury wrote on November 30, 2024, “I don’t love waiting in lines, but I am from Texas, and we wait in line for great BBQ. It’s part of the experience. It’s a wonderful opportunity to mingle with strangers you may never mix with and experience humanity.” Explain Kfoury’s comments in terms of ingroups.
For the AI-conscious, ChatGPT nailed questions 1, 2, 3, but whiffed on 4.
If you’d like to incorporate AI, ask students in their groups to use AI to answer the questions and then critique AI’s responses based on what they’ve learned in class about these concepts (Costa et al., 2024). These same instructions would also work as a solo take-home assignment.
References
Balk, T. (2024, November 30). A hole in apollo bagels’ business model? It’s too popular. The New York Times. https://www.nytimes.com/2024/11/30/nyregion/apollo-bagels-nyc.html
Costa, C., Husain-Habib, N., & Reiter, A. (2024). Integrating ai into education: Successful strategies, ideas, and tools from psychology instructors. Teaching of Psychology, 00986283241297635. https://doi.org/10.1177/00986283241297635
[The attached photo is not of an Apollo Bagels bagel, as far as I know.]
Let’s talk about grief
written by Sue Frantz | May 26, 2025
My father died of cancer when I was a teenager. He was 52. I didn’t realize how young he was until I surpassed his age. My father died in middle age. It wasn’t his middle age.
I’ve never liked covering death and dying at the end of the Intro Psych lifespan chapter. By putting death after discussion of being an older adult, the implication is that that is the right time to die. Everyone who dies before their 80s or 90s has evidently done life wrong. That doesn’t sit well with me.
In my Intro Psych textbook, the previous author had placed death and dying at the end of lifespan. When I revised the book, I deleted that section of the chapter. That didn’t feel right, either. It’s an important topic that we need to be talking about.
I visited the booths at the 2024 American Psychological Association convention. I could claim that I enjoy seeing what’s new in the land of vendors, but really, I just like seeing what’s new in promo items. My favorites these days are branded Tide pens and neck gaiters. I also like lip balm, but I may have a lifetime supply now. Even if my lifetime extends deep into my 90s.
On this particular visit to the vendor booths, I met Jen Reising and Heather Taylor of The Mourning Movement who offer “professional grief resources to build community and change the narrative around grief.”
In my conversation with Jen and Heather, the death and dying coverage solution came to me. Our Intro Psych coverage should not be about death and dying but about grief. Yes, we experience grief from the death of someone we love—including a pet—or our own impending death, but we also experience grief that results from other losses such as a job, a friendship or other relationship. A presidential election. Each requires coping with the loss of a previously imagined future.
Jen and Heather write:
Grief is not just about sadness; it encompasses a myriad of feelings that can surprise us in their intensity and variety. You might find yourself oscillating between anger and relief, guilt and nostalgia, or despair and love—all within a short span of time. This is perfectly normal. Emotions in grief are like colors in a palette, each adding depth and nuance to our experience of loss (Reising & Taylor, 2024).
Rather than cover death and dying in the lifespan chapter, I’m going to cover the more global feeling of grief in the emotions chapter.
In a survey of 800 Intro Psych instructors, one-third reported that they don’t cover emotion (Richmond et al., 2021). Some instructors who exclude emotion have told me that discussion of the theories of emotion bores them. What if we changed the focus of the emotions chapter from theories that explain where emotions come from to focus on some of our more powerful emotions? Let’s talk about happiness and anger. And, yes, let’s also talk about the complex emotions that come with grief.
References
Reising, J., & Taylor, H. (2024, September 11). The many faces of grief—Embracing emotional diversity. The Mourning Movement. https://themourningmovement.com/f/the-many-faces-of-grief—embracing-emotional-diversity
Richmond, A. S., Boysen, G. A., Hudson, D. L., Gurung, R. A. R., Naufel, K. Z., Neufeld, G., Landrum, R. E., Dunn, D. S., & Beers, M. (2021). The Introductory Psychology census: A national study. Scholarship of Teaching and Learning in Psychology, 7(3), 163–180. https://doi.org/10.1037/stl0000277
What if it’s not about the grades?
written by Sue Frantz | May 26, 2025
The 2024-2025 ski racing season is underway. Mikaela Shiffrin, at the age of 29 holds the record for the most World Cup alpine skiing wins with 97. She blew past the previous record holder, Ingemar Stenmark, who had 86 wins. Stenmark’s record was set in 1989 and was thought to be unbeatable.
In alpine skiing, winners are commonly determined by tenths of a second. In a recent race, less than a second and a half separated the top eight racers (Zaccardi, 2024). All racers work to improve their technique in order to improve their speed. Their goal is not to win; their goal is to find a faster way down the mountain. Mikaela Shiffrin is no different from other top athletes in that way. Get faster; the wins will come (Armour, 2024).
That’s a great example of the difference between extrinsic and intrinsic motivation. Are you working for the glory and the praise that comes with a win? Then you are extrinsically motivated. Or are you working to get better for the sake of getting better? Do you want to be the best you that you can be? Then you are intrinsically motivated.
Ask your students—in a free response format, index cards work fine—“Why are you in college?” (If you teach high school students, ask what they plan to do after high school, and then ask them why.)
For each card, read it silently to yourself to make sure the content is appropriate, then read it out loud. Ask your students if the motivation sounds more intrinsic, more extrinsic, or if there isn’t enough information to make a determination. In the case of college, if a student says they’re here to get a degree or to qualify for a job, their motivation is extrinsic. However, if they say they’re here to learn, their motivation is intrinsic.
Of course, this is all a bit more nuanced. I’ve had students tell me directly that they don’t care about my course because they’re not psychology majors. They were much more intrinsically motivated in courses that had prefixes that matched their major. My thought process after that was pretty straight-forward. If my students aren’t seeing why psychology matters to them, then I need to make it clear why psychology should matter to them. If I couldn’t explain why particular course content should matter, that course content got tossed.
Who is more likely to cheat? Those who are extrinsically motivated (Krou et al., 2021). A student who just wants the degree can cheat their way through college and get that degree without learning.
A student who wants to learn will do the work required for learning. The grades—and the degree—will follow as a natural byproduct. Just as the wins follow for skiers who work to get better.
Here’s the million dollar question. How do we help students shift from extrinsic motivation to intrinsic motivation?
Shiffrin’s 97th victory
References
Armour, N. (2024, October 25). Mikaela Shiffrin is using her records pursuit for good. USA Today. https://www.usatoday.com/story/sports/columnist/nancy-armour/2024/10/25/mikaela-shiffrin-world-cup-milestone/75816994007/
Krou, M. R., Fong, C. J., & Hoff, M. A. (2021). Achievement motivation and academic dishonesty: A meta-analytic investigation. Educational Psychology Review, 33(2), 427–458. https://doi.org/10.1007/s10648-020-09557-7
Zaccardi, N. (2024, October 26). Federica Brignone becomes oldest woman to win Alpine skiing World Cup race. NBC Sports. https://www.nbcsports.com/olympics/news/federica-brignone-mikaela-shiffrin-alpine-skiing-world-cup-soelden