FollowUp.cc: Remind Yourself
[Update 1/17/13: FollowUp.cc remains free for those who use up to 30 reminders a month. For up to 100 reminders and integration with Google Calendar, you’ll need to sign up for their personal plan at $5/month.]
A month ago I wrote about NudgeMail, a service that allows you to send email reminders to yourself in the future. For example, if you send an email to Monday@NudgeMail.com, you’ll receive that email back from NudgeMail on Monday morning. An email sent to 1pm@NudgeMail.com sends that email back to you the next time 1pm rolls around. An email sent to 5minutes@NudgeMail.com sends that email back to you in 5 minutes. Unfortunately, NudgeMail mysteriously stopped working for me. Since I found the service so useful, I went searching for another company that provides a similar service. I found one that does the same thing, but has some additional features.
The advantage of NudgeMail is that there is no registration, no login. That’s also its disadvantage, I discovered. When it stopped working for me, I had no easy to way to see the future NudgeMails I had scheduled. My only option was to go through Outlook’s sent folder. (Actually, I used Xobni to narrow down the search – see this earlier post, but it still wasn’t easy.)
For email reminders, I’m now using FollowUp.cc.
It works the same way in that if I want a reminder on Monday, I send an email to Monday@FollowUp.cc. If I want a reminder at 1pm, I send an email to 1pm@FollowUp.cc. See FollowUp’s FAQ for all of ways you can set a time for a future reminder.
When I send the reminder, FollowUp.cc will add it to a calendar that I can access on their website, and it will be added to a calendar I can view in my own Google calendar. And when that reminder shows up in my mailbox later, I can ‘snooze’ it, so it’s sent to me again at some future point.
An example
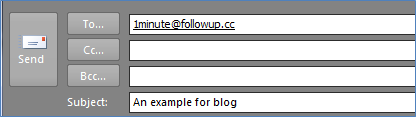
I send this email:
A minute later, I received this email:
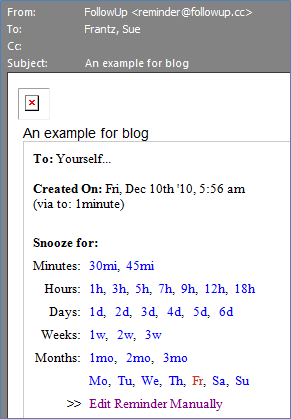
I can either do what I wanted to do, or I could ‘snooze’ it. If I click ‘1w,’ I will get this same email reminder back in a week. If I click ‘edit reminder manually,’ I’m directed to a webpage where I can set the time and date myself.
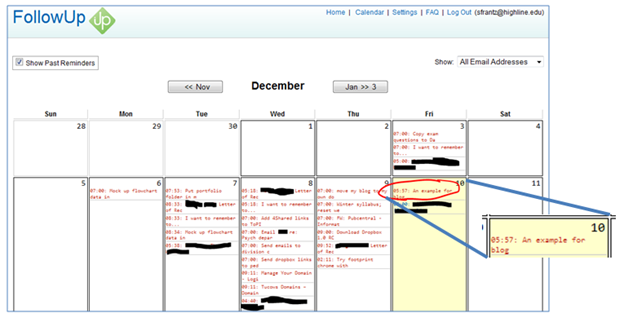
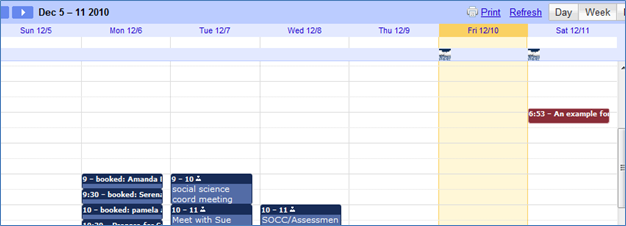
The FollowUp.cc calendar
I wrote that email on Friday, December 10th at 5:56am. When I visit my calendar at FollowUp.cc I can see that “An example for blog” has been added. It’s in red because by the time I was ready to take this screenshot, 5:57am had already passed.
Within the FollowUp.cc settings, you can get the URLs for both an iCal calendar and RSS feed.
If you use Google calendar, on the bottom left, there is a section called ‘Other calendars.’ Click add. Then select ‘Add by URL.’ Then paste the iCal URL from within your FollowUp.cc Settings.
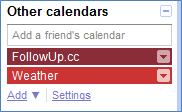
The FollowUp.cc calendar only shows your upcoming reminders. (I snoozed the ‘an example’ reminder until tomorrow so it would appear in my calendar.) If you don’t want to see your reminders all the time, under ‘Other calendars,’ click ‘FollowUp.cc.’ The color will turn to white. Click it again to turn it back on.
I tried out the RSS feed, but I decided that I didn’t need my reminder information in my feed reader, too. My email and my Google calendar were plenty!
From other email addresses
By adding other email addresses to your account, you can send yourself reminders from them as well. Whatever account you send from, email reminders will go back to that account. All email reminders go into the same calendar though.
Remind others
If I email me with something like, “Let’s find time next month to discuss (some issue),” and I cc January3@followup.cc, then on January 3rd, you and I will both get this email in our inboxes. If I bcc January3@followup.cc, then only I will get the reminder. If I use Subtextual (see this earlier post), then I can add an additional message to myself. And, of course much mixing and matching is possible.
For example, let’s say that I email you, cc’ing someone else and January3@followup.cc. I then write a message: “Here’s the background…” But because I want to include some additional information in the reminder for you and me, I use Subtextual.
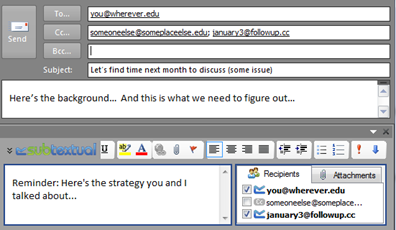
On January 3rd, the ‘here’s the background’ email will be sent as a reminder to ‘someoneelse,’ to you, and to me. The ‘here’s the strategy’ email will be sent as a reminder to just you and me.
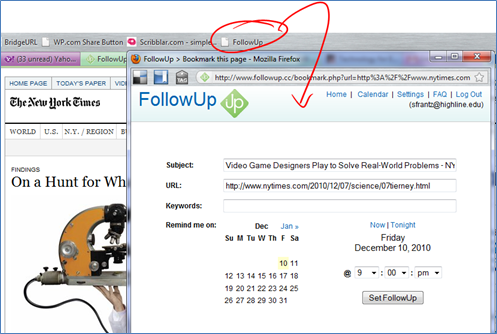
Remind yourself about websites
FollowUp.cc also provides a bookmarklet. When I click a link in my browser, I can set a reminder to be sent to me later reminding me to visit that website.
Conclusion
The developers continue to make improvements. Keep an eye on this product!