Navigate Folders Faster: QuickJump

As another academic year gets off the ground I’m shuttling more files around than I did all summer. I have folders, subfolders, and sub-subfolders on my C:\ drive and my college’s M:\ drive. I used to use the M:\ drive both as backup and to hold files not currently in use, like PowerPoints and handouts for courses I hadn’t taught in awhile. About a year ago I copied onto my new laptop my flash drive files that I carried around with me. I put them all in a folder called ‘flash drive files’ with the anticipation that I would sort it out later. I’ve found myself using the electronic equivalent of the ‘archeological dig’ filing system. You know the one I mean. Papers pile up on your desk, and you can find what you’re looking for, roughly, by date. “That was a long time ago, so that paper’s near the bottom.” My electronic files have begun to take on some of those same characteristics.

Managing folder trees to find the right folder to either locate a document or to save a new document has become an adventure. Sometimes even when I know exactly where something is, it may take several mouse clicks to get there.

Enter QuickJump, the latest product from TechHit, the company that brought us SimplyFile, the email filer I blogged about last month. (QuickJump only works with Windows products, sorry Mac users.)

QuickJump allows you fast and easy navigation of your folders. When you first run it, it only indexes the folders in “My Documents.” If you’d like it to index additional folders or folders on other drives, like network drives, just let it know. In my case, I added the network M:\ drive.

With a keyboard shortcut (CTRL-SHIFT-J is the default, but you can make it whatever you’d like) you get this pop-up:

An alphabetical listing of the first 100 of my 1134 folders is nice, but QuickJump’s power is in its searching ability.

When I type ‘assessment’ into the search box, I get the 85 folders that contain the word assessment. (I have 85 folders that contain the word assessment?!)

If I keep typing I can narrow it down even further. When I add “psych” I get it down to 7 folders. Much better! Partial words are fine. In fact, QuickJump revises the list of results as you type. After I had typed “assessment ps” I had already identified the folder I needed. Word order doesn’t matter, either. If the words or partial words you type appear in the folder tree anywhere, QuickJump returns the folder.

QuickJump works any time you want to find a folder. No programs open and you’re looking for a folder? CTRL-SHIFT-J. You’re in MS Word, and you’re ready to save your document? Hit save, then CTRL-SHIFT-J. You’re in your email program and are saving a file, like all of those emailed student assignments? As soon as the “save as” box appears, CTRL-SHIFT-J.

I did a little test. I timed how long it took me to get to a given subfolder buried 4 layers deep. With QuickJump, it took me 6 seconds to get there. Using standard navigation, by double-clicking on My Documents and double-clicking through layers of folders, it took me 9 seconds. QuickJump was 1/3 faster even when I knew exactly where to find the folder using standard navigation. That makes it exponentially faster when I’m not sure where a particular folder is!

QuickJump made my life run just a little more smoothly. Now if I can just find a similar product to help me manage all of those papers on my desk.

This product is $29.95 and comes with a 30-day free trial. Readers of this blog can purchase QuickJump for $23.95 (20% off). Just use this link before September 22nd, 2009.


Twitter: There Are Educational Uses?

I joined Twitter some months ago, and then quickly became one of 60% U.S. Twitterers that Nielsen found didn’t return a month after joining. But now I have to do some rethinking.

I’m a member of a social networking group called College 2.0: Higher Education, Online Learning, and Web 2.0. Here is a recent post to a discussion forum where the topic was Twitter (reproduced here with permission of the author).

For a long time, I’ve been a big fan of Facebook, and I’ve been thinking about ways I might somehow incorporate Facebook into my classroom (given that I know many of my students use it, and it seems like it might be something that could engage them and get them excited about learning statistics). I still haven’t figured out a way to use Facebook in my classes, but I did think about something I could do with Twitter. This summer, I asked my students to “tweet” about things they were finding in the news or online that related to statistics (e.g., news reports that included statistical information, uses or misuses of statistics, interesting graphs, cartoons, data sets, websites that teach statistics, survey or poll results, YouTube videos, etc.). I thought this would be a great way to emphasize statistical literacy in my course and to help my students become more savvy consumers of statistical information they are presented with in the “real world” on a daily basis. These are definitely learning goals in my courses. I presented this as an extra credit opportunity to my students (they would get a point for each “tweet” they posted, and they could post up to five “tweets”) and I provided them with information about how to set up Twitter accounts if they did not already have one. I had 20 students in my summer course, and 15 of them signed up for Twitter and participated in my “experiment.”

I’ve been so excited about how this went and how involved my students got in this “experiment” that I plan to continue doing this in future classes. It got my students looking for how statistics is used (or sometimes misused) in the “real world,” and I can’t tell you how many discussions I overheard my students having before and after class about things they were finding that they wanted to “Twitter” about. One of my students–who is also a teacher–actually e-mailed me yesterday to tell me that this Twitter experiment gave him many ideas for how he might incorporate this technology into the courses he teaches. Plus, I found this exercise was a great way for ME to make announcements to my students about things I was also noticing in the news. I don’t always have the time to go over these things in class, but using Twitter allowed me to get the word out and to model the kinds of questions I hoped my students would ask as they came across different information presented in news reports, polls, and journal articles.

If you want to learn more about what I did and see some examples of the kinds of posts my students and I put up on Twitter, you can follow me and my class on Twitter. You can follow me at www.twitter.com/MGEverson, and, if you enter #epsy5261 as a search term, you’ll see things that we all posted.

I realize I am very biased here, but I think this could have some potential in many classrooms, and that’s why I wanted to share it here. It’s a way you can incorporate more technology in your course if you want to, and I also feel it’s a good way to get students thinking about how what they are learning about applies to their everyday lives. For me, teaching statistics is sometimes a challenge because many of my students are taking the course because they HAVE to, and some are not very motivated to learn the material (or are very anxious about it because they assume it’s just a math class). For those students who come to our courses with little motivation or interest in the subject, this might engage them a bit more, especially if they are interested in social networking. I’ve learned through doing this (and talking to others–like you–about Twitter) that there are so MANY other ways in which Twitter can be used in the classroom, and to me, this is exciting. I can’t wait to experiment more!

One thing I must admit, however, is that my course is a graduate-level course. I would hope this would work in a similar way with undergraduates, but I haven’t tried it yet with my undergraduate course. Hopefully, the next time I teach that course, I can try it.

Michelle Everson

Department of Educational Psychology

University of Minnesota

When classes begin this fall, I’ll ask my (undergraduate) students if they Twitter. Whether they do or not, I’ll ask if they would be interested in the sort of experiment that Michelle Everson tried.

Has anybody else used Twitter in a course? What did you do, and how did it work?


Electronic Grading: Germ-Free!

If you’re concerned about the flu virus and you haven’t moved to electronic grading, now might be a good opportunity to start.

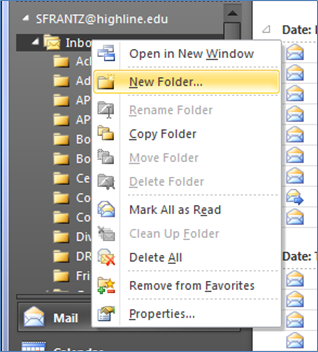
Managing email. As soon as I get an assignment, I hit reply, type “Got it,” then hit send. This eliminates follow-up emails from students asking, “Did you get my assignment?” In my email program, I keep a folder called “Grade these.” All student assignment emails are moved there so they don’t get lost in my inbox. (SimplyFile makes this easy to do with the click of one button. See this post for more information about SimplyFile.) After I’ve emailed students their graded assignments, I move their emails into the “Graded” folder.

Outlook folders:

Managing the documents. The papers themselves are saved to a “Student papers” folder in “My Documents.” Each file I save is renamed with standard nomenclature: Student last name, assignment, and whether the assignment was turned in late. For instance, if Alan Ladd turned in his second reaction paper on time, I would name the file LaddRP1. If he turned in his experimental design assignment late, I would name it LaddXD-Late. After grading the assignments, I move them into the “Graded” folder located in the “Student papers” folder. (UPDATE 10/10/09: See a more recent blog post on EZDetach for an easier way to save files from email messages.)

My Documents:

Once I’ve sent a graded assignment back to a student, I move the file into a “Sent” folder.

Attaching files to Outlook email: A tip. You can drag and drop files into open emails to attach them. (You can also drag attachments out of emails that have been sent to you into folders or onto your desktop.) See this video:
[youtube=http://www.youtube.com/watch?v=CxrpGIPvAJI&hl=en&fs=1]

Using MS Word 2007 to grade assignments. Select the “Review” tab. Click “Track Changes.” Any change you make shows up in red. Deletions are struck-through; additions are underlined.

Track Changes

To add a comment, with your mouse highlight the text on which you’d like to comment. Click “New Comment,” then type your comment.

Add Comment

When you’re done, save your file, record the grade, and send the file back to the student. That’s it!

TabletPC users. On the Review tab, select “Start Inking.”

Start Inking

That produces the “Pens” toolbar. Just write like you normally do.


Xobni [inboX]: Not Just Another Outlook Addin

Xobni allows me to quickly find email messages, attached files, and contact information for anyone who has ever emailed me. With the large number of students each term as well as various committee responsibilities and other collaborative projects, Xobni has made managing the onslaught of email much easier! For example, when I agree to write a letter of recommendation for a student, I turn to Xobni to call up all previous emails and files exchanged with that student. Within those I often find specific examples I can use in writing the letter.

Most of Xobni‘s functionality can be found in its free version. For a one-time $29.95 fee, you can upgrade to Xobni Plus which gives you a bit more power. Everything in this post, I believe, is included in the free version. Click here to see a comparison between Xobni and Xobni Plus. (If you tried Xobni before, you may have found that it slowed Outlook down when starting. With improvements, Xobni doesn’t slow it down as much. It’s worth trying again.)

This is what my Outlook inbox looks like. Xobni occupies the fourth column. Whatever message is selected, Xobni displays the information for that sender. In this case, I’ve emailed myself and have that message selected, so my information is displayed. This is my Xobni profile as it appears in my Outlook.

Xobni gives me all sorts of information about the sender, e.g., contact information such as email addresses and phone numbers. I have the Facebook icon selected so I get the sender’s most recent status update (assuming the sender and I are Facebook ‘friends’ or the sender’s Facebook profile is public).

Selecting the other icons in the center of the image above produces a wealth of information.

Analytics. This graphic shows how many emails I’ve sent and received and when I’ve received them. If I had someone else selected in Xobni, I would see how many emails I have sent them, how many they have sent me, and when they have sent them.


Actions. Clicking the orange ‘actions’ icon allows me to email the person. (Remember, Xobni displays the information for any person whose email you have selected in your inbox.) If I click “Email Sue,” a new message pops up with the email address already filled in. If I click “Schedule a time with Sue,” Xobni not only opens a new email message, but it also accesses my Outlook calendar, automatically enters my free times for the next 5 working days, enters my standard sign off and signature information. Very handy!


LinkedIn. Click the LinkedIn icon to call up information from the person’s LinkedIn profile.


Hoovers. Hoovers.com provides public information about companies. If the person works for a company in the Hoovers database, the Hoovers button gives me a snapshot of the organization. When I receive email from someone who works at APA, this is what Xobni gives me. Clicking “view more” at the bottom takes me to the Hoovers page for APA.


Further down. In the bottom half of the Xobni column, I get a list of people associated with the email sender in the “Network” area. When I send or receive email from a particular person, this box identifies who has been cc’ed on those various emails. Selecting one of them replaces the current Xobni profile with the profile of the person I have selected.


In the “Conversations” box, I get a list of all of the emails, clumped by subject line, I have exchanged with the person whose profile is displayed. Each threaded conversation is dated with the most recent first. Mousing over a conversation thread, like I’ve done here, produces a pop up window with a preview of the messages in the thread.

If I select the thread, the Xobni person profile is replaced with more detailed information.

Then if I select a message within the thread, I can choose to open the message in Outlook or reply to the message directly from Xobni. Any time I want to go back, I just hit the “Back” button. If I want to go all the way back to the beginning, to the original profile where I started, I click “Start Over.”

There’s a very similar process for “Files Exchanged.” Here I get a list of the files I’ve exchanged with that person, both ones I’ve sent and received. Mousing over the file name gives me information from the email the file came with as well as information about the file itself. Double clicking the file name will open the file.

In the “Appointments” area I can see what upcoming appointments I have scheduled for the person whose Xobni profile I’m viewing. (Remember, to view a Xobni profile, just select the person’s email in Outlook.)

Search. With all of that said, the Xobni feature I cannot live without is search. In the search box, enter your search term, and Xobni will search people, email messages, appointments, and tasks. (In the free version, for messages, Xobni will only search subject lines and will search your current Outlook messages plus one archive file. Xobni Plus will search the message body in both your current Outlook messages and in an unlimited number of archive files.)

Download Xobni. Try it out. It’s free!

UPDATE (5/7/2010). Xobni released version 1.9 on April 14, 2010.  The functionality is pretty much the same, but the user interface looks a little different.  Xobni also now collects URLs exchanged between you and the person whose information you are looking at.


SimplyFile: An Outlook Addin

Even with a whole host of new technologies out there, for communicating with people at a distance, email remains my lifeline. For work email, I use MS Outlook, as I have for years. I always wished it would work how I wanted it to work. TechHit’s SimplyFile gets me closer.

I can file an email message in its appropriate folder with a click of a button (or keyboard shortcut). I can create a task from an email message. I can turn an email message into an appointment in my calendar. I can make a message disappear from my inbox for a designated period of time, and then have it reappear on its own later.

SimplyFile is an Outlook addin. (Try it free for 30 days. After that, it’s $39.95.) I tried it for 30 days, but I wasn’t sure it was worth the price. I uninstalled it. After not having it for an hour, I pulled out my credit card. It made my email time so much more efficient, I couldn’t go back to my pre-SimplyFile way of doing things. The software is so easy to use, there’s really nothing to learn. Truly.

The toolbar. There are two ways to access the SimplyFile toolbar. If I’m viewing messages in the main Outlook window, I can use the bottom-most toolbar in this image.

If I’ve opened a message, the toolbar appears here:

Filing messages. When I have a message selected in Outlook, SimplyFile takes a guess at which folder I’d like to move it based on where I’ve put similar messages in the past. If I want to put the selected message in the ‘OTRP’ folder, all I need to do is click ‘File Message’ or use the keyboard shortcut Alt+M. If that isn’t the right folder, clicking the drop down arrow in the folder box gives you SimplyFile’s next best guesses.

The first ones are SimplyFile’s top 5 guesses. The next 20 are good choices. If I don’t like any of those options, I click ‘<Select/Create folder>’ to select/create a new folder.

Did you accidentally file the message in the wrong folder? Click ‘Undo File’ to pull the message back into your main inbox. Just like using undo in Word, you can undo the filing of several messages. (I don’t know how many can be undone; I have only had occasion to undo 5 or so in a row.)

This list shows all main folders and their subfolders listed together. If you’d like to see the folder paths, you can change that setting in SimplyFile’s options menu.

.

.

Task it. When I get an email that requires some action on my part, I ‘task it.’ This not only calls up Outlook tasks, but it embeds the message in the task. For example, let’s say I open the following message.

.

.

.

.

All I need to do is click ‘Task It,’ and SimplyFile opens a new Outlook task. The subject line from the original email is the subject line for the task. Change it if you’d like. The body of the email is reproduced in the body of the task. Also feel free to edit this space at will. Double clicking the envelope at the bottom of the body will open the original email message.

.

.

.

.

.

.

Schedule it. Open an email. Click ‘Schedule It.’ Outlook opens a new Outlook appointment. Like a task, the email’s subject line becomes the appointment’s subject line. The email’s body is copied into the appointment’s body. Double-clicking the envelope at the bottom opens the original email. You will need to change the date and time. SimplyFile isn’t smart enough (yet?) to pull the date and time out of the body of the message.

If there were other recipients of this message, they all would be included when I click ‘Scheduling.’

If moving your mouse to click ‘Schedule It’ isn’t fast enough for you, in SimplyFile’s options, you can create a hotkey that will allow you to turn an email into an appointment without your fingers leaving your keyboard.

.

.

Snooze it. Have a message in your inbox that you don’t need to deal with right now? But you want to get it out of your way? Hit the snooze button.

For any message, when you click ‘Snooze It’ this dialog box appears. The default is 7 days, but change the days/hours/minutes to whenever you’d like. The message will disappear, then like magic it will reappear in your inbox at the time you designated.

To do this, SimplyFile creates a ‘SimplyFile’ folder in your inbox with a ‘Snooze’ subfolder where it holds your snoozed email messages until the time expires.

If you’d like to see what’s snoozing, just open that folder. If you’d like to de-snooze a message, just drag it back into your main inbox folder.

Try it.
Download SimplyFile and try it out for 30 days for free. If you uninstall it and go back to your current way of handling email, let me know how you managed it!


ReadTheWords

Wouldn’t it be nice to have someone to read to you? Like, that article you’ve been meaning to get to? Or student papers? What if you not only had someone to read it to you, but you could take the recording with you to listen to while you work out or on your daily commute?

Check out Read The Words.

Give it any text, either by typing it in, uploading a file, giving it a URL or the address of an RSS feed. The file will be converted to audio. There are several different avatars (voices) you can choose from including a British accent and an Indian accent. You can adjust the reading speed of the avatar to match your listening speed.

For students who are learning English, they can have the written English text in front of them while they listen to the audio for practice with pronunciation. For students who are learning Spanish or French, they can have Spanish or French text read by a Spanish or French speaking avatar.

Once the file has been created, you can download it as an MP3, send it as part of an email, or embed the file in a webpage like I have done here.

The free version of the service allows you to have 3 recordings saved on their server with up to 30 seconds of speaking time per file. For $19.99 a year you get 25 recordings saved on their server of up to an hour of reading time per recording. For $34.99 per year, you get 100 recordings saved and the recording time is upped to 8 hours per file.  If you download the file, you can delete it from your library on their server to free up more space for more files.

If you try it out, let me know how it works for you!


Scheduling a Bunch of People? Try Doodle.

One of the things I like about Outlook is the ability to flip through everyone’s schedule to find a likely meeting time. But when everyone isn’t in the same Outlook system, we end up having to find a time via email. You write, “When can you meet?” And the 7 people you’re trying to get together send you an email back some with when they’re available and some when they’re not available. You then have the fun and excitement of creating a matrix that will show the best time for everybody.

Or perhaps you have students schedule time to meet with you one on one? Want to find an easier option than a sheet of paper circulated around the room or taped to your office door? Or maybe you want to schedule time with your online students and that sheet of paper just doesn’t work at all?

Or maybe you have students writing research papers and you want to limit what the paper topics are and how many students can write about each topic?

Enter Doodle.com.

The instructions are simple. “Create a poll.” “Forward the link to the poll to the participants.” “Follow online what the participants vote for.” “Free. No registration required.” Even though you don’t have to register I recommend that you do. Registering allows you easy access to all of your polls in one place, both the ones you’ve created and the ones you’ve participated in, through the ‘MyDoodle’ link.

First let’s walk through the process of setting up a poll to schedule a conference call. At the end of this blog I’ll discuss using Doodle to set up student conference schedules and how to use Doodle to manage students and their research paper topics.

At Doodle.com clicking ‘schedule an event’ produces this screen. Type in a title, an optional description, your name, and your email address. If you registered and are logged in, your name and email address are automatically entered.

Clicking the ‘next’ button at the bottom of the page (not pictured) produces this date selection page. Since this is a conference call for July 13th, I only selected July 13th. You may choose as many dates as you’d like. Just click on each date to select it. To deselect a date, you may either click the date in the calendar again or click the red X next to the date in the ‘selected dates’ area. The arrows next to ‘July 2009’ allow you to change months.

Click ‘next’ at the bottom of the page (again, not shown). Now we can choose our times. Doodle is quite flexible in terms of how you can enter times.

Here I’ve clicked the links to ‘enable time-zone support’ and ‘add further time slots.’ I’ve chosen my time zone, and I’ve entered some times. Notice that if I had more than one day available for the conference call, there would be an additional row for that day. Once I had selected the times for the first day I could copy and paste those times into each subsequent row using the ‘copy and paste first row’ option.

When I click ‘Finish,’ Doodle will send me two emails. The first contains a participant link that I will send out to my conference call participants. The second contains an administrative link that will allow me to edit or delete the poll. If I’m registered, I can also access the administrative features by logging into Doodle.com and clicking on ‘MyDoodle.’

This is what the poll looks like after I’ve entered the times that I’m available. If you’re not in the Pacific time zone, you can choose your time zone, and click ‘update.’ Doodle will change the time to match your time zone. Just type your name in the empty box, check the times that you’re available, and click ‘save.’ That’s it!

You can go back into your poll and edit it whenever you’d like by using the administrator link. If you change the time options after someone has already participated, little question marks will appear in those time slots for each participant. This means that you don’t know whether the participants who have already participated would have chosen those new options over the ones they did choose. Email your participants to let them know that you changed the options and that they can re-vote.

You may have noticed that on the last screen, before we hit ‘finished’ there was an ‘options’ button.

‘Yes-No-Ifneedbe Poll’ allows your participants to choose ‘if need be’ instead of just yes or no. Very handy!

‘Hidden poll’ is self-explanatory.

‘Only you can modify/delete votes and comments’ disallows your participants from modifying or deleting their own votes and comments. Note that the only participants who can modify or delete their own votes and comments are those who have registered with Doodle.com.

‘Limit number of OKs per participants (row) to 1.’ We wouldn’t want to do this for our scheduling poll since the goal is to find times that work for everyone. But there may be a poll where you’d want everyone to choose only one option.

‘Limit number of OKs per option (column).’ If you were organizing an event where you needed two volunteers for each time slot, this feature would be handy. Click that option then in the ‘limit’ box, type 2.

Student conferences

Do you hold individual conferences with students? Create a scheduling poll with your available time divided into 15-minute time slots. Under ‘options,’ select ‘limit number of OKs per option (column)’ and ‘limit number of OKs per participant (row) to 1’ so that students can only sign up for one time slot.

Here is what such a poll might look like.

Notice that once a participant has selected a time slot, that time slot is not available for anyone else. The scroll bar on the bottom allows participants to scroll to the right to see more days.

Student research papers

Not only can Doodle manage scheduling, but it can manage any kind of straight-forward poll.

To create this poll on the Doodle.com main page, I selected “make a choice.” I put in the topics choices and using ‘options’ I limited students to only one topic, but up to 4 students can choose each topic.

In conclusion

If you’ve used Doodle or if you decide to try it, let me know how you’re using it and how it works for you!


The Smartboard Alternative for $40

UPDATED 6/24/2012 
Have a tablet?  You can go this route instead. 

There you are in class and you write on your whiteboard (or chalkboard, I hear those still exist) the most perfect explanation of whatever it is you explain. Wouldn’t you love to be able to save that to share with future students? Or perhaps you’re part way through the material you want to cover when class ends. Don’t you wish you could save what you’ve written so you could start there next class? Do you find that the linearity of PowerPoint is starting to wear you down? Wouldn’t you love to just point at a spot on the screen and zip to the slide you want? Or wouldn’t it be nice to access the internet without moving from the front of the room? Don’t you wish you had a few thousand dollars laying around for a smartboard?

This is me writing on the screen using an infrared pen. The displayed program is Classroom Presenter.

What if I told you that you can have all of the functionality above for about $40 (assuming you already have a projector and a computer)?Wii remote: $30Trip to Radio Shack: $7.50*

Dried up dry erase marker: free

Simulated smartboard: priceless

If your computer is not Bluetooth enabled, you’ll need a USB Bluetooth dongle (that’s what they’re called, I swear!): $3

If you already have a Wii remote, then that’s free. The price of this project just dropped to practically nothing!

*This cost does not include the $8 soldering kit, the $7 for the spools of wire, and because some parts are sold in pairs, you’ll probably want to make two pens.

Before we play MacGyver, I’m going to send you to watch Johnny Lee show you how this works in a 5-minute TED talk video. If you like what you see, come back, and I’ll get you set up with everything you need.

[Seriously, go watch the video.]

We’re going to use a Wii remote to act as the conduit between your classroom’s screen and your computer. We’re going to use an infrared pen to tell the Wii remote what to tell the computer. In short, we’re going to do what Lee did. If you combine this Wii remote setup with Classroom Presenter (see my 4/14/2009 blog post), you will have a powerful interactive whiteboard.

What you need.

1. Wii remote. That’s easy. You can use the one that came with your Wii – you’re not going to do anything to it other than tote it to class. It will still work just the same way with your Wii system. You don’t have a Wii system? You can buy a Wii remote wherever game systems are sold.

2. Infrared pen. This is a little harder. You can order them online from $8 to $30. IRPensOnline and Penteractive are two such sites [Update: Some sellers have pressure-activated pens if you’d rather not use a thumb switch]. (Disclaimer: I haven’t used either retailer. Sites are provided only for informational purposes.) Or you can make your own (thus the trip to Radio Shack). I used the instructions from Ken Moore of Ken Moore Design. He includes a how-to video, written instructions, and a (printable) Radio Shack shopping list complete with part numbers. I opted to use a dried up EXPO dry-erase marker because we seem to have those in abundance. You know where to find them. In your classroom, it’s usually the first one you pick up. Because some of the parts you need are sold in pairs it makes sense to make two pens. You should always have a back-up anyway.

Tips for making the pen.

a. Ken’s shopping list doesn’t include wire. I used 22-gauge – definitely something on the smaller side is better. Wires have to be stuffed into the marker with the battery holder so the smaller they are, the easier everything fits.

b. When he says that force is needed to get the LED holder into the tip of the marker, he is not joking. I used a drill to bore the tip to make it a little wider, particularly around the opening. I think this made it easier for the threads of the LED holder to bite. Once they did, screwing it in wasn’t hard. Lots of force to get it started. Seriously.

c. For my pen, small, needle-nose pliers will be needed to change the battery. I’ll worry about that when the time comes.

d. One person recommended a daub of super glue to hold the LED in place in the holder – not a bad idea.

e. Since the LED is infrared, by definition, you can’t see it when it’s lit. Please remember this after you followed the instructions to the letter, push the switch, and nothing seems to happen. Dig out your digital camera or flip on your cell phone’s camera, press the pen’s switch, and look at it with your camera. If your pen is working, you’ll see the light through your camera’s viewfinder.

Here’s my pen. Notice the bulge in the plastic at the tip? That gives you a sense of the amount of force needed to get the LED holder in. (Kudos to EXPO for using high quality plastic in their products!)

3. Smoothboard software. This is what allows your Wii remote to talk to your computer. It’s not the only software out there, but it has a lot of functionality so it’s the one I recommend. It’s free for educational use, but when you run it, you’ll have to wait 10-15 seconds before the “continue unregistered version” option becomes available. If you like the software, send them $30 to register it.In this blog post, I’m going to just talk about the basic setup, but know that with Smoothboard, you can use a second Wii remote placed in a different spot for redundancy (if you’re standing in front of one, the other one can still ‘see’ the screen; this may also reduce the choppiness that sometimes happens, but I haven’t tried it) or you can use a second one as a ‘presenter’ tool. The latter seems like too much work to me, but you can read the Smoothboard manual and decide for yourself.

[Mac users: Here’s Mac-compatible software.]

4. Classroom Presenter. Okay, this isn’t necessary, but it makes a great smartboard! This free (PC) software (courtesy of the Center for Collaborative Technologies at the University of Washington) was designed for use with TabletPCs. But, when projected on the classroom screen, it gives you terrific smartboard functionality. Of course anything that’s on your computer screen will show up on your classroom screen, but imagine having this:

Load your PowerPoint into Classroom Presenter. Take your infrared pen and, in the toolbar, ‘tap’ the pencil, and write on the slide. Change colors. Switch to the highlighter. Erase individual marks or the entire screen. Quickly ‘tap’ any of the slides on the right to show a new slide. Open a blank screen. When you’re done, save your file, and open it again next class. Or you can save it as html and upload it to your website, course management system, or email to your students. If your computer is WiFi-enabled or is connected to a WiFi network, students with (PC) laptops who are running Classroom Presenter can see your slides on their computer, get your annotations in real time, make their own annotations, and save the file at the end of class. And they can send slides to you in real time, and you can display them for the class. But I digress. For more on this program, again, see my 4/14/2009 blog post.

The classroom setup.

1. Connect your Wii remote to your computer via Bluetooth. Open your computer’s Bluetooth manager, and tell it you’d like to connect a new device. Put your Wii remote in ‘discoverable’ mode. To do this, press and hold the 1 and 2 buttons at the same time. As long as the lights are blinking, it’s ready to be discovered. It will appear in your list as Nintendo RVL-CNT-01. Any time you want to connect your Wii remote, press and hold those 1 and 2 buttons again and then double-click your new Nintendo option in your Bluetooth manager. Presto. It’s connected.

2. Turn on your classroom projector. Once your computer’s screen is displayed, you’re ready to go.

3. Place your Wii remote. This will require a little trial and error to find the best location.

a. To the right or left? Consider how you usually write on the board. You don’t want your back between the pen and the Wii remote. (Better yet, use two remotes, one on each side. Or you can have one remote in closer; that should give greater precision to your writing in the area covered by that closer remote.)

b. How far away? One suggestion, based on a little research, is to take the height of your screen and double it. That’s the distance away from the screen you should place your Wii remote. For example, if your screen is 4 feet high, then your Wii remote should be placed 8 feet away. In my classroom, that worked great. (When I was farther away, the infrared light was too hard for the Wii remote to pick up, and my nice curved line started jumping around all over the place.)

c. How high? The first few times I did this, I found that I tended to point the remote too low. Aim for the middle of the screen. On a desk, I flipped a table-top podium on its side, set 2 textbooks on top of that and then propped a whiteboard eraser under the front of the remote to angle it up a bit. That worked perfectly. Of course a tripod works, too. (Penteractive sells a replacement battery cover for the Wii remote that has a tripod mount built into it.)

4. Run the Smoothboard software. The first thing you need to do is calibrate it. Just press the A button on the Wii remote. Here is the calibration screen:

Notice the circle with the crosshairs in the top left corner? Walk up to your classroom’s screen, put the tip of your infrared pen in the center of the circle, and press the switch. If it’s in your Wii remote’s line of sight, the circle will disappear and then reappear in the top right corner. Repeat this process for all 4 corners. If the circle doesn’t disappear, make sure you’re not standing between the pen and the remote. If you’re not in the way, then that spot is not covered by the Wii remote, and you’ll need to adjust the remote.

This is the Smoothboard interface that shows the battery level on your Wii remote. You can also choose whether you want to use the remote as a whiteboard (which is what we’re using it for) or as a presentation device. I haven’t tried this latter use, so I’ll leave that for someone else to write about.

The “Cursor Control Toolbar” puts a little floating toolbar on your screen. Clicking those buttons allows you to do things like mimic a mouse right-click. Very handy.

The gray box at the bottom shows the area covered by the Wii remote. The white space shows the area you’re using. The more white space within the gray box, the better. This is telling me that I won’t be able to access the very bottom left of the screen because it’s outside the gray box.

5. Run Classroom Presenter, or whatever other software you’d like. Your infrared pen, when the switch is pressed, now acts like a mouse controlling your cursor. Open programs. Open websites. Write on the screen. Anything you can do with a mouse, you can now do with your infrared pen.

Word of caution.


Writing takes some getting used to. To print words, press the button on the pen, draw your line, stop pressing the button. Repeat for each line. If you write in cursive, you’ll likely have an easier time since each word is one big line. Precision isn’t this tool’s strong point. Think of it as writing with a crayon.

In conclusion…


If you have the money, by all means go with a smartboard or a TabletPC. If you’re looking for some impressive functionality for a cost that is almost covered by the change in your couch, it’s worth trying out.

If you decide to give this a whirl, let me know how it goes!


Flipping Typical: Preview Your Fonts

Looking for a new font for your syllabus? Tired of Times New Roman?

This is a practical and simple idea. The website Flipping Typical identifies 60 fonts on your computer and displays them all at once. Type in whatever you’d like to see and that text will be displayed in those fonts. Want to see it in bold or italics? Highlight the text, then CTRL-B for bold and CTRL-I for italics.

If you want to change the font at the top of the screen, either click on the font you want from the list below or click in the black box and type in the font of interest.

The site doesn’t bring in all of your fonts; I don’t know how it selects the ones it does. However, if you type a font you have in the black bar, it will add it to your default list. The next time you visit the site, that font will appear in your list of fonts.

Clicking “A-Z” on the far left of the black bar will order your fonts alphabetically.

And that’s all there is to it. Amazingly simple.


Grade Reports: Merging Excel and Word

I confess that I’ve never quite caught the course management system bug.  I used Blackboard (Bb) years ago but since then I’ve found ways to accomplish my pedagogical goals without it.  As my college makes the switch from Bb to Angel, I promise to take another look at moving some of my course into Angel.  But until then…

I still keep my grades in an Excel spreadsheet.  After each exam I send my students grade reports by doing a mail merge in MS Word; it’s kind of like a mind meld for MS Office products.  I used to print these grade reports and hand them out in class, but email works just fine — and reaches those students who seem to have disappeared from the course.

To send grade reports, you need three things: grades in an Excel spreadsheet, a form letter in Word, and, if you’re going to email grade reports, an email program that Word can use, such as Outlook.

In this post I explain how to set up your files to send grade reports. Once they’ve been set up, a couple clicks will allow you to send them out again.

Set up your Excel spreadsheet.

Let’s start with the grade sheet. My grade sheet is much more complicated than this (perhaps a future blog post) but let’s pretend this is my spreadsheet for a class that’s part way through the term.

In my spreadsheet, the top row helps me keep my content organized (“unit tests” and “papers”), the next line contains my column headings, and the student data begins on line 3. When you do a mail merge, Word likes to have just one row for column headings, so I just copy and paste lines 2 through however many students into a new worksheet. Let’s call that worksheet “GradeReport.”

Now we have this worksheet.

Save your Excel file and close it. Let’s head on over to Word.

Set up your Word document.

Imagine writing a letter to each of your students. What would you want it to say? Here’s one possibility.

I have my grade report document set up so that the date is automatically entered. To do this in Word 2007, go to Insert –> Quick Parts –> Field –> Date. Then you can choose the date format you like. Every time you open that document, the date will be updated.

Notice the lone comma. I’m going to have Word insert the student’s name in front of the comma and insert my ‘notes’ on the other side.

I put in the /50s and /40s to remind students how many points those were worth.

Let’s merge!

With both files set up, we’re ready to have Word ask Excel for the data.

From your Word document, go to the Mailings tab, click “Select Recipients” then “Use Existing List.”

Word will ask you to locate the file you’d like to use. Navigate to your Excel grade file. You’ll be asked to select the worksheet you want. Choose your “GradeReport” worksheet. That window will close and, anticlimactically, nothing will appear to have happened. In fact, Word is now poised to pull in data from your grades; you just have to tell Word which data you want.

Which data would you like?

Put your cursor where you would like the field to go. Let’s start with the student’s first name, so I’ll put the cursor in front of the comma. Now, on the Mailings tab, click the down arrow next to “Insert Merge Field.” Here you will see the column headings from your Excel file.

Here, I’ve selected “First” to insert the student’s first name. And this is what that field looks like:

Now I just place my cursor where I want the rest of the fields to go and select those fields. Here is what my Word document looks like when I’m done. I can format those fields like I do any other text. For example, I can change their font color or size or make them bold. If you didn’t get the field exactly where you want it, you can move it just like any other text.

Preview.

I don’t want to send this out without taking a look at what the students are going to see, so I’ll click the “Preview Results” button on the Mailings tab. This gives me the data from the first person on my grade sheet.

This all looks pretty good except the course percentage is a little more precise than what I need. There are a couple ways to solve this. The easiest way is back in my Excel file. When I copy and paste the data from my main spreadsheet into my “GradeReport” spreadsheet, if I “paste special” and just paste the values, I’ll get 62.6 here instead of this super long calculation. The second way looks a little scarier but it’s just as easy. But if you’re already a little anxious, just plan on handling this the easiest way and skip this next section.

[For those who aren’t afraid of a little code, right click anywhere on the percentage. Word will highlight the entire number and give you this menu. Select “Toggle Field Codes.” The number will change to this: {MERGEFIELD percent}.

Now we’re going to add a little code that tells Word to shrink this number to something more reasonable. Add ‘\# 0.x’ to the field so it reads {MERGEFIELD percent \# 0.x}. This tells Word that after it goes to Excel to get this number, truncate the number to one decimal place. The 62.608… number is replaced by 62.6.

Send!

Now that we’re satisfied with how it looks, let’s mail out the grade reports. On the Mailings tab, click “Finish & Merge.” I’m going to select “Send E-mail Messages” but you could just print them if you prefer.


I now get this popup box where Word has guessed that the column in my spreadsheet labeled ‘Email’ contains my students’ email addresses. If Word guesses incorrectly, clicking the down arrow will allow you to choose a different field. After typing in my subject line, all I need to do is click “OK” and Word will tell Outlook to send each student’s grade report to that student’s email address.

Next time.

Now that you have your grade report file set up, next time all you have to do is open your grade report document and click “Finish & Merge.”