I first wrote about Akindi in 2013 (see this post), and boy has it undergone some amazing changes in 2014. With this first post of 2015, I hope to convince you to give it a try this term.
With Akindi, you print out bubble sheets for a test. Students take the test in class. You run the filled-in bubble sheets plus an answer key through a scanner to create a pdf. Upload the pdf to Akindi, and Akindi grades your test. And gives you all the statistics on that test and its questions you could want. Want to give the corrected bubble sheets back to your students? Just download the pdf and print.
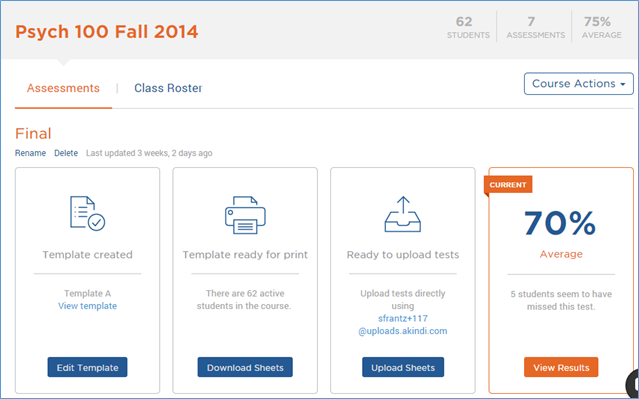
This is what the dashboard looks like. I’m inside a course called “Psych 100 Fall 2014.” In the top right corner you can see that I had 62 students in that course. This particular assessment was called “Final.” Using the buttons at the bottom, I can edit the bubble sheet template, download those bubble sheets for printing, upload a pdf of the scanned completed bubble sheets, and, finally, view the results.
Let’s start near the beginning.
Creating a template
As of this writing, you have two template options. “Template A” is 100 questions; “Template B” is 50 questions. Since this was my comprehensive final, I used the 100-question template. I can just print blank sheets and let my students fill in their names and student ID numbers, or I can go prefilled. Personally, I like prefilled; there are fewer mistakes that way. (Although, if I had 100 students…) I entered my students’ names into my “Class Roster” for this Akindi course; okay, I confess, I pasted their names in a csv file and uploaded their names into this Akindi course. Rather than use my students’ actual student ID numbers, I allowed Akindi to assign them random numbers. Since I’m not connecting Akindi to my course management system*, what number is used doesn’t matter. Akindi just needs a number to connect the student’s bubble sheet to their name on the Akindi website. When you choose prefilled, Akindi pulls the names and student IDs from this class roster and enters them on the bubble sheets for each student. In “Header Info” I also ask Akindi to put the student name at the top of the bubble sheet to make it easier for me to distribute them in class.
[*Side note about course management systems. I believe this option is only available when institutions adopt Akindi, not individual instructors.]

Download blank bubble sheets and upload completed bubble sheets
Once you have your bubble sheets created, download them. If you went prefilled, the answer key ID number (0000) is also prefilled. There is nothing for you to bubble in but the answers. Print out the bubble sheets. Akindi will even add a few blank ones in case you need them, say, if a student spills coffee on their bubble sheet – and both of their neighbors’ bubble sheets. [Pro tip: If your printer is set to auto-duplex, turn it off. Otherwise you will have two students bubbling in different sides of the same sheet. Awkward.]
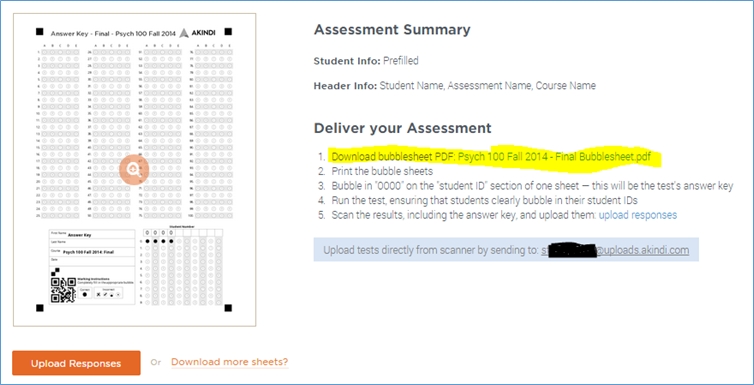
After students have taken the test, collect the bubble sheets and your answer key, and run them through a scanner to create a pdf. Our building’s copier will also scan to pdf, and let me email the file. I have two choices. I can email the pdf to myself, save it to my computer, and then click the “upload responses” button you see in the image above. Or I can just email the file to Akindi directly using the special email address Akindi created. The email address is given in the light blue highlighted text in the screen above, and, very thoughtfully, given on the first page of the bubble sheet pdf. If I choose to have my copier email the pdf to Akindi, the test will be graded before I get to my office. And my office is not that far away.
The results
This is where you see the magic.
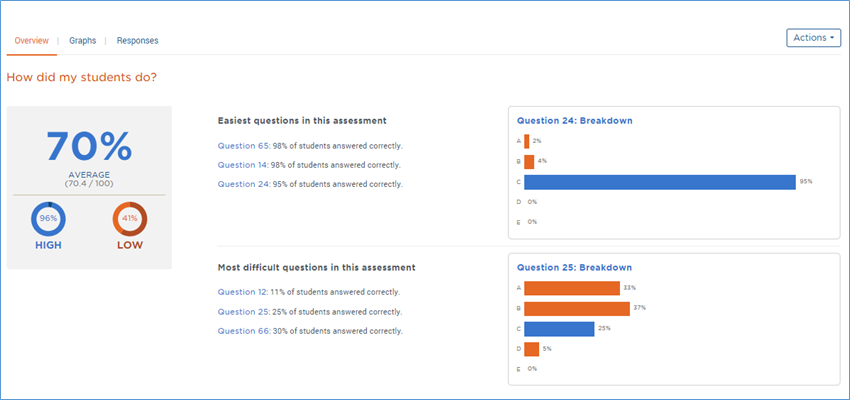
Results are divided into three screens. “Overview” which you see here, “Graphs,” and “Responses.” If Akindi isn’t sure of a student’s response, another option will appear here, “Exceptions.”
In “Overview,” we see the class average on the left with the high score and low score noted. And then we see the three easiest questions and three most difficult questions. When I moused over “Question 24” the graph on the right changed to show me the data for question 24.
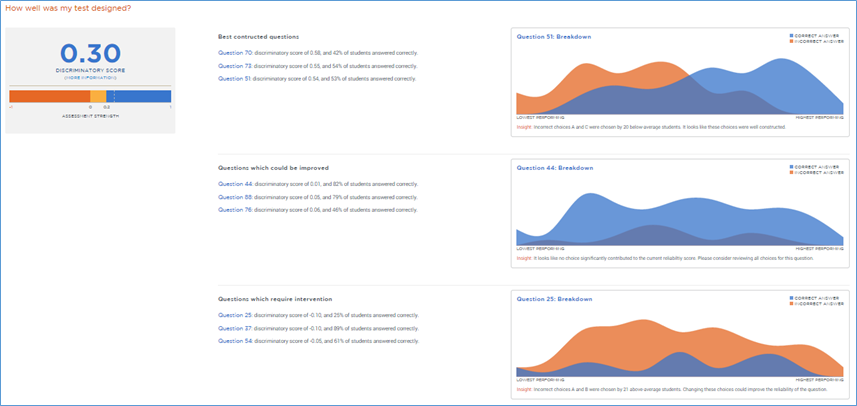
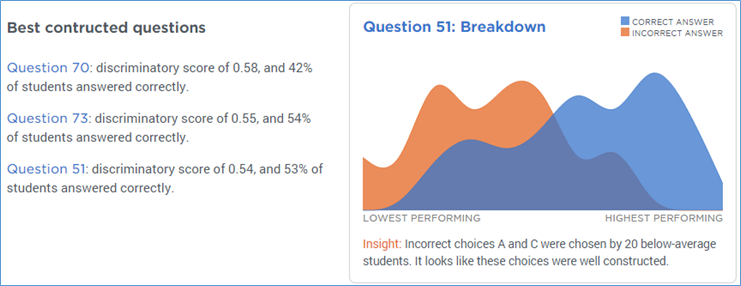
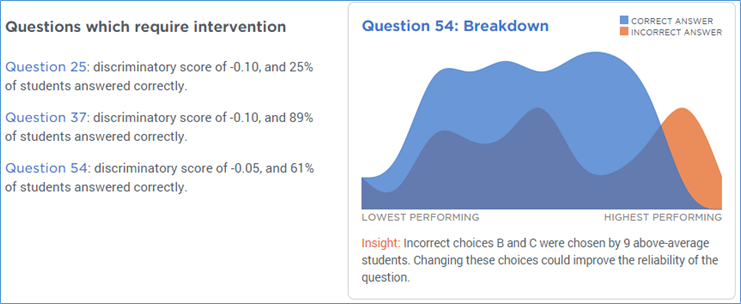
Scrolling down the “Overview” page, I can see the discrimination scores for the test as a whole (.30 in this case; it’s in the blue, so it’s acceptable) and for six of my questions: “Best constructed questions,” “Questions which could be improved,” and the diplomatically-worded “Questions which require intervention,” i.e. these questions suck. Akindi looks at the top third of performers on this test and sees how they answered this question and then looks at the bottom third of performers on this test and sees how they answered this question. For a strong question, we expect that the top performers would answer it correctly and the bottom performers would answer it incorrectly. A high discrimination score indicates that exactly that has happened. For my best-constructed test items, the discrimination scores are .54, .55, and .58. My could-be-improved questions have discrimination scores of .01, .05, and .06. My require intervention questions have discrimination scores of -.10, -.10. and -.05. A negative score means that the top test performers did the worst on the question and the bottom test performers did the best on the question; not a good thing.
The graphs really help me see what is going on. As above, I can mouse over each question to change the graph to that question.
Let’s take a closer look. This is the graph for question 51, discrimination score of .54. I can see that most of the students who got this question right (blue) were the highest performers on the test (right side of the graph), and that most of the students who got this wrong (orange) were the lowest performers on the test (left side of the graph). Akindi even tells me a bit more about what was going on in the “Insight” text below the graph.
This is the graph for question 54, discrimination score of -.05. The highest performing students got it wrong, and of everybody else, about half got it wrong (dark purple – that’s blue and orange overlapping) and about half got it right. Given that so many (9) of the best-performing students got this question wrong means that I really need to look at this question.
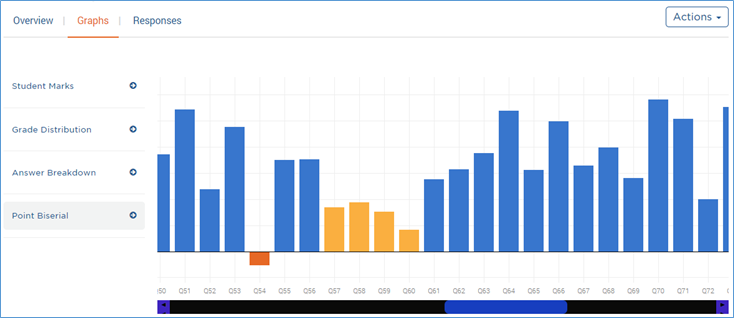
If I switch to the graphs screen, clicking on “Point Biserial” at the bottom shows me the discrimination scores for all of my questions. Here I’ve scrolled over so you can see problematic question 54 in orange, a string of yellows that are worth a closer look, and beautiful question 70. If I mouse over a bar, I see the actual score for that item.
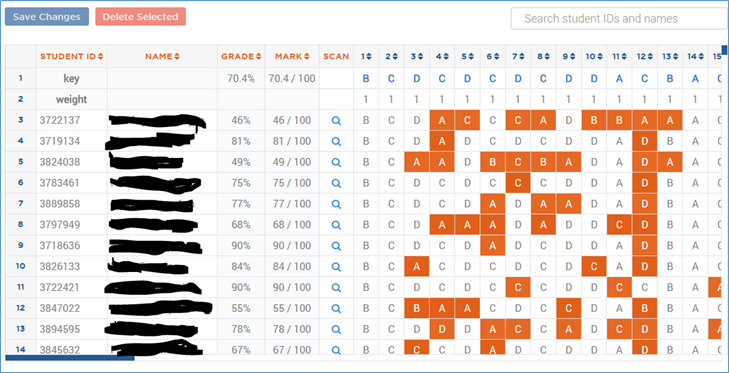
On the “Responses” screen, I see the data for each student: Student ID number, name, grade (percent), mark (number of questions correct out of total possible), scan (clicking on the magnifying glass opens a new page in my browser where I can see that student’s scanned bubble sheet), and responses to each question (questions in orange boxes are incorrect). All of the columns are sortable. I can click on the heading to sort by that column. Clicking on “Grade” will sort by grade high to low, click again to sort low to high.
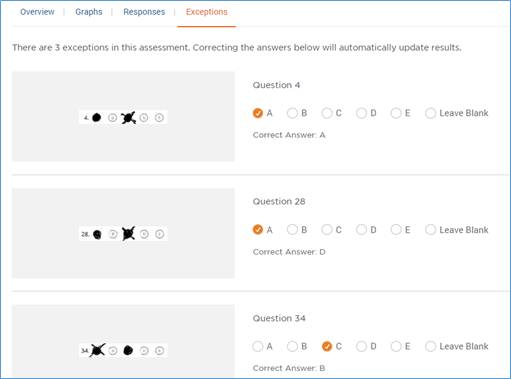
If Akindi runs into trouble deciphering a student’s response, you will see “Exceptions.” Clicking on that link calls up the exceptions screen. Unlike optical scanners like Scantron, Akindi doesn’t care what writing utensil a student bubbles with. In this case, a student used a pen and, of course, had no way to erase. Akindi just saw that two answers had been bubbled in, and so flagged them as “exceptions.” Akindi just shows me the relevant questions from the student’s scanned sheet and asks me to manually select an answer. Akindi then automatically adjusts all of the data accordingly.
The “Actions” button
In the top right corner of any Akindi screen related to a particular assessment, you will see the “Actions” button. It’s sort of a quick access button.
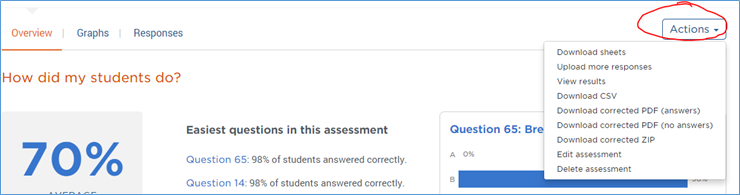
Of particular note are the four middle download options.
“Download CSV” will download all of the data from the “Responses” screen to a spreadsheet.
“Download corrected PDF (answers)” will give you essentially the same scanned set of bubble sheets that you uploaded, except that a test score will be printed on them, and a green checkmark will appear next to the questions students got right and a red letter representing the correct answer will appear next to the questions students got wrong. Good for printing.
“Download corrected PDF (no answers)” is the same as above, except that the right/wrong answers are not marked. Good for printing.
“Download corrected ZIP” is the same as “Download corrected PDF (answers)” except that the student bubble sheets aren’t in one big pdf; when you unzip the file, each student’s test is a separate pdf. Good for, say, distributing to each student individually through your course management system.
How I use the data
I primarily use the data to improve my test items for the next term. The first thing I do is look at the questions with the lowest point biserial scores. If I decide it’s a bad question, I may just toss it completely. If I think it can be salvaged, I will reword the stem or the possible answers.
For questions that have A, B, C, D options, if no student chose, say, option D, I may just go with options A, B, and C the next time I use the question. There is nothing magical about four or five answer choices. If one is clearly not being chosen, there’s probably no good reason for it to be there other than to give students something more to read. When I’ve shortened questions this way, I have seen no difference in exam scores. Nor should I. The question option is doing nothing.
Having this kind of data available makes it easier to see what concepts students are getting and what concepts students are struggling with. The most difficult question in the test I used for this blog post was question 12. That question, I see, had a point biserial of .22, which isn’t too bad. What was question 12 about? It was addressing the correlation-does-not-equal-causation concept, a difficult one for students to get. The next thing I need to do is look back at the first exam and see if students got that concept there. If not, then I need to spend more time on it up front, perhaps adding in an assignment to give students practice with it. If students got it on the first test, but not on the final, then they lost it along the way. In that case, I need to embed more practice with it throughout the course.
What’s next?
Akindi continues to develop this product. Look for some additional, and very helpful, functionality in 2015. Including the ability to have multiple versions of a test.
 I had been hearing chatter through my technology news feeds about the newest kid on the video conferencing block: appear.in. It was time to take them for a spin.
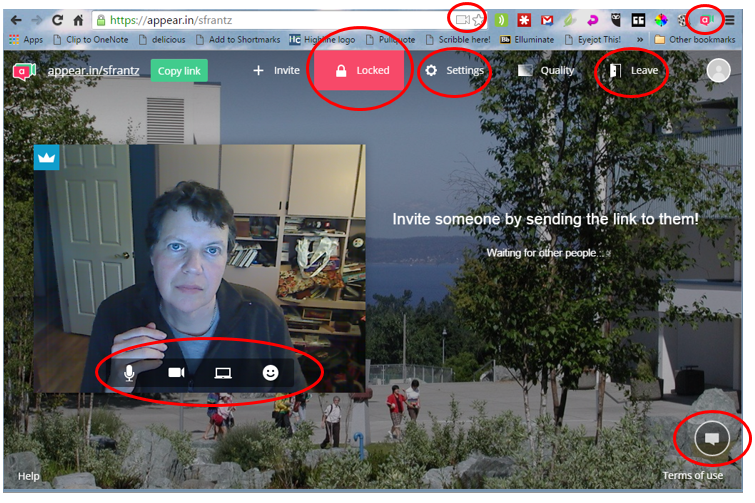
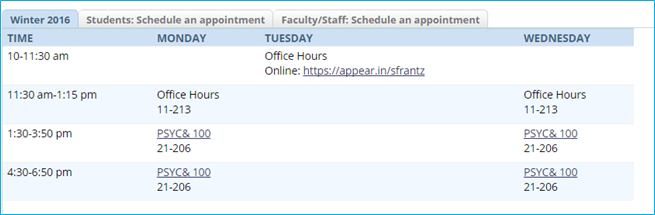
 If my dogs, Murray and Tanner, clicked on the link provided in my Tuesday office hours, they would see this. They are visiting my room through my smartphone – they have an easier time manipulating a touchscreen than a keyboard, and it’s my smartphone because we’ve decided they’re too young to have their own smartphones. Here they’re using a web browser, but appear.in also has an easy-to-use app.
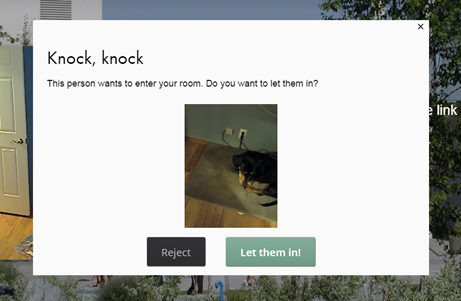 s knocking along with a live view from their camera. I can choose to open the virtual door or not. If you wait too long to say “let them in!” it will time out and they’ll automatically be rejected.
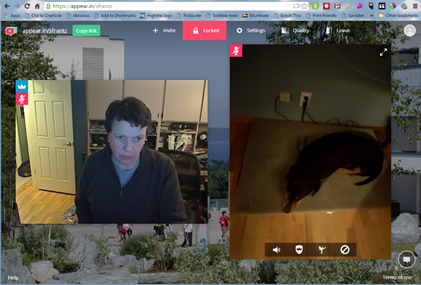


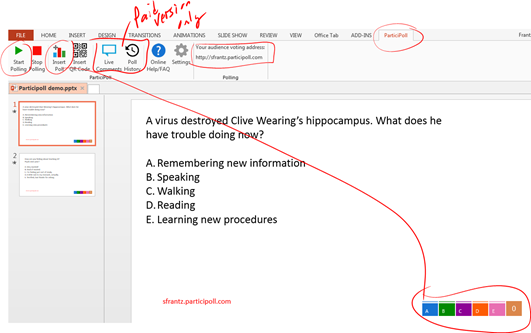 When you sign up for a free
 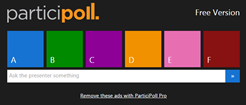 All six answer options will appear as lettered, colorful buttons. The participant just taps or clicks on their answer choice. As long as the question is still open, participants can answer or change their answers.
 The graph at the bottom of your slide has a counter on the far right to tell you how many votes have been recorded.
 When you are ready to reveal the results, advance your slide. Be patient! It can take a few seconds for the results to appear. The slower your internet connection, the more time it will take for the results to appear. When you advance your slide again, all of the results will disappear. Going back to the slide will reveal a reset poll, and your participants will have to re-vote.
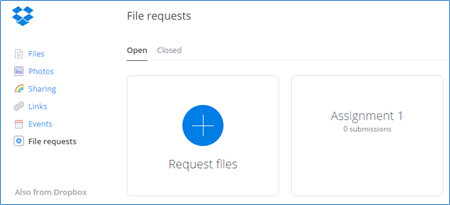
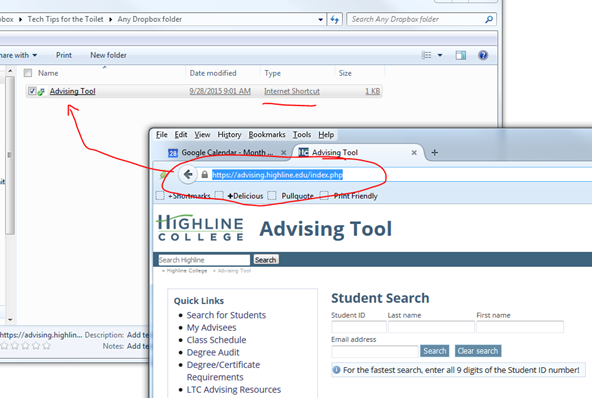
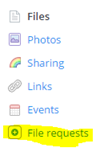 To access this feature, log into your Dropbox.com account via your web browser. On the left, click on “File requests”. Click the big blue button “Create file request”.
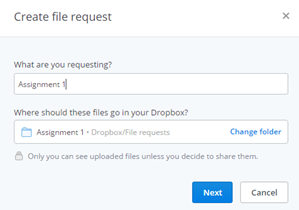 ou write something in the required “What are you requesting” field, like “Assignment 1”, Dropbox will create a new subfolder called “Assignment 1” that will reside inside of the “File requests” folder. If you already have a Dropbox folder location in mind, say, in an assignment subfolder that resides in your course folder that resides in your academic year folder, you can click “change folder”, and Dropbox will show you all of your folders. Pick the once you want.