I was honored earlier this month to be a guest on a podcast on teaching hosted by Elizabeth Yost Hammer, director of the Center for the Advancement of Teaching and Faculty Development (CAT+FD) at Xavier University of Louisiana (XULA). The topic was – no surprise – technology for teaching and learning.
When you have 40 minutes to kill, give it a listen.
Elizabeth and I have been friends for years, and she knows that I read a lot of non-fiction. The podcast ends with Elizabeth asking about my three favorite books from 2017. Because of time limitations, I was limited to three – although I appreciate Elizabeth’s flexibility because I thought I was going to be able to just talk about one. In any case, she has given me a reason to give my entire list here. In the interest of full disclosure, Elizabeth and I are in online book group together, and for the last I-don’t-know-how-many years, in December or January I give an annotated list of my 5-star and 4-star books from the previous year. I hadn’t done it for 2017, so with Elizabeth’s prompting, I wrote it up. And here it is for you, with (most of the) typos edited out.
5-star books
The Undoing Project: A Friendship That Changed Our Minds by Michael Lewis
After Lewis wrote Money Ball, he learned that the biases he wrote about had been well-researched years earlier by Danny Kahneman and Amos Tversky. And that led to him writing this Kahneman/Tversky biography. It’s a must-read for anyone who teaches or has ever taught psychology.
The Orphan Tsunami of 1700: Japanese Clues to a Parent Earthquake in North America by Brian Atwater
The sleuthing that went into this discovery will have you on the edge of your seat. That 1700 quake was a biggie.
Caesar’s Last Breath by Sam Kean
Kean (The Tale of the Dueling Neurosurgeons, The Disappearing Spoon, The Violinist’s Thumb) brings us another awesome tour through science history. The framework for this one is gas – specifically the gases that we breathe. He opens with the death of Julius Caesar and the liter of air that was expelled in Caesar’s last breath. It takes about 2 weeks for atoms in the breath you just exhaled to circumnavigate the globe and about 2 years to fully disperse in our atmosphere. It is likely that in that breath, you exhaled an atom or two of Caesar’s dying breath. That alone should be enough reason for you to pick up this book.
Get Well Soon: History’s Worst Plagues and the Heroes Who Fought Them by Jennifer Wright
If you’re currently sick, as I was when I read it, the chapter on the bubonic plague will make you feel much better. The chapters on tuberculosis and the Spanish flu hit a little too close to home. Wright is a relatively new history writer – and she’s good. She gives a good sense of what it was like to live with these illnesses in those time periods. And she draws some powerful connections between then and now. If nothing else, read in the Spanish flu chapter how it came to be called the Spanish flu and not the more historically accurate Kansas flu.
The Woman Who Smashed Codes: A True Story of Love, Spies, and the Unlikely Heroine who Outwitted America’s Enemies by Jason Fagone
How did practice with decoding bootlegger messages during prohibition help bring down the Nazis? This fascinating biography starts in a group with a cult-like feel and ends with the creation of the NSA, another organization that arguably has a cult-like feel.
Huế 1968: A Turning Point of the American War in Vietnam by Mark Bowden
We’ve reached a point in American history where we can (finally) be more reflective about the Vietnam War. The author takes us into the experience of what this battle was like for people on both sides of the conflict – and reveals the hubris of both sides.
The Odyssey of Echo Company: The 1968 Tet Offensive and the Epic Battle to Survive the Vietnam War by Doug Stanton
The battle for Huế described in the book above took place during the Tet Offensive. This book takes a different angle and describes the experience of one company.
Apollo 8: The Thrilling Story of the First Mission to the Moon by Jeffrey Kluger
The year 1968 wasn’t just about war; this was also the year we sent people around the moon. The story that grabbed me the most from this book (and told in the XULA CAT+FD podcast) was Charles Lindbergh, merely in his 60s, visited with the astronauts the evening before their launch. I cannot, as hard as I try, wrap my head around that. How did we go from one guy flying solo across the Atlantic to sending people to fly around the moon in the span of 41 years?
Born a Crime: Stories from a South African Childhood by Trevor Noah
This is Trevor Noah’s memoir about growing up in Johannesburg during apartheid. He’s an excellent storyteller with compelling stories to tell.
4-star books
What It Is Like to Go to War by Karl Marlantes
If the two 5-star books on the Vietnam War are not enough for you, consider this one. This is Marlantes personal war memoir. What was it like for him to serve in Vietnam? And what advice does he have for today’s soldiers?
Killers of the Flower Moon: The Osage Murders and the Birth of the FBI by David Grann
When you’re an ethnic minority and you have oil money, people have reason to want you dead and other people have reason not to care. And in the end we got the FBI.
Cannibalism: A Perfectly Natural History by Bill Schutt
About half the book is on human cannibalism and about half is on non-human cannibalism. You will not look at your neighbor the same way again.
The Great Quake: How the Biggest Earthquake in North America Changed Our Understanding of the Planet by Henry Fountain
This was the 1964 Alaska quake. And with it finally came an acceptance of plate tectonics.
Quakeland: On the Road to America’s Next Devastating Earthquake by Kathryn Miles
Miles writes in the style of Mary Roach. Identify a bunch of topics related to earthquakes, visit interesting places and talk with interesting experts, and then write about it. While not as funny as Roach – but that bar is pretty high – her writing is accessible and engaging. One chapter is dedicated to the 1700 Pacific Northwest quake. If you’re going to read the 5-star The Orphan Tsunami, then read that book first. I don’t want this chapter to ruin the mystery for you.
Logical Family: A Memoir by Armistead Maupin
Maupin has had a fascinating life.
“From his loving relationship with his palm-reading Grannie who insisted Maupin was the reincarnation of her artistic bachelor cousin, Curtis, to an awkward conversation about girls with President Richard Nixon in the Oval Office, Maupin tells of the extraordinary individuals and situations that shaped him into one of the most influential writers of the last century.”
And, yes, the conversation with Nixon was quite awkward.
Fun Home: A Family Tragicomic by Alison Bechdel
This was the first graphic novel I’ve read. And I’m game to read another one.
[I knew that the Game of Thrones television show was too violent for me. And I had heard that the novels were just as gruesome. I thought I’d give the graphic novel a go. Nope. In the first 7 pages, a person was mauled by demonic creatures and others were beheaded.]
While there is death in Fun Home, there are no beheadings.
Al Franken, Giant of the Senate by Al Franken
This memoir focuses on his getting into office and being in office. He brings a humanity to the Senate that is tough to see from the outside. I skimmed the latter chapters when he hopped on top of a soapbox. No comment about his resignation.
Nine Who Survived Hiroshima and Nagasaki by Robert Trumbull
There are nine people that Japan recognizes as having survived both bombs. This book tells their stories. Some were in Hiroshima on business. After the bomb hit, they hopped on the train as soon as it started running again to return home – to Nagasaki.
Drone Warrior: An Elite Soldier’s Inside Account of the Hunt for America’s Most Dangerous Enemies by Brett Velicovich and Christopher S. Stewart
Drones are the new air support for ground troops. What does this new warfare look like?
Dreamland: The True Tale of America’s Opiate Epidemic by Sam Quinones
This book provides the history and the context I needed to understand how we got to here. When I read recently about the 21 million opiates shipped to a town of 3,000 in West Virginia, I was not at all surprised.
The Lost City of the Monkey God: A True Story by Douglas Preston
There is so much about ancient South American cities that we don’t know. See Get Well Soon for more on what happened to so many of these cities. Also, there are good reasons I’m not a jungle explorer. Enough said.
The Seeds of Life: From Aristotle to da Vinci, from Sharks’ Teeth to Frogs’ Pants, the Long and Strange Quest to Discover Where Babies Come From by Edward Dolnick
This book wins for longest subtitle. I remember when I read The Fourth Part of the World and was introduced to what it was like to live before we had maps, let alone accurate maps. The knowledge of the world we have today is astounding. Not only do I know where Europe is, I’ve been there. And with a credit card, I could be there tomorrow. The Seeds of Life does the same thing for knowing where babies come from. I graduated from storks a long time ago, and now I can’t fathom what it’s like to not know that. (This is sounding like the start of a psych blog post on hindsight bias.) How is it that science came around to finally sorting this out? And, you know, it wasn’t that long ago. This really is a fascinating history. You might know Dolnick as the author of The Clockwork Universe, The Forger’s Spell, and The Rush.
The Radium Girls: The Dark Story of America’s Shining Women by Kate Moore
It turns out that radium is dangerous. This a tragic story of how factory workers were seen as easily replaceable. I can’t say much more without giving away a lot.
The Long Haul: A Trucker’s Tales of Life on the Road by Finn Murphy
Murphy will load up your furniture, haul it across the country, and unload it. While it sounds straightforward, he’s got some stories!
Blue on Blue: An Insider’s Story of Good Cops Catching Bad Cops by Charles Campisi
Internal Affairs, the department within the police department that looks into cop corruption, has never been looked upon favorably. Campisi found himself almost accidentally in charge of Internal Affairs at the New York Police Department. In what was a brilliant move, he took the best people coming out of the police academy, and assigned them to Internal Affairs for a set time period. After that, they could have any posting they wanted. That changed everything. Those who were working in Internal Affairs were known to be the best – and, more importantly, they didn’t have any choice but to do it. If they purposefully “failed” out of Internal Affairs school, they were given the worst posting imaginable. Campisi has some amazing stories to share – including some 9/11 challenges. Feel free to skip the last few chapters where Campisi identifies everything that has gone wrong with the department since he left.
The Stranger in the Woods: The Extraordinary Story of the Last True Hermit by Michael Finkel
This guy decides one day, without telling anyone, to go live in the woods. And there he stayed for 27 years. How did he live? Why did he do it? And why did he come back to civilization?
The Card Catalog: Books, Cards, and Literary Treasures by the Library of Congress
The history (and demise) of the card catalog as revealed through photos of cards from actual (retired) card catalogs. If you’re a fan of libraries – and especially if you remember the card catalog – this is a must-read.


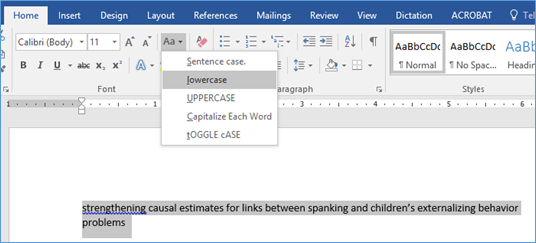


 But, really, if the text in the image is important, I should use the text itself, not an image of the text. Or maybe there is some text I have in an image that I want to be able to edit. If it’s just a few sentences, it’s not a big deal to just type it out. But if it’s a lot of text? That option is less attractive.