Delay sending emails: Outlook and Gmail
A veteran colleague recently advised a newly-hired professor to not send students email at 1 am. Why? Because students will come to expect that all of their professors will respond to their email inquiries at 1 am. I don’t know if that’s true, but another colleague replies to messages late at night but delays sending them until the morning for that very reason.
Outlook comes with the ability to delay sending emails. Gmail can do it with an add-in.
Gmail users: Install Boomerang. (Try the pro version for free for 30 days. After that, use the pared-down free version or pay $4.99/month for more features.)
I’ll let Boomerang help you get set up in Gmail.
For Outlook users, here are your instructions.

Outlook users: In your new message, click “Options,” then choose “Delay Delivery.”

You will get this pop-up. In the “Delivery options” section, the “Do not deliver before” checkbox will be checked. If you don’t like the date and time Outlook has chosen for you (5pm today), change it to something you would prefer. These settings will only hold for this message. Start a new message, and the date/time will revert back to Outlook’s default
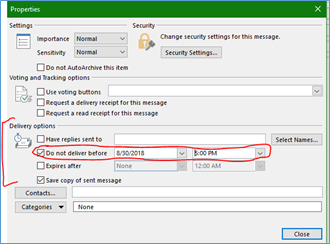
Unfortunately, Outlook doesn’t give you the ability to change this default delayed send time. Fortunately, this has bugged someone who had the skill to fix it. Install SetDeliveryTime. Follow their instructions to change the default day/time.
Once the date/time is as you’d like it, click the “Close” button on the “Delay Delivery” pop-up (or press ENTER on your keyboard). The “Delay Delivery” button on your message will now be highlighted. Write your message and click “Send.”

Your message will be held in Outlook’s “Outbox” until the designated time for it to be sent. If you decide you don’t want to send it, open your “Outbox” and delete the message. Or if you want to change the time it’s sent, open the message, click on “Delay Delivery” and choose a different time.
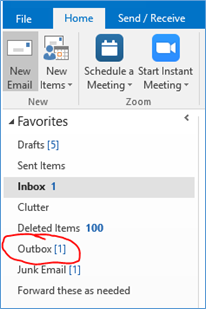
Using the Quick Access Toolbar
If you use “Delay Delivery” a lot, add it to your Quick Access Toolbar and save yourself a few clicks. The Quick Access Toolbar is the line of icons right at the top of every MS Office program. Click on the icon to activate that function.
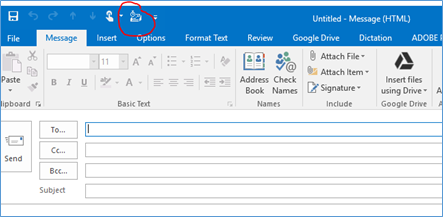
In this case, when I click on the “Delay Delivery” icon in my Quick Access Toolbar, I get the pop-up screen where I can confirm the date and time of delivery. When I click “Close” (or press ENTER on my keyboard) on that pop-up, the icon in the Quick Access Toolbar is highlighted.
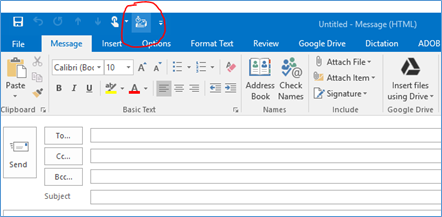
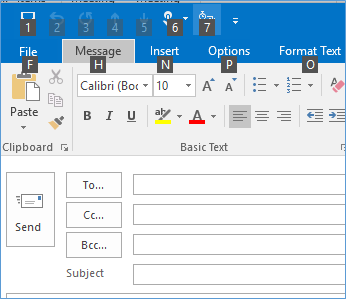
It gets even better for those of you who like keyboard shortcuts. Press the ALT key on your keyboard. All of the Quick Access Toolbar icons are numbered. Seven has been assigned to the “Delay Delivery” icon. When I’m writing a message that I want to delay sending, I can press ALT-7 to get the pop-up. Pressing “Enter” will accept the date/time and close the pop-up.
Add “Delay Delivery” to the Quick Access Toolbar
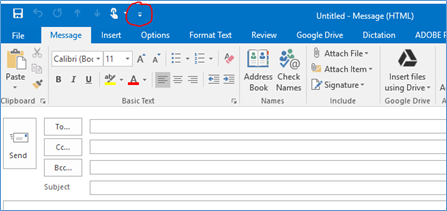
To customize your message’s Quick Access Toolbar, open a new message. Click the down arrow to the right of the Quick Access Toolbar icons. In the pop-up, choose “More Commands”.
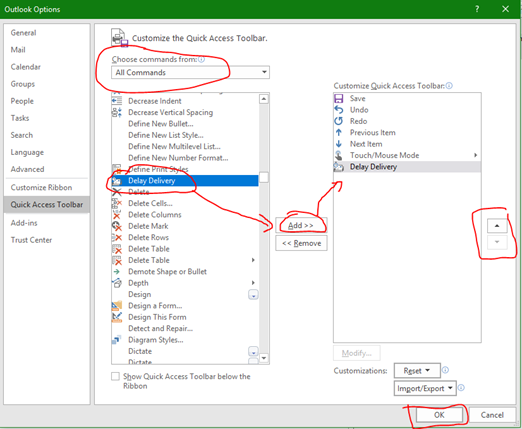
In the pop-up window, choose “All Commands,” then scroll down and select “Delay Delivery”. Click the “Add” button, and “Delay Delivery” will be added to your Quick Access Toolbar. If you want to move if from the last spot to a different spot, use the arrow on the far right of the window. When you’re happy with your Quick Access Toolbar customizations, click “OK”.
Now that you’re in business with “Delay Delivery”, I’m going to leave you to review all of the other commands you can add to your Quick Access Toolbar. Remember, the Quick Access Toolbar for a message is different than the Quick Access Toolbar for the main Outlook window. And, yes, you have a Quick Access Toolbar in Word, Excel, and PowerPoint. Happy customizing!