Scribblar: Shared Whiteboard
You are working with a student or a colleague. You are both standing in front of a whiteboard drawing, writing, and discussing your topic. But how do you do this online if you and your collaborator are not in the same physical location? I love Join.me for screensharing, but it’s not very useful if you want to draw something – unless of course you have some type of drawing program on your computer, like EpicPen.
Try Scribblar if you’re looking to share a whiteboard, in real time.
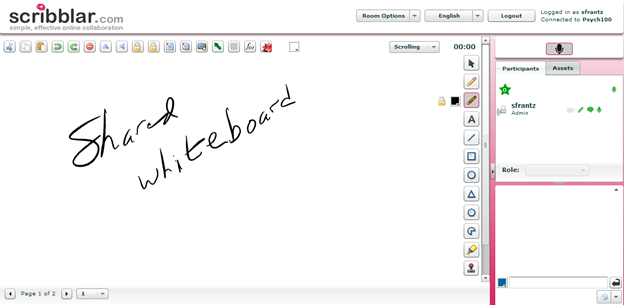
After setting up a free account (maximum of one room and only two users per room; see plans and pricing for more information), create your first room. You can play on the whiteboard without anyone else in the room, but to get a true feel for it, invite a friend by copying the URL for the whiteboard and emailing it to them.

The drawing tools
The menu to the right of the whiteboard provides the drawing tools. In Scribblar, mouse over each icon to see the popup descriptor.
Selector (arrow): Once you’ve written or typed on the board, click on this icon, and then click and drag on the whiteboard to select the elements you’d like. Dragging over any portion of an element will select the whole thing. If it’s a drawn image, you can click and drag to move it. Selected elements can be deleted with your keyboard’s delete key.
Pencil: This is the basic, freehand drawing tool. You can change the color and thickness.
Smooth pencil: You can change the color of this tool, but not the thickness of the line. It does appear to render a smoother line than the regular pencil.
Text (the “A” icon): For those who’d rather type than draw.
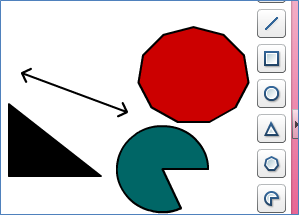
Shapes (straight line, square, circle, triangle, polygon, wedge). Select, then click and drag to set the size. Each shape element has its own features. The wedge, for example, includes a slider that lets you determine how much of a wedge you want to show, from 1 degree to 360 degrees. The straight line tool has options for adding arrows to one or both ends of the line. Change the fill color, line color, or both.

Highlighter: It works just like a highlighter. Change the color and the width.
Stamp: This tool comes with 6 premade stamps: Star, arrow, diamond, trademark symbol, registered trademark symbol, and copyright symbol.
The editing tools
The menu along the top of the whiteboard space provides the editing tools. Like the drawing tools, mouse over each icon to see the popup description.

Cut, copy, paste, undo, redo, delete, flip horizontally, flip vertically, lock the page to editing, unlock the page, clear the page, clear all the pages (how to add pages is explained below), take a snapshot of the whiteboard (your best option for saving what you produced), pointer (for, well, pointing – if you’re pointing, no other whiteboard tools will work for you. Click the icon again to toggle it off.), make the background a grid, equation editor, Wolfram/Alpha (for those with a paid plan), and change the whiteboard to a color other than white.
Adding new boards

In the lower left corner of the whiteboard, you can add new whiteboard pages to your room. Just click the right arrow, and a new page will appear. To switch back to the first page, click the left arrow or click the dropdown menu and navigate to the page you want.
If there is a way to delete a page once you have created it, I haven’t found it. If you erase an entire page, the page will still be listed here; it won’t be deleted. You can always delete the entire room and start over.
Audio, chat, and files
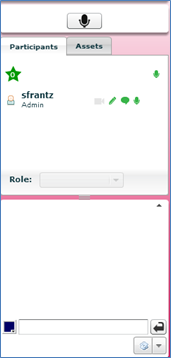
To the right of the whiteboard is the list of participants. The icons to the right of each participant’s name let you determine what kind of control that person has. Click the pencil, chat bubble, and microphone to toggle those off. If you’re the “admin” for the room, you cannot turn these off for yourself. The chat window is directly below the participant window. Above the participant window is the microphone. Click it on to talk.

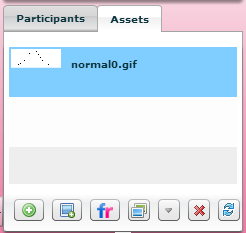
The “assets” tab icons give you the power to upload an image, import a snapshot of a webpage, add a Flickr image, set a selected image as a background to your whiteboard page, download the selected image, delete the selected image, and refresh the “assets” window. If you want to just add the image to your whiteboard screen, click and drag it from the “assets” window to your whiteboard page.

Embed code
Want to embed your whiteboard room in a webpage? In the top right corner of the Scribblar whiteboard screen, click the little arrow next to “Room Options” and select “Embed this room.” A popup screen will give you the html code.

Limitations
Scribblar is built on Flash, so it won’t work on many mobile devices.
Scribblar only allows for audio communication, not video. If you want video, use Skype or some other video communication service.
No screensharing. Scribblar is only about sharing this particular program; you cannot share your entire desktop. For that, consider Join.me or Google Hangouts.
Caution: If you create a room, and then don’t visit it for 60 days, Scribblar will delete your room. If that’s a concern for you, use a service like FollowUp.cc to remind yourself to visit your room every 59 days.
