YouCanBook.Me: Customizing for My Purposes
UPDATED 9/5/2011: Be sure to read a more recent post on this tool.
Last month I wrote about a new service (YouCanBook.Me) that lets students schedule appointments with you themselves. (See the original blog post.) Now that I’ve been using it for a couple months, I wanted to share with you what I’ve learned.
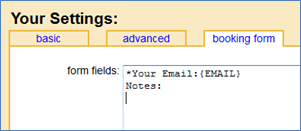
The booking form
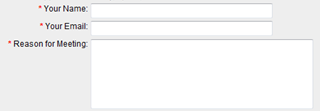
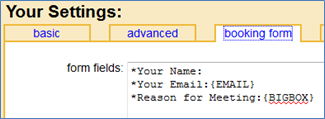
The default booking form asks those making an appointment with you to give you their email address (required) and leave a note (not required). I, however, want more information than that, and YouCanBook.Me gives me the power to ask for whatever I’d like. Specifically, I want the appointee’s name, email address, and the reason for the meeting. And I want the appointee’s name to show up in the subject line of my calendar.
In the YouCanBook.Me dashboard, clicking the ‘booking form’ tab allows me to make those changes. Each line produces a separate input box. The asterisk means the appointee must enter something in that field. Whatever is entered in the first line will be entered as the subject line for the appointment.
|
Default Booking Form |
My Customized Booking Form |
|
|
What the appointee sees: |
 |
 |
|
How to get it to look that way: |
 |
 |
[Thanks to my colleague Rich Bankhead for his suggestion to add a ‘bigbox’ for the ‘reason for meeting’ area instead of the default small box.]
A different calendar for each quarter
With the fall quarter coming to a close, it occurred to me that I didn’t want students to be able to schedule an appointment with me after the last day of the quarter, but I didn’t want to block off all of the days from mid-December to early January in my Google calendar since I use my calendar for things other than scheduling time with students.
YouCanBook.Me lets you select start and end dates for booking, so I changed the dates to match the dates of fall quarter.

But then I thought that some students may want to schedule an appointment with me next quarter right now. If the calendar ends on December 9, they won’t be able to do that until I change the calendar dates on December 10. Keith Harris at YouCanBook.Me suggested that I solve this by creating separate calendars for each quarter. What a great idea!
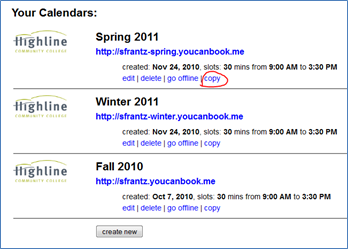
On the main dashboard, you’ll find a list of all of your calendars. If you have just one calendar, you’ll see just that one. Once it’s set up as you’d like, click ‘copy.’

I created three, one for each quarter. I changed the dates of each to match the dates for the quarter. Then I changed the title and the subdomain (on the ‘basic’ tab) to match the quarter.
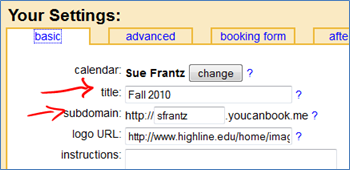
For example, for the winter quarter calendar, I changed the title to Winter 2011, and I changed the subdomain from sfrantz to sfrantz-winter. Here are my three calendars.
Rather than link to each of these separately, I embedded the calendars on a newly-created ‘appointment’ page on my website. On the top of the webpage I put the instructions for scheduling an appointment which I deleted from each calendar. And then I copied the embed html code from each of the calendars and pasted it on the webpage. You can use the embed code wherever you can use HTML code, including on pages inside your course management system (e.g., Angel, Blackboard).
The embed code can be found right above the preview pane in your YouCanBook.Me dashboard for each of your calendars.
[UPDATE 12/3/2010 : To embed calendars on a page, YouCanBook.Me uses iframes. Unfortunately the security settings on some browsers keep some users from viewing that content. After having a couple students say that they couldn’t see the calendars, I deleted the web page I created and am again linking directly to my YouCanBook.Me calendar. In the calendar instructions I’m including a link to the next quarter’s calendar for students who want to schedule an appointment further out. When this quarter ends, the hyperlink on my website will go directly to next quarter’s calendar whose instructions include a link to my spring calendar. To see what it looks like, go to my main web page and click on “Schedule an Appointment with Me.” ]

Schedule 15 minute appointments for the first two weeks of the term
Keep the ability to create different calendars in mind if, say, you want students to set up 15-minute appointments with you at the beginning of the term, perhaps as a ‘come introduce yourself’ sort of meeting.
Copy an existing calendar, change the subdomain to something like YourName-15, set the start and end dates to whatever you’d like, then set the appointment length to 15 minutes. Give the link to students.
If you want to do the same thing at the end of the term, edit this calendar so that the start and end dates are for the end of the term.
Syncing with Outlook
I sync my Google calendar with Outlook 2010, and I’ve discovered that Google has a weird bug. When events with guests are scheduled in Google calendar, they get stuck in a weird loop with Outlook. A ‘ghost’ version of the event (only those with guests) gets created and set to 1979. Whenever Outlook syncs with Google calendar, that 1979 event gets dumped into Outlook’s deleted folder. Since it happens every time they sync, that deleted event shows up over and over again. The only solution I’ve found is to go into Google calendar, search for the appointment (which is not 1979) and remove the guest from the appointment (or delete the appointment altogether).
The default for YouCanBook.Me is to add the appointee as a guest to the appointment. This is handy because if you delete the appointment, you’ll be asked whether you’d like to notify the appointee that you’re canceling the appointment. If you don’t sync with Outlook, or if you do but don’t have the 1979 experience, there’s no need to change anything.
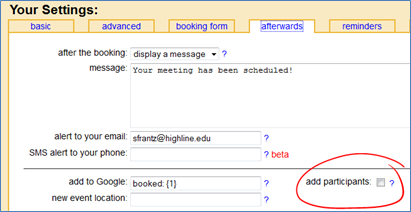
If you’re in my position with those ghost appointments showing up in your Outlook’s deleted folder, you can change YouCanBook.Me so that appointees aren’t brought in as guests. On the ‘afterwards’ tab, uncheck the ‘add participants’ box. That’s it.
If you’re using YouCanBook.Me, I’d love to hear how it’s working for you!