PowerPoint 2007: Presenter View
One of the most common complaints I hear about PowerPoint is that it is linear; when you run your PowerPoint, you’re locked into running it in the order in which you created it. This is simply not true. “Presenter view” must be the most underused of the most useful PowerPoint features. All you need is a computer that can give you an ‘extended desktop,’ which is almost all laptops and most desktop computers made in the last few years.
This is what is displayed through the projector.
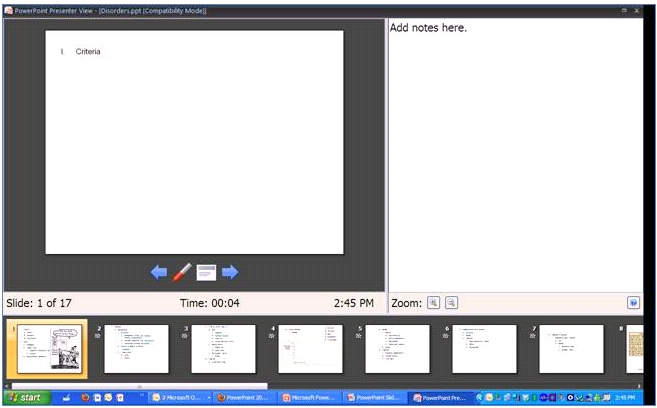
But this is what I see on my computer monitor:
PowerPoint treats the projector as an ‘extended desktop.’ In essence, the presentation is presented on the projector’s ‘monitor’ while the presenter view is presented on your computer’s monitor.
Getting an ‘extended desktop.’
Check your computer’s documentation. For most Window’s computers, in Control Panel, open Display, and go to the Settings tab. Look for something that reads “extend the desktop.” (Mac and Linux can also extended desktop, but you’re really on your own in learning how to do it. Sorry!)
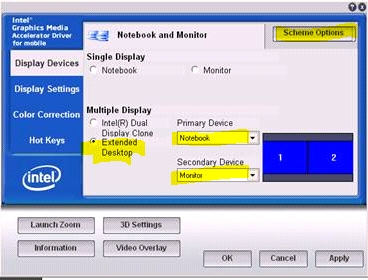
I have the Intel Graphics Media Accelerator Driver, so this is how I got the extended desktop.
I right clicked on my laptop’s desktop. I selected “Graphics Properties” and checked “Extended Desktop”. I made the primary device my notebook and the secondary device the monitor.
(Notice the blue boxes labeled 1 and 2? This puts the notebook screen on the left and the projector screen on the right. You can grab and move those boxes if you want the notebook screen on the other side. I explain why shortly.)
I clicked “Scheme Options” and then gave it a name, like Presentation Mode, and saved it. When I plug into my classroom’s laptop cable, I right click on the desktop, “Select Scheme,” and choose Presentation Mode. In the classroom, I know it’s working when the classroom monitor displays my desktop’s background image with nothing else on it.
In PowerPoint.
In PowerPoint, when you save your PowerPoint file, on the Slide Show tab, check “Use Presenter View” and make sure “Show Presentation On:” is set to Monitor 2.
That’s it.
The show will run as it normally does through the projector, but now you have some very nifty functionality on your computer screen. If you added notes to your slides when you built your slide presentation, you can see your notes on the right side of the screen. With the filmstrip of all your slides at the bottom of the screen, if you want to jump ahead or go back, just click on the slide you want.
If you want to write on the slides with the ‘pen’, when you build your slide presentation, make sure you turn off “advance slide on mouse click” (under the Animations tab). If you are changing an existing presentation, click on one slide, then CTRL-A to select them all, and then turn off “advance slide on mouse click.” If you don’t turn it off, every click on the slide with the pen will advance it. “Advance slide on mouse click” isn’t really necessary anyway with this setup since you have the arrow controls in front of you. I use a presentation remote, and that advances the slides just fine, as well.
If you want to show something else on the classroom screen, like a webpage or video, just drag the window off your computer ‘over’ to the classroom screen. After all, it’s just an extended desktop. If your computer monitor is on the left (see the note above about the numbered blue boxes), then drag the program window off the screen to the right to see it appear on the projector’s ‘desktop.’ The first few times you use this setup, you may lose your mouse pointer. If you can’t see the pointer on your computer monitor, it’s probably over on the projector’s ‘desktop.’ If you’ve said that your computer monitor is on the left, then move your mouse to the left to get it back on your computer screen.
This will change your relationship with Powerpoint – for the better.
Give it a try and let me know how it goes!


