Grade Reports: Merging Excel and Word
I confess that I’ve never quite caught the course management system bug. I used Blackboard (Bb) years ago but since then I’ve found ways to accomplish my pedagogical goals without it. As my college makes the switch from Bb to Angel, I promise to take another look at moving some of my course into Angel. But until then…
I still keep my grades in an Excel spreadsheet. After each exam I send my students grade reports by doing a mail merge in MS Word; it’s kind of like a mind meld for MS Office products. I used to print these grade reports and hand them out in class, but email works just fine — and reaches those students who seem to have disappeared from the course.
To send grade reports, you need three things: grades in an Excel spreadsheet, a form letter in Word, and, if you’re going to email grade reports, an email program that Word can use, such as Outlook.
In this post I explain how to set up your files to send grade reports. Once they’ve been set up, a couple clicks will allow you to send them out again.
Set up your Excel spreadsheet.
Let’s start with the grade sheet. My grade sheet is much more complicated than this (perhaps a future blog post) but let’s pretend this is my spreadsheet for a class that’s part way through the term.

In my spreadsheet, the top row helps me keep my content organized (“unit tests” and “papers”), the next line contains my column headings, and the student data begins on line 3. When you do a mail merge, Word likes to have just one row for column headings, so I just copy and paste lines 2 through however many students into a new worksheet. Let’s call that worksheet “GradeReport.”
Now we have this worksheet.

Save your Excel file and close it. Let’s head on over to Word.
Set up your Word document.
Imagine writing a letter to each of your students. What would you want it to say? Here’s one possibility.
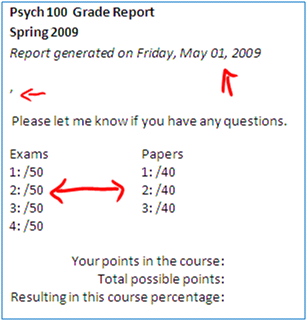
I have my grade report document set up so that the date is automatically entered. To do this in Word 2007, go to Insert –> Quick Parts –> Field –> Date. Then you can choose the date format you like. Every time you open that document, the date will be updated.
Notice the lone comma. I’m going to have Word insert the student’s name in front of the comma and insert my ‘notes’ on the other side.
I put in the /50s and /40s to remind students how many points those were worth.
Let’s merge!
With both files set up, we’re ready to have Word ask Excel for the data.
From your Word document, go to the Mailings tab, click “Select Recipients” then “Use Existing List.”
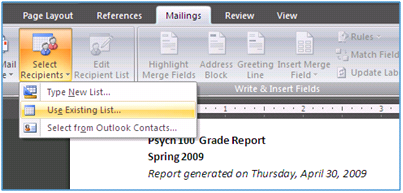
Word will ask you to locate the file you’d like to use. Navigate to your Excel grade file. You’ll be asked to select the worksheet you want. Choose your “GradeReport” worksheet. That window will close and, anticlimactically, nothing will appear to have happened. In fact, Word is now poised to pull in data from your grades; you just have to tell Word which data you want.
Which data would you like?
Put your cursor where you would like the field to go. Let’s start with the student’s first name, so I’ll put the cursor in front of the comma. Now, on the Mailings tab, click the down arrow next to “Insert Merge Field.” Here you will see the column headings from your Excel file.
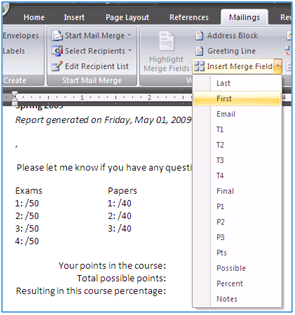
Here, I’ve selected “First” to insert the student’s first name. And this is what that field looks like:

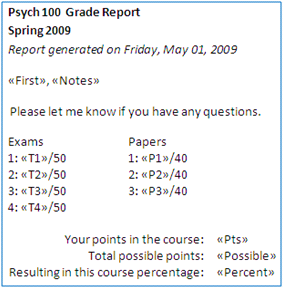
Now I just place my cursor where I want the rest of the fields to go and select those fields. Here is what my Word document looks like when I’m done. I can format those fields like I do any other text. For example, I can change their font color or size or make them bold. If you didn’t get the field exactly where you want it, you can move it just like any other text.
Preview.
I don’t want to send this out without taking a look at what the students are going to see, so I’ll click the “Preview Results” button on the Mailings tab. This gives me the data from the first person on my grade sheet.
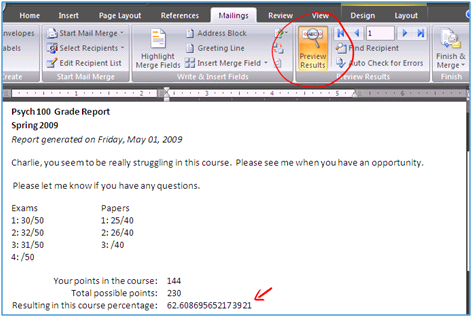
This all looks pretty good except the course percentage is a little more precise than what I need. There are a couple ways to solve this. The easiest way is back in my Excel file. When I copy and paste the data from my main spreadsheet into my “GradeReport” spreadsheet, if I “paste special” and just paste the values, I’ll get 62.6 here instead of this super long calculation. The second way looks a little scarier but it’s just as easy. But if you’re already a little anxious, just plan on handling this the easiest way and skip this next section.
[For those who aren’t afraid of a little code, right click anywhere on the percentage. Word will highlight the entire number and give you this menu. Select “Toggle Field Codes.” The number will change to this: {MERGEFIELD percent}.
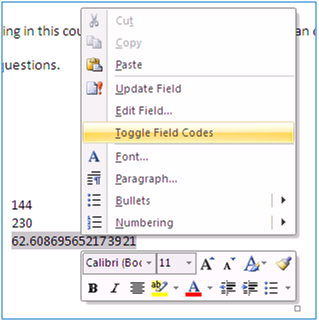
Now we’re going to add a little code that tells Word to shrink this number to something more reasonable. Add ‘\# 0.x’ to the field so it reads {MERGEFIELD percent \# 0.x}. This tells Word that after it goes to Excel to get this number, truncate the number to one decimal place. The 62.608… number is replaced by 62.6.
Send!
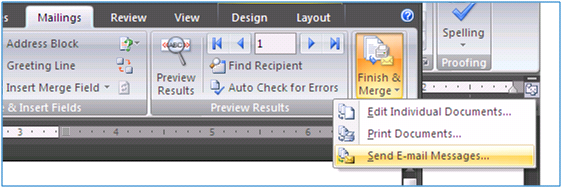
Now that we’re satisfied with how it looks, let’s mail out the grade reports. On the Mailings tab, click “Finish & Merge.” I’m going to select “Send E-mail Messages” but you could just print them if you prefer.
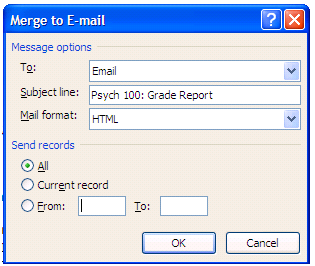
I now get this popup box where Word has guessed that the column in my spreadsheet labeled ‘Email’ contains my students’ email addresses. If Word guesses incorrectly, clicking the down arrow will allow you to choose a different field. After typing in my subject line, all I need to do is click “OK” and Word will tell Outlook to send each student’s grade report to that student’s email address.
Next time.
Now that you have your grade report file set up, next time all you have to do is open your grade report document and click “Finish & Merge.”