Share Your Bookmarks: Mmmm…. Delicious!
You’re sitting at home, and you come across an amazing website that you think is perfect for your students. How do you get it out to them?
- I wait and tell them in class.
- I email them.
- I add an announcement to my course management system.
- I add a link to my website.
- I just bookmark it and let Delicious do the rest.
I mentioned in an earlier post that cloud computing is taking content off your computer and moving it up into the internet ‘cloud.’ You can take your bookmarks out of your browser and move them to where you can access them from any computer. (You’re already thinking how great it would be to have the same bookmarks on your home and office computer, aren’t you?) You can also decide which of those bookmarks you would like your students to have access to, and you can automatically post those bookmark updates to your website or your course management system.
And, yes, you can designate whether you’d like a particular bookmark to be public or private. Just because you can share doesn’t mean you have to!
Viewing bookmarks.
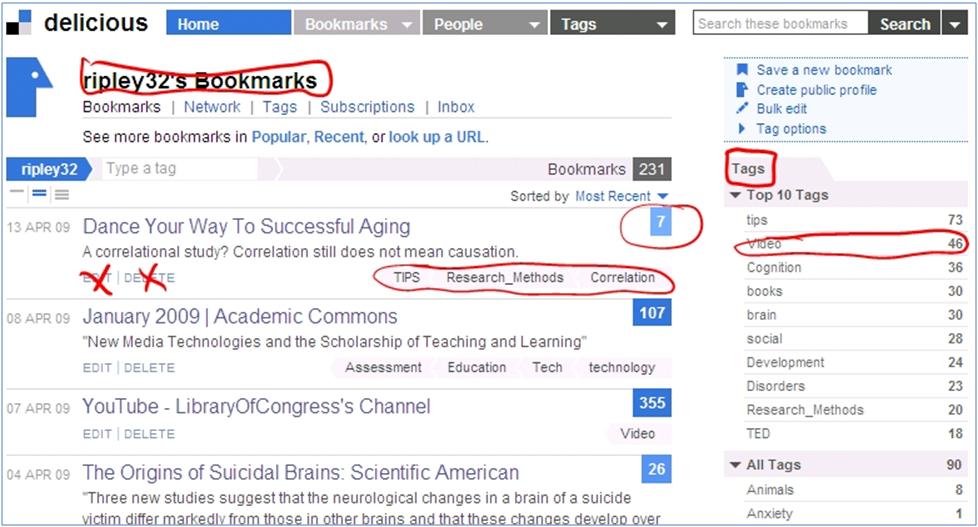
If you visit my Delicious bookmarks, where my online moniker is ripley32, this is pretty much what you would see. Because these are my bookmarks, I have the option to do things like edit and delete bookmarks that obviously visitors don’t have.
Here you can see my bookmarks, organized by date with the most recent at the top. The numbers in the blue boxes tell me how many other Delicious users have bookmarked that site. Three of these links have descriptions; I added those when I bookmarked them. Each also has ‘tags’ that I typed in on my own at the time I made the bookmark. On the far right you can see my tags. Tags just make for easy searching.
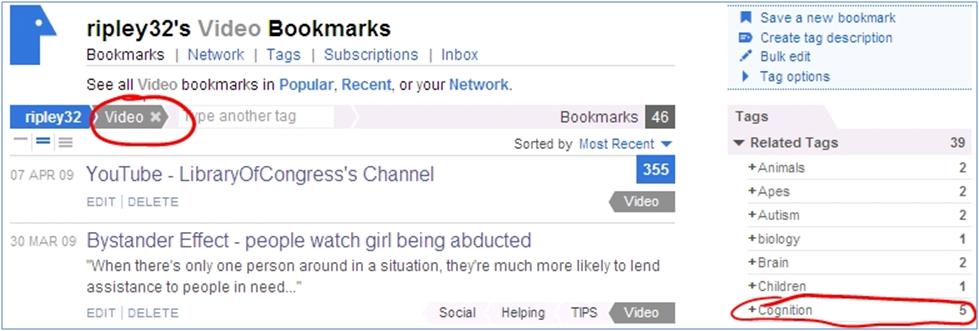
Let’s say that you were only interested in seeing the videos that I have bookmarked. Clicking the ‘video’ tag gives you just the 46 bookmarks that I tagged ‘video.’
Now I see just those ‘video’ bookmarks, and on the right I now get ‘related’ tags. I can see that 5 bookmarks that carry the video tag also carry the cognition tag. Clicking on ‘cognition’ will give me just those 5 videos that I said relate to cognition. If you did that, we’d go down one more level where you’d see that of the videos that are tagged video and cognition, there are 2 that are tagged ‘language.’ Clicking that tag would just give you those 2.
If you didn’t share your bookmarks with another soul, Delicious is incredibly valuable for organizing the dozens and dozens of bookmarks you have. Now is probably a good time to mention that Delicious makes it easy to move your bookmarks off your computer and into your Delicious account. After logging in, go to ‘Settings,’ and then upload your bookmarks. You can also download your bookmarks to your browser if you’re so inclined.
The social part of social bookmarking.
Do you have your RSS feed reader set up? (For more on RSS feed readers, see this blog post.) Let’s say that you’ve found my bookmarks so interesting that you want to know when I add something new. Scroll to the bottom of my bookmarks page and click ‘RSS feed for these bookmarks.’ Any bookmark I add will be sent to your RSS feed reader. If you’re only interested in hearing about new videos I bookmark, click on the ‘video’ tag, then scroll to the bottom of that page and click the RSS feed link. You’ll only hear about my new bookmarks that I’ve tagged ‘video.’ If you’re only interested in new video bookmarks that are cognition-related, click on ‘cognition’ under ‘related tags,’ then… you get the idea.
Saving new bookmarks.
Delicious makes it easy for you to save new bookmarks.
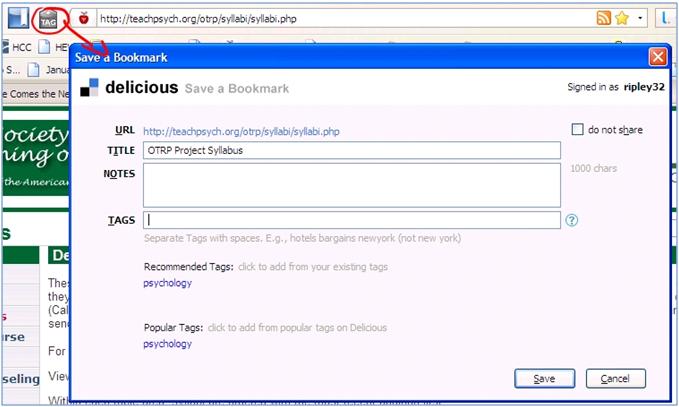
When you download the Delicious toolbar for Firefox or IE, two new icons are added to your navigation toolbar, just left of the URL. The blue one with the white stripe that looks like a bookmark takes you to your bookmarks. The other tag is for creating new bookmarks. Visit the page you want to bookmark, then click the ‘TAG’ button. A box pops up with the page URL and the page title pre-entered, the latter of which you are free to change. Add any notes you’d like to include, type in your tags, and click the ‘do not share’ box if you’d like to keep this bookmark private so only you can see it. Click ‘Save,’ and you’re done.
Posting bookmarks to your website or course management system.
This is a snapshot taken of my Intro to Psych main webpage. My Delicious bookmarks (not the ones designated as private) show up as a ‘link roll,’ the term used for ‘rolling links.’ Although you can only see 2 links here, there are 15 on the actual page. When I add a new bookmark to Delicious, the bookmark pops in at the top of the list and the bottom one rolls off. The descriptions for each bookmark are what I added in the ‘notes’ field when I created the tag; you can edit that whenever you’d like. If you visit the page, clicking on the title will take you to my Delicious bookmarks. Clicking a bookmark will take you to the bookmarked website.

You can also create link rolls based on tags. For instance, I post pages that contain my lecture outlines as well as other content my students might find helpful or interesting. On these pages I’ve added link rolls specifically related to that content. Here’s an example from my neuroscience page where the only links that appear are the ones I have tagged ‘brain.’
To create a link roll, go to ‘Settings.’
Scroll down to the bottom of the page and click on ‘Link Rolls.’ On that page, choose your ‘display options,’ such as title and the tags you want (if you choose video and cognition, it will just give you the bookmarks that have both tags). How the link roll will look is displayed on the right. Once it’s configured to your liking, scroll to the top of the page and copy the html code. Go to wherever you edit your webpage, put the cursor where you’d like the link roll to appear, switch to html view, and paste the html code.
Tag Rolls
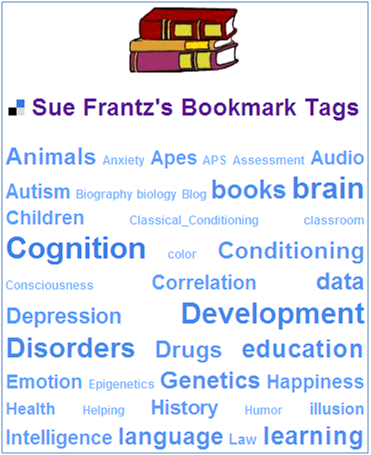
Instead of posting the link titles, you can just post your tags as a ‘cloud.’ The tags with the most bookmarks are bigger. Visitors can click on a tag to see all of the bookmarks for that particular tag. You can add this to your website in the same way you added link rolls. Visit ‘Settings,’ scroll to the bottom, and click ‘Tag Rolls.’ Select the parameters you’d like, then copy the code. Edit the webpage where you would like to include the tag roll, switch to html view, and paste the code.
Mmmmm…. Delicious!
[polldaddy poll=1545686]


